Your coupon for will be reflected when you check out!
✖
Your coupon for
✖
Hello!
You're visiting the PartSelect site in U.S.
Would you like to shop on the Canadian site?
Stay on this site
Go to Canadian site
✖
Model Number Locations
1Select Category Type
Select Category Type
2Select Product Type
Select Product Type
3Select {MODEL} Type
Select {MODEL} Type
Sample Model Number Tags
Model numbers can be made up of numbers (1005400, for example) or a combination of letters and numbers (LAT1000AAE). The model number will most likely appear on either a paper sticker or a metal plate. Your appliance's model number tag may look similar to the sample model number tags shown here (model number highlighted in yellow):
Located at the front of the dryer, this lint filter traps lint and debris from the exhaust air flowing out of the dryer drum. This part measures approximately 12 inches long x 7 inches high, has a plastic frame, and a mesh body to catch debris. If your filter needs cleaning, the dryer cycle will take longer due to a buildup of lint or fabric softener affecting the air flow through the filter. If there is a buildup, try scrubbing the filter with hot water and soap. If the filter is damaged or torn, it should be replaced. Cleaning the lint filter before starting the drying cycle is a great way to ensure your dryer performs properly.
How Buying OEM Parts Can Save You Time and Money
Why buy the real thing?
OEM stands for Original Equipment Manufacturer. Simply put, this means that the company who made your appliance is also supplying the replacement part for it.
Keep searches simple. Use keywords, e.g. "leaking", "pump", "broken" or "fit".
Sorry, we couldn't find any existing reviews that matched. Try using some different or simpler keywords.
★★★★★
★★★★★
Colleen S - August 31, 2021
Verified Purchase
Perfect fit!
The filter fit perfectly! Thank you so much!
★★★★★
★★★★★
Marjorie B - February 19, 2019
Verified Purchase
worked great!
Glad I purchased the new lint filter, it brightens up the dryer in a way
★★★★★
★★★★★
Michelle W - February 4, 2019
Verified Purchase
Perfect
The part was in great condition...very sturdy. We began using it that same day. All is well
★★★★★
★★★★★
Lee P - August 16, 2018
Verified Purchase
part turned out to be not needed
upon receipt of lint filter we installed the filter and found out we had the same problem. Upon further inspection it was found to be a problem with the dryer frame which was fixed. the old filter fits fine and the new one was not used. Did not return as the cost would be prohibited. The part was sent and received in a decent time frame.
★★★★★
★★★★★
Sister Alice L - September 22, 2019
Verified Purchase
great part- fit perfectly
The part fit perfectly and is now busily catching lint from the laundry
★★★★★
★★★★★
Ada C - January 15, 2020
Verified Purchase
No troubles gadget
There was nothing to do to make the part work. The part was identical to the original filter we used for years and it goes in and out with each load dried. This transaction was smooth and as easy as I wish the world would always go.
★★★★★
★★★★★
Elizabeth H - December 22, 2020
Verified Purchase
Worked like a Charm
Replacing my lint filter gave my 20-year-old dryer a new lease on life. And it was a very simple fix.
★★★★★
★★★★★
ALAN W - September 18, 2019
Verified Purchase
Perfect fit
My new filter fits perfecty. Old one was so glogged from past owner, i couldn't get it clean. Inexpensive just to replace it. Very simple order process and quick delivery. Don't know why i didn't do this right away.
★★★★★
★★★★★
Nancy L - April 1, 2024
Verified Purchase
Fixed
Easy repair, worked as expected.
★★★★★
★★★★★
Timothy D - January 25, 2019
Verified Purchase
Easy to order
Easy to order at a good price,but didn't exactly fit. Had to modify a little bit.
< Prev
1
2
Next >
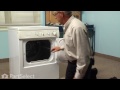
Installation Instructions
Average Repair Rating: 4.5 / 5.0, 5 reviews.
What's this?
Sort by:
< Prev
1
Next >
Search filter:
Clear Filter
Your search term must have 3 or more characters.
Keep searches simple. Use keywords, e.g. "leaking", "pump", "broken" or "fit".
Sorry, we couldn't find any existing installation instruction that matched.
Lint filter was wearing out.
Just replaced the new lint filter with the old lint filter. The part fit perfectly. I did not have a problem.
Barbara J. from Lancaster, CA
Difficulty Level:
Really Easy
Total Repair Time:
Less than 15 mins
2 of 2 peoplefound this instruction helpful.
Was this instruction helpful to you?
Thank you for voting!
lint filter bent
Vacuumed lint and inserted new filter.
Ellen from Baltimore, MD
Difficulty Level:
Really Easy
Total Repair Time:
Less than 15 mins
19 of 223 peoplefound this instruction helpful.
Was this instruction helpful to you?
Thank you for voting!
lint filter did not fit "squarely" into its place
replaced old filter, only to find that the new one had the same issue. After closer examination, I determined the filter guide that screws into place, which I had removed earlier to clean lint out, did not hold the lint casing correctly. I removed and reinstalled the piece that has the metal moisture sensors, and replaced it, ensure bot
... Read moreh screws held the lint casing as it should. Now I have two lint filters that fit perfectly! So, if you ever remove the piece wtih the metal sensors, make sure that the lint casing is screwed in correctly when replacing.
Read less
Jeff from Bethalto, IL
Difficulty Level:
Easy
Total Repair Time:
Less than 15 mins
18 of 19 peoplefound this instruction helpful.
Was this instruction helpful to you?
Thank you for voting!
My lent screen broke on my dryer
I remove the old lint filter and just put the new one in.
Mary from Garland, NC
Difficulty Level:
Really Easy
Total Repair Time:
Less than 15 mins
Tools:
Pliers
4 of 5 peoplefound this instruction helpful.
Was this instruction helpful to you?
Thank you for voting!
squeeking/ grinding really bad
First I pryed up the top cover then opened the access cover on the rear to remove the belt from the drum. Next I removed the front of the dryer to have access to remove the drum. I then removed the 3 screws that hold the drum to the rear drum bearing assembly and pulled the drum through the front of the dryer. I then removed the bearing a
... Read morend proceded to remove the ground ball and reassembled in reverse steps.
We're sorry, but our Q&A experts are temporarily unavailable.
Please check back later if you still haven't found the answer you need.
3 questions answered by our experts.
Sort by:
< Prev
1
Next >
Search filter:
Clear Filter
Your search term must have 3 or more characters.
Keep searches simple. Use keywords, e.g. "leaking", "pump", "broken" or "fit".
Sorry, we couldn't find any existing answers that matched.Try using some different or simpler keywords, or submit your new question by using the "Ask a Question" button above!
Barbara Lewin
October 8, 2017
This is a Frigidaire dryer. When i type in the model # for this lint filter this is the lint filter that comes up. However down below it only displays electric dryers for this lint filter. I have a gas dryer. The lint filter looks pretty much the same but i am not sure. Can you help me?
For model number FGR341AC1
Hi Barbara,
Thank you for your inquiry. This is the lint filter coming up under your model number so this would be the correct one for your appliance. I hope this helps. Thank you and have a great day!
2 people found this helpful.
Did this question help you?
Thank you for voting!
Rachel
November 9, 2017
Does the lint screen come with the two screws or do I need to order them separately?
For model number AEQ7000ES1
Hi Rachel, Thank you for the question. The lint filter does not require screws. It just slides into the air duct slot. Hope this helps!
2 people found this helpful.
Did this question help you?
Thank you for voting!
Dennis
December 4, 2017
I have a front loader gas Frigidaire dryer. I am trying to get the "housing" piece the lint filter slides into.. it has two screws. thanks
For model number AGQB6000ES2
Hi Dennis,
Thank you for your question. I have listed that part in a link down below for you. Good luck with you repair.