Husqvarna Parts

Husqvarna Appliance Parts

Popular Husqvarna Parts

Your Price
$6.09
   In Stock
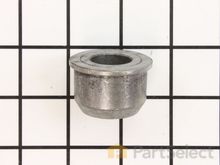
Husqvarna Bearing
★★★★★
★★★★★
3 Reviews
PartSelect Number PS9006914
Manufacturer Part Number 532009040
The OEM bearing, also known as the flange bearing, is silver, made of metal, and sold individually. It is used on riding mowers to secure the wheel in place and allow it to rotate freely on the shaft. Over time, the part may become worn and damaged, which you will notice if you experience a squealing or grinding sound from the wheel in question, or you notice the wheel is sloppy on the shaft. You will need a hammer and punch to complete this repair, which most of our customers rated as easy. Make sure you tap the new bearing into place evenly inside the tire rim.
Installation Instructions
robert from EUREKA, CA
transaxle rotated forward on 2015 Husqvarna YT42DXLS
2015 Husqvarna YT42DXLS. Both transaxle support struts broke causing the transaxle rotated forward and shear transaxle mounting bracket. The transaxle was not damaged. All 3 parts required replacement. There are some good youtube videos to watch to show how to complete the repair.

HINT: I removed the mower deck and placed jack stands under the frame to support the rear end of the mower. I then supported the transaxle with a floor jack. This worked great for positioning/aligning the transaxle up to the frame after the new mounting bracket was installed.

HINT: Due to the shearing of the transaxle mounting bracket, it was difficult to get a socket to seat correctly on the some of the nuts securing the transaxle to the mounting bracket. I highly recommend getting 4 new nuts because you will likely damage/strip the nut while removing it.

HINT: The youtube videos all show removing the rear tires. The rear tires can be difficult to remove; and there are some interesting youtube videos on removing stuck rear tires. If you have a stuck rear tire, you can complete the repair with the tires on; it is just a bit more challenging to squeeze your hands behind the tire to reach the bolts. I was able to only get one tire off.

HINT: If I wasn't able to do the repair with the rear tire on, my idea for getting the rear tire off was to fabricate a bracket that would work with a gear puller. The plan was to utilize the two symmetrical 1/4 inch-ish size holes in the rim to install 12" long bolts. I would then install a C-channel over the bolts, which would place the C-channel directly over the axle. I would then drill a hold in the C-channel for the gear puller bolt to go through. The shoulders of the gear puller bracket would then push against the c-channel. I was planning on using a few large fender washers on the back side of the rim to help prevent the rim from getting damaged when pulling the tire. You will be pulling the rim about 3 inches to get it off the axle.

HINT: It look four hours to repair plus another half hour of watching youtube videos; probably would have taken two hours if I didn't spend two hours trying to take off one of the rear tires that was stuck.

HINT: Since I was working under the mower, I also replaced the drive (motion) belt as preventative maintenance.
Read more...
Your Price
$5.07
   In Stock
Husqvarna Filter- A/C Cartridge
★★★★★
★★★★★
4 Reviews
PartSelect Number PS8987387
Manufacturer Part Number 491588S
This is a replacement air filter/AC cartridge for your small engine. The air filter prevents dirt and debris from entering the engine. Over time, the air filter can become clogged or damaged, and this can lead to reduced performance. This air filter is approximately 4 inches wide and approximately 5 inches long. To replace the air filter, locate the air filter cover on the side of the engine, unscrew it, and remove the old filter. Be sure to clear out any dirt, clippings, or other debris that has found its way into the air filter assembly before you insert the new filter. Reattach the air filter cover, and secure it with the screws. This product is sold individually.
Fixes these symptoms
Installation Instructions
Barry from FRANKFORT, KY
replaced gasket that go's between the air cleaner housing and carb. cleaned housing and reinstalled with new air filter
Also replaced fuel tank , the built in fuel shut off started leaking , had to replace the tank. Ordered a new one Briggs & Stratton original equipment fit perfect . This is a 25 year old Briggs & Stratton lawn mower 3.5 HP, Runs perfect, starts by the 2nd crank every time. First time I ever had to spend money on it since I bought it new in 1991 Read more...
Your Price
$3.65
   In Stock
Husqvarna Ring Klip Number T5304-75
★★★★★
★★★★★
1 Review
PartSelect Number PS9143890
Manufacturer Part Number 812000029
The Ring Klip Number T5304-75, also known simply as a ring clip, is an OEM part designed to secure your mower wheel to its axle. This part is black, made of metal, and around an inch in length. It is sold individually and may become damaged over time due to wear and fatigue.
Installation Instructions
Anthony from OLIVEHILL, TN
Wheel bushings were bad
Removed old clip removed rim from tractor, removed grease fitting on rim, took hammer and screw driver knocked out old bushing turned rim over knocked out other bushing. Press in new bushings reinstalled grease fitting slide tire back on tractor, put retaining washers on then locking clip put on dust cover grease at grease fitting. Repeat other side. Read more...
Your Price
$4.51
   In Stock
Husqvarna Plug-Spark
★★★★★
★★★★★
1 Review
PartSelect Number PS9140427
Manufacturer Part Number 796112S
This part is the replacement spark plug for your engine. It measures approximately 2.5 inches by 1 inch. The spark plug creates the spark that ignites fuel in your engine during the combustion process. Over time, spark plugs can become worn and can go bad, which will prevent the engine from firing. You can test your spark plug for continuity with a multimeter, and inspect it for corrosion if you suspect the spark plug has gone bad. This is an OEM part sourced directly from the manufacturer and it is sold individually.
Fixes these symptoms
Installation Instructions
David from KNOXVILLE, TN
Replace carburetor
Loosened engine cover and moved out of the way
Removed air intake and filter
Loosened and disconnected gas line to carburetor
Unscrewed carburetor and disconnected from throttle arm
Reversed process using new carburetor, O-ring and gasket
Read more...
Your Price
$6.49
   In Stock
Husqvarna Fuel Line
★★★★★
★★★★★
4 Reviews
PartSelect Number PS9472280
Manufacturer Part Number 530069247
This is the replacement fuel line 25 Inch for several OPE products that use small engines. The fuel line carries fuel from the tank to the carburetor. Over time, the fuel line can become badly clogged, and it can become brittle as well. When the fuel line is badly clogged or cracked, fuel can leak out and it can make it difficult to start or run the engine. To replace the fuel line, carefully disconnect the old line from the carburetor and from the fuel grommet, then replace it with the new line. This fuel line is 25 inches in length and is made of clear plastic. The fuel line is sold individually and is an OEM part sourced directly from the manufacturer.
Fixes these symptoms
  • Engine stops after a few seconds or minutes
  • Will Not Start
  • See more...
Installation Instructions
Mark from LYNDONVILLE, NY
Deterioration of fuel line system
Removed the top cover (T25 torx), and side cover (T25 torx) with recoil starter. Drained all fuel, and removed all pieces of fuel old fuel line and the weighted filter from inside the tank by shaking out and the (long forceps). A spot headlamp makes it easier to see inside the tank for much of the procedure. Remove the foam filter to find the two 8mm nuts and remove the air filter housing and carburetor (nut driver, 8mm socket) the choke lever slides out of its slot with some wiggling and moving the carb back off the mounting studs. Leave the throttle cable attached to the filter housing and move both assemblies out of the way to access the top wall of the fuel tank. There is a cover over the carb adjust screws that wiggles out also. The fuel line and purge line both pass through the wall of the tank and need to be pulled out with some effort (long curved forceps) from inside the tank through the fuel fill port. They are a tight fit. Pay attention to the lines size and location. Large line is in the position away from the recoil starter with the little plastic fitting hanging near the top of the tank. The smaller line is closest to the recoil starter. Both new lines will need to pass through the tank wall (this is the most difficult part). To facilitate the initial entry through the wall of the tank, cut a tapered end on your new lines. Use a very slippery lube to coat the end of the line and push it into the tank as far as you can from the top (forceps or soft grip pliers) help. Look inside the tank and pull the lines through fully out of the tank fill (long curved forceps and head spot light). Don't pull all the way through the fuel fill, just enough to install the new fuel line fitting in the return purge line and the new weighted filter on the fuel line and pull the lines back inside the tank. The return line with fitting close to the top of the tank and the filter hanging so it lays at the bottom of the tank, and able to swing around so it keeps contact with fuel at all times. Remove the old purge/primer bulb two screws (Phillips). The short stem is suction, long stem is pressure. Don't mix them up and connect lines backwards, don't ask me how I know! Lol! If you have such a saw like mine, that has no fuel lines intact, it is difficult to vision the line routes. There are helpful schematics on the internet. Just remember that the purge bulb long fuel stem sends pressure back to the tank through the return line (larger line in the tank with the line fitting away from the recoil). That line can now be cut to length and pushed on the bulb long stem. The suction side of the bulb short stem, connects to the purge line on the side of the carburetor (short line). You need to cut that line to the same length as the old one. It has to curve twice to get to the suction side of the purge bulb without kinking. The only other line left is the fuel line with the filter attached hanging inside the tank. Be sure you have the filter able to lay on the floor of the tank and move around. That line connects to the carburetor opposit side from the purge bulb. Dont cut that one until the carb is installed for proper length. The fuel routes from that filtered line into the carb, then out of the carb to the purge bulb suction side, then out to the return line in the tank with the fitting end. That fitting installed into the line serves only to keep the line from pulling back out of the tank, nothing attaches to it. Make sure all lines are clear of the mounting area of the carb, and throttle function. Pass the bulb lines through the slot in the side of the case being sure the lines don't kink. Secure the bulb with the two phillips screws. Position the carb on the studs and slide the choke lever into its place in the case as you go. Place the filter housing on the studs and push the carb and housing down watching the fuel lines for any kinks, especially where the throttle cable is in close proximity to the short carb purge line. Check the throttle function for interferance, and Install the two 8mm nuts. Now route the fuel line around the throttle mechanism out of the way, hold it to the barb on the side of the carb and cut it to length and install. Put some fuel mix in the tank (dont fill it) to test. Press the primer bulb, tilting the saw with fill cap removed, and see if anything leaks, also watch fuel flow back to the tank inside as you press the bulb. You should see fuel and air bubbles from the purge line. When all air bubbles are gone the system is purged. Install the new foam filter in the housing and then the top and side cases. I did not reinstall the cover of the carb adjust needle screws so I could adjust the fuel/ air mixture to run at peak performance. Hope this helps! The kit that I got was perfect and there are some useful instructions included. Thank you! Respectfully Mark Read more...
Your Price
$3.65
   In Stock
Husqvarna Cap Axle Black 1 50 x 1 00
★★★★★
★★★★★
1 Review
PartSelect Number PS9007667
Manufacturer Part Number 532104757
This genuine black cap axle, also sometimes known as the dust cap, is around 2 inches in diamater and sold individually. Comprised of plastic, it is designed to keep debris out of the hub and axle of your lawn mower or garden tractor. Over time, your dust cap may become damaged or lost due to wear and tear. If this happens, dirt and debris can freely enter the axle and hub, causing damage. This is an easy repair to make and does not require any tools. Just look for the cap axle on the rim of the wheel to make your repair.
Installation Instructions
Anthony from OLIVEHILL, TN
Wheel bushings were bad
Removed old clip removed rim from tractor, removed grease fitting on rim, took hammer and screw driver knocked out old bushing turned rim over knocked out other bushing. Press in new bushings reinstalled grease fitting slide tire back on tractor, put retaining washers on then locking clip put on dust cover grease at grease fitting. Repeat other side. Read more...
Your Price
$3.65
   In Stock
Husqvarna Clevis Pin
★★★★★
★★★★★
1 Review
PartSelect Number PS9009427
Manufacturer Part Number 532132673
This clevis pin is an OEM replacement part that is compatible with various makes and models of tiller and is sold as an individual part. The purpose of this pin is to snap or break under a certain amount of pressure if your tiller is jammed, to protect the more valuable components of your tiller. Measuring at approximately 2-inches long and made of high-quality metal, replacing this pin should only require pliers to swap out the old pin for the new.
Your Price
$4.88
   In Stock
Husqvarna Engine Fuel Filter
★★★★★
★★★★★
2 Reviews
PartSelect Number PS9285148
Manufacturer Part Number 530095646
This fuel filter is for lawn and garden equipment engines. Fuel filter cleans the fuel before it reaches the carburetor. Work in a well-ventilated area when installing this part. Drain the fuel tank and disconnect the spark plug wire before beginning the repair.
Fixes these symptoms
  • Engine stops after a few seconds or minutes
  • Will Not Start
  • See more...
Installation Instructions
Mark from LYNDONVILLE, NY
Deterioration of fuel line system
Removed the top cover (T25 torx), and side cover (T25 torx) with recoil starter. Drained all fuel, and removed all pieces of fuel old fuel line and the weighted filter from inside the tank by shaking out and the (long forceps). A spot headlamp makes it easier to see inside the tank for much of the procedure. Remove the foam filter to find the two 8mm nuts and remove the air filter housing and carburetor (nut driver, 8mm socket) the choke lever slides out of its slot with some wiggling and moving the carb back off the mounting studs. Leave the throttle cable attached to the filter housing and move both assemblies out of the way to access the top wall of the fuel tank. There is a cover over the carb adjust screws that wiggles out also. The fuel line and purge line both pass through the wall of the tank and need to be pulled out with some effort (long curved forceps) from inside the tank through the fuel fill port. They are a tight fit. Pay attention to the lines size and location. Large line is in the position away from the recoil starter with the little plastic fitting hanging near the top of the tank. The smaller line is closest to the recoil starter. Both new lines will need to pass through the tank wall (this is the most difficult part). To facilitate the initial entry through the wall of the tank, cut a tapered end on your new lines. Use a very slippery lube to coat the end of the line and push it into the tank as far as you can from the top (forceps or soft grip pliers) help. Look inside the tank and pull the lines through fully out of the tank fill (long curved forceps and head spot light). Don't pull all the way through the fuel fill, just enough to install the new fuel line fitting in the return purge line and the new weighted filter on the fuel line and pull the lines back inside the tank. The return line with fitting close to the top of the tank and the filter hanging so it lays at the bottom of the tank, and able to swing around so it keeps contact with fuel at all times. Remove the old purge/primer bulb two screws (Phillips). The short stem is suction, long stem is pressure. Don't mix them up and connect lines backwards, don't ask me how I know! Lol! If you have such a saw like mine, that has no fuel lines intact, it is difficult to vision the line routes. There are helpful schematics on the internet. Just remember that the purge bulb long fuel stem sends pressure back to the tank through the return line (larger line in the tank with the line fitting away from the recoil). That line can now be cut to length and pushed on the bulb long stem. The suction side of the bulb short stem, connects to the purge line on the side of the carburetor (short line). You need to cut that line to the same length as the old one. It has to curve twice to get to the suction side of the purge bulb without kinking. The only other line left is the fuel line with the filter attached hanging inside the tank. Be sure you have the filter able to lay on the floor of the tank and move around. That line connects to the carburetor opposit side from the purge bulb. Dont cut that one until the carb is installed for proper length. The fuel routes from that filtered line into the carb, then out of the carb to the purge bulb suction side, then out to the return line in the tank with the fitting end. That fitting installed into the line serves only to keep the line from pulling back out of the tank, nothing attaches to it. Make sure all lines are clear of the mounting area of the carb, and throttle function. Pass the bulb lines through the slot in the side of the case being sure the lines don't kink. Secure the bulb with the two phillips screws. Position the carb on the studs and slide the choke lever into its place in the case as you go. Place the filter housing on the studs and push the carb and housing down watching the fuel lines for any kinks, especially where the throttle cable is in close proximity to the short carb purge line. Check the throttle function for interferance, and Install the two 8mm nuts. Now route the fuel line around the throttle mechanism out of the way, hold it to the barb on the side of the carb and cut it to length and install. Put some fuel mix in the tank (dont fill it) to test. Press the primer bulb, tilting the saw with fill cap removed, and see if anything leaks, also watch fuel flow back to the tank inside as you press the bulb. You should see fuel and air bubbles from the purge line. When all air bubbles are gone the system is purged. Install the new foam filter in the housing and then the top and side cases. I did not reinstall the cover of the carb adjust needle screws so I could adjust the fuel/ air mixture to run at peak performance. Hope this helps! The kit that I got was perfect and there are some useful instructions included. Thank you! Respectfully Mark Read more...
Your Price
$3.65
   In Stock
Husqvarna Washer 25/32 x 1-1/4 x 16 Ga.
★★★★★
★★★★★
2 Reviews
PartSelect Number PS9008998
Manufacturer Part Number 532121749
This OEM washer, also known as a flat washer, has dimensions of 25/32 x 1-1/4. Silver in color and metal, the washer is sold individually. Although this part can have a range of applications depending on the equipment, its general function is to spread the load under a bolt. Ensure you consult your owners manual or check your model number to confirm this is the washer you need for your equipment. This part will need to be replaced when your existing one is worn or damaged. It is an easy repair according to our customers, and does not require any special tools.
Installation Instructions
Frederick from BINGHAMTON, NY
Front wheels, too much end play
Shimmed the wheels out on axle.. No more slop. Read more...
Your Price
$13.42
   In Stock
Husqvarna Handle Parking Brake
★★★★★
★★★★★
1 Review
PartSelect Number PS9372920
Manufacturer Part Number 532196439

Related Husqvarna Parts

Popular Husqvarna Models

Below are the most popular Husqvarna models we have. Enter your model number in the search box to find your model.