Your coupon for will be reflected when you check out!
✖
Your coupon for
✖
Hello!
You're visiting the PartSelect site in U.S.
Would you like to shop on the Canadian site?
Stay on this site
Go to Canadian site
✖
Model Number Locations
1Select Category Type
Select Category Type
2Select Product Type
Select Product Type
3Select {MODEL} Type
Select {MODEL} Type
Sample Model Number Tags
Model numbers can be made up of numbers (1005400, for example) or a combination of letters and numbers (LAT1000AAE). The model number will most likely appear on either a paper sticker or a metal plate. Your appliance's model number tag may look similar to the sample model number tags shown here (model number highlighted in yellow):
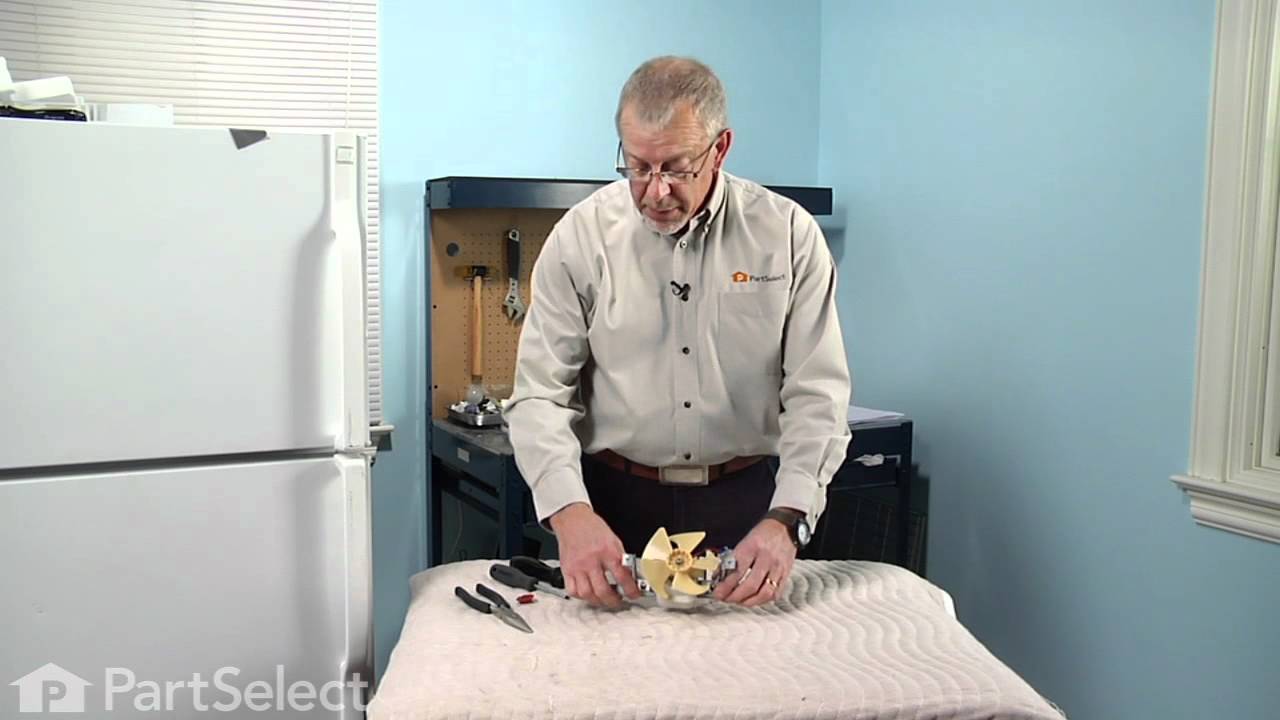
This evaporator fan blade is for your refrigerator, and it circulates air so that the temperature of the fridge is regulated. This model has 3 blades, and is a little more than 4 inches in diameter. It is made of white plastic and is sold individually. If your refrigerator is noisy and you hear a clicking sound, it is a good indication that the evaporator fan blade is warped or damaged. If the fridge or freezer sections become too warm, the fan could be to blame as well.
How Buying OEM Parts Can Save You Time and Money
Why buy the real thing?
OEM stands for Original Equipment Manufacturer. Simply put, this means that the company who made your appliance is also supplying the replacement part for it.
Keep searches simple. Use keywords, e.g. "leaking", "pump", "broken" or "fit".
Sorry, we couldn't find any existing reviews that matched. Try using some different or simpler keywords.
★★★★★
★★★★★
Teri M - May 31, 2023
Verified Purchase
Repair
Works well
★★★★★
★★★★★
Jacob W - June 5, 2020
Verified Purchase
Fixed the issue!
My freezer started giving off an intermittent loud buzzing sound. After doing some online searches I found out it could be the evaporator fan. As someone who does not normally order products online I was skeptical but PartSelect had the product I needed. I ordered the part and it was delivered in a reasonable amount of time. I was able to install the evaporator fan with medium amount of work on my freezer (with the help of some online videos) and haven't heard the loud buzzing sound again.
★★★★★
★★★★★
Bert W - October 1, 2020
Verified Purchase
Fridge Is So Much Quieter
Replacing the fan blade wasn't as easy as I expected, but when it was done, it was surprising how quiet it runs.
★★★★★
★★★★★
Edward R - April 5, 2018
Verified Purchase
repair
perfect
★★★★★
★★★★★
James M - June 27, 2018
Verified Purchase
easy repair
The part worked great. All is well with my fridge, no lost food :)
★★★★★
★★★★★
Patricia H - February 14, 2019
Verified Purchase
Part not needed now.
After I ordered part the fan noise stopped and has not been heard since. Guess I'll hold on to it until needed. FYI I love the instructions you provide to make these repairs. As a woman I can do these repairs as well!
Thank you.
★★★★★
★★★★★
Penny S - February 14, 2018
Verified Purchase
Noise from freezer
The part came fast. Unfortunately must need to replace motor underneath as freezer is still noisy. Also, the video to take freezer parts out is nothing like the inside of my GSS25XGPABB so taking it apart was a real challenge as the only thing close to being the same was removing the screws initially. I would like to see a video posted for my model because every reference for a video is a totally different model. Apparently we should've videos our own tear down and posted for others needing help in the future. That being said, fan arrived timely and in one piece and is installed.
★★★★★
★★★★★
Medel F - August 2, 2018
Verified Purchase
Outstanding brand new part.
I received the same exact part I needed, fast delivery and great customer service assistance.
★★★★★
★★★★★
John W - March 12, 2018
Verified Purchase
Easy Repair
Ordered this part and it came by mail broken to pieces. Called customer service and they sent a new one with no questions asked. Part came within a few days in perfect condition and as described. Quick fix. Excellent customer service!!!
< Prev
1
Next >
Installation Instructions
Average Repair Rating: 3.1 / 5.0, 12 reviews.
What's this?
Sort by:
< Prev
1
2
Next >
Search filter:
Clear Filter
Your search term must have 3 or more characters.
Keep searches simple. Use keywords, e.g. "leaking", "pump", "broken" or "fit".
Sorry, we couldn't find any existing installation instruction that matched.
INTERMITENT LOUD NOISE FROM EVAPORATOR FAN IN FREEZER
The repair did not go exactly the way it was described in the YouTube video, but basically it was similar. After unplugging the power cord, emptying the freezer, removing the shelves and the ice reservoir, I removed the ice maker assembly by unscrewing a Philips head screw and unplugging the power connector. The connector had little ret
... Read moreaining tabs on each side that I pried open with a straight blade screwdriver. Then the ice maker lifted right out. Next I removed one screw holding the auger motor assembly, unplugged the power connector, and lifted out the assembly. This where things got difficult. After flailing around a bit, I removed the panel on the back wall of the freezer below the evaporator fan assembly, exposing the evaporator coil. I saw that the fan assembly was attached with two screws at the top and two screws at the bottom. The top screws were easily removed, but when I removed the bottom screws, which were situated in very tight quarters, I DROPPED BOTH SCREWS DOWN BEHIND THE EVAPORATOR COIL. Be prepared with a magnetic nutdriver so this doesn't happen to you. I could not retrieve the lost screws, but fortunately it appears that the top screws hold the assembly securely enough. The assembly was loose, but it was still attached by a power cord that I could not disconnect. I removed the tracks on the side walls for the ice bucket, and then I could maneuver the fan motor assembly just enough that I could reach over the top of it, grab and pull off the old fan blade, and slide the new fan blade onto the shaft. Reassembly was straightforward, replacing each part (except two lost screws) in reverse order to disassembly. After getting everything put back in and plugging in the power cord, I was amazed at how quiet it ran.
Read less
Bert from SAN JOSE, CA
Difficulty Level:
A Bit Difficult
Total Repair Time:
30 - 60 mins
Tools:
Nutdriver, Screw drivers
4 of 5 peoplefound this instruction helpful.
Was this instruction helpful to you?
Thank you for voting!
Ice built up around evaporator fan blades and blades chipped and broke. Refrigerator was making loud vibrating noises.
Removed ice bucket, and unplugged ice maker. Removed light cover. Removed ice maker. Pulled fan blades straight up and removed. Pushed new blades on to motor shaft. Fairly easy .
David from KNOXVILLE, TN
Difficulty Level:
Really Easy
Total Repair Time:
15 - 30 mins
Tools:
Nutdriver
1 personfound this instruction helpful.
Was this instruction helpful to you?
Thank you for voting!
Evaporator motor was not operating properly
Removed the parts and replaced them with the parts you sent me. Now it operates normally.
Fresh food compartment of refridgerator not cooling. Water dispenser freezing
I am going to start by talking about the problems. I woke up one beautiful morning around 4 am and grabbed my breakfast and coffee. I was not happy and realized there was a problem when the milk was almost as warm as the coffee. I was confused because I could hear the compressor running and the freezer was cold. On line directed me the r
... Read moreight direction but I did not want to believe it. I did eventually confirm the evaporator coils in the freezer were frozen over because the heater was evap coil defrost heater was burnt out (multi-meter). I never realized a refridgerator had a heater, weird. The water dispenser in the freezer door had been freezing up for the past year. I could never find a real problem or solution to fix it. I did not find anything relating the evaporator coils freezing over causing the water line to freeze but thinking about the problem it made sense. The freezer was much cooler than it needed to be to cool the fresh food side. The temp control ensures the freezer is at least a certain temp, it did not limit how cold it would get. The hardest part of the repair was waiting for the part. I installation and reassembly of the freezer was easy. I replaced the cooling fan because the old one looked a little chewed up on the sides. It was not recommended or required. After the repair I was able to feel good airflow in the upper freezer and in the fresh food compartment. I think the fix will effect the temperature, the water line and also should help me get more ice from the ice maker (the freezer ducting feeds cold air to the ice maker area). Good luck.
My GE refrigerator emitted high pitch noise a short while ago. I tried different dampening methods that helped but not eliminating the problem. I finally replaced the fan, motor, and associated parts and solved the problem. The total cost was about $50.
Broke the fan blade when replacing the Evaporator motor
Took cover off, pushed blade on, and replaced cover
Rose from Dorr, MI
Difficulty Level:
Really Easy
Total Repair Time:
Less than 15 mins
Tools:
Nutdriver
2 of 5 peoplefound this instruction helpful.
Was this instruction helpful to you?
Thank you for voting!
I Placed A Heat Gun In The Freezer Section To Defrost The Coils And Did Not Return In Time. The Heat From The Heat Gun Rose Upward And Melted All Of The Soft Plastic Parts. The Good News Was That The 16 Parts Were Not Expensive But The One Main Part That Was Needed To Put It All Back Together Took 3
I replaced all of the plastic parts as well as the heat coil that is mounted at the bottom of the coils that keeps the coils from freezing up. If I had not melted the plastic parts the coil could have been replaced in 2 days, 1 day to receive the part and the next to do the work. This is the second time I have had to replace this heater
... Read more.
Refrigerator fan was very noisy and we started to notice frost on our food in the freezer.
I should state first that I am a DIYer and have no experience fixing appliances. The fan noise seems to be a common problem. It has something to do with the bearings. Mine was actually hitting the housing in front on the fan as well. Getting into the installation, I knew I had to take the back panel and fan housing off. But I found o
... Read moreut that everything needs to come off. This is the ice maker, the housing underneath the ice maker as well as the fan housing and back panel. This isn't difficult but good to know before hand. A quick note, the light bulb housings come out by pulling them forward. It's a good idea to label the screws as you take them out as there are quite a few that need to come out. I replaced the evaporator fan the fan blade and one grommet. In hind sight I should have replaced both grommets as they both showed wear. They are both exactly the same so you can order two of the above. All in all this is a pretty easy fix. It takes a bit of time, but it's not to difficult. Th most difficult thing was the wiring. The fan comes with a six prong connector and has four prongs taken up. There is, what I think is a temperature sensor, that takes up the other two prongs. Since I didn't order that part, I had to cut it out of the old connector and insert it into the new evaporator fan connector. This was a bit difficult and would have been much easier if I had ordered the part. Unfortunately, I don't know what that part is called, but it must be some kind of temperature sensor as it clips on the coil. The wires also run through a blue rubber wire-run that needs to be sliced open. This was pretty easy to do with a small serrated pocket knife. SLice it on the back side of it and pull the old wires out. When you are ready to install, just run the new wires through the hole from the old wires. Once you have replaced the fan the new blade and the two new grommets, it's just a matter of replacing all the equipment. Fan housing first, then the upper housing followed by the ice maker and the back panel. Good luck
Firt Removed the Ice Maker Tray and the full ice maker assembly. Removed the plastic shroud that sits over the fan assembly. Since the original connector (or the plug)for the motor had also a temperature sensor attached to it and did not know how to remove and trabsfer to the new motor connector I spliced the new motor to the old connecto
... Read morer. It was fairly straight forward. Overall the job was not that difficult and since I was trying to be more meticulous it took a little longer. An average person can do it in around 30 to 45 minutes.
First I removed the shelf and light cover, then removed 3 screws from the ice make. Then I removed 6 screws from the moter cover (back wall of the freezer) and removed it. I then removed the 2 screw holding the moter. This is where the soldering iron comes in. The wire leads from the old motor were molded into a 3" rubber holder and t
... Read morehe end wire plastic connector held 6 prongs (2 from a thermo tube). The new motor only held the 4 moter prongs, 2 were empty. To resolve this problem I cut the wires on both the new and old motor. I then attached the old connector to the new moter with the soldering iron and shrink tubing. Replaced all the parts I had removed and started it up. Works like a champ.....
We're sorry, but our Q&A experts are temporarily unavailable.
Please check back later if you still haven't found the answer you need.
5 questions answered by our experts.
Sort by:
< Prev
1
Next >
Search filter:
Clear Filter
Your search term must have 3 or more characters.
Keep searches simple. Use keywords, e.g. "leaking", "pump", "broken" or "fit".
Sorry, we couldn't find any existing answers that matched.Try using some different or simpler keywords, or submit your new question by using the "Ask a Question" button above!
Robert
June 28, 2022
How to remove Green keeper ring from blue to remove from shaft to install new blade
For model number GSS25IYNEHFS
Hello Robert, Thank you for your inquiry. We have included a link to our installation video on how to remove the evaporator fan grommet from the motor shaft in the freezer motor. We hope this helps and if you need help placing an order, customer service is open 7 days a week. Please feel free to give us a call. We look forward to hearing from you!
I have a small Squeak that last about 3 seconds after it sounds like the compressor shuts down . What do I need?
For model number GSS25LSLNCSS
Hello Chad, thank you for contacting us. We would recommend checking the fans and making sure both fans are working. If the fans are good, the issue is most probably related to the overload PTCR, part number PS12727172, and the run capacitor, part number PS11764031. Customer service is available 7 days a week if you require assistance placing an order. Thanks again for reaching out!
The evaporator fan is loose on the motor shaft. When I replace the fan how far do I need to push the fan onto the shaft? Now it slides all the way down.
For model number GE GSS25SGPE
Hello Ronald, thank you for contacting us. Based on our research, you need to push the fan until it fixes on the shaft. After fixing it, check it by moving it with the hand and checking whether it is moving properly or not. We hope this solves your problem!
Did this question help you?
Thank you for voting!
Mary
May 23, 2023
Ice is slowly forming in the bottom of the freezer. After a period of time, water leaked on floor. I'm assuming it has to do with the automatic defrost, as the refrigerator and freezer, including the water dispenser and the icemaker seem to be all functioning fine. We manually defrosted the unit and now several days later, ice is gradually forming in the bottom of freezer again. What parts do you suggest are needed?
For model number GNE22GMEBFES
Hi Mary, thank you for contacting us. Considering the symptoms you mentioned, the issue seems to be with the defrost heater, part number PS2374788. The defrost heater assembly turns on several times throughout the day to melt away any frost that may have accumulated on the evaporator coils. If the defrost heater assembly is defective, the defrost system might not work, and frost may continue to accumulate on the evaporator coils. Checking the defrost heater for continuity using a multimeter might help. Good luck with the repair!
Item is in stock and is estimated to be delivered in 2-3 business days via Standard Shipping.
On Order
Item is not in stock and usually ships 3-5 business days from the time you place your order.
Special Order
Item is not in stock and usually ships 10-15 business days from the time you place your order.
NLA - No Longer Available
This item is no longer being made by the manufacturer, and cannot be added to your shopping cart.
[{"position":0,"name":"Home","title":"Home","url":"/"},{"position":1,"name":"Refrigerator","title":"Refrigerator","url":"/Refrigerator-Parts.htm"},{"position":2,"name":"Fan or Blower","title":"Fan or Blower","url":"/Refrigerator-Fans-and-Blowers.htm"},{"position":3,"name":"WR60X30922","title":"WR60X30922","url":""}]
You added 1 item to your cart
✖
% OFF
$
$
Qty:
Total item(s) in cart:
Order Subtotal
$
*Taxes and shipping will be applied during checkout