Your coupon for will be reflected when you check out!
✖
Your coupon for
✖
Hello!
You're visiting the PartSelect site in U.S.
Would you like to shop on the Canadian site?
Stay on this site
Go to Canadian site
✖
Model Number Locations
1Select Category Type
Select Category Type
2Select Product Type
Select Product Type
3Select {MODEL} Type
Select {MODEL} Type
Sample Model Number Tags
Model numbers can be made up of numbers (1005400, for example) or a combination of letters and numbers (LAT1000AAE). The model number will most likely appear on either a paper sticker or a metal plate. Your appliance's model number tag may look similar to the sample model number tags shown here (model number highlighted in yellow):
YTW4514PN0DG General Electric Dishwasher - Overview
Save your modelModel Saved!
Save your model for later to make things easier.
Model has been saved to My Models. If you're not signed in, your lists are available on this device and will expire within 30 days.
Model has been saved to My Models.
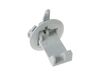
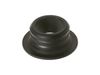
This lid lock, also known as a door lock, is a genuine OEM replacement part for your washing machine. The lid lock keeps your washer lid closed during the washing cycle. If this part is broken, your w...
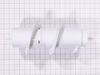
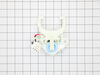
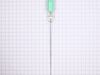
This is a manufacturer-made suspension rod and spring assembly for your washing machine. This suspension rod is one of four suspension rods that make up the entirety of the inner suspension of your wa...
This rod and spring assembly is designed to fit with washing machines and is made by the original manufacturer of your washer. It is a part of the washer suspension system that helps to stabilize and ...
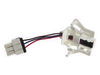
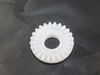
This is a mode shifter or shift actuator for models of washing machine. Mode shifters are designed to change the function of the washing machine motor, between spinning cycles and agitation, and is us...
This is a clutch for your washing machine. The clutch is made of a white plastic material and is used within washing machines to engage and disengage the transmission during the wash and spin cycles, ...
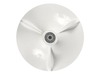
This auger is an authentic OEM replacement part specially designed for washing machines. It is a white, spiral-shaped agitator located in the center of the wash basket. During the wash cycle the auger...
This drive belt is sourced from the original manufacturer for use in various models of dryers. It is a rubber belt that connects the motor to the transmission of the washer. It enables the drum to spi...
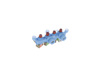
This is an inlet valve for models of compatible washing machines. Inlet valves are electrically controlled solenoid valves that open and close as needed during the washing cycle, to allow water into t...
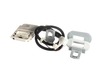
This is a speed sensor for a variety of washing machine models. Speed sensors are used to monitor the speed of the washer drum and communicate it to the electronic control board to slow or quicken it....
Presenting the GE SCR 1/4-20, 2A SINULOC Screw, a key component for ensuring the optimal functioning of your washers. This robust piece, designed with precision by GE, assures a safe and snug fit to m...
Ask our experts a question about this model and we'll get back to you as soon as possible!
1 question answered by our experts.
Sort by:
< Prev
1
Next >
Search filter:
Clear Filter
Your search term must have 3 or more characters.
Keep searches simple. Use keywords, e.g. "leaking", "pump", "broken" or "fit".
Sorry, we couldn't find any existing answers that matched.Try using some different or simpler keywords, or submit your new question by using the "Ask a Question" button above!
Christian
October 10, 2022
Water is spraying behind the control panel, possibly from the blue plastic piece where the two hot/cold water lines connect to.
For model number YTW4514PN0DG
Hello Christian, thank you for your question. We have researched your model and found that the issue is probably with the Water Inlet Valve Assembly, part number PS12171559. If that does not take care of the issue, then the problem is most likely to be related to the Internal Drain Hose Assembly, part number PS11729495. If you require assistance to place an order, please contact customer service. We hope that helps!
Removed the control panel back plate cover. Removed the 3 screws that held the water control valve in place. I then unplugged each solenoid one at a time and plugged it into the new control valve. Once all wires were transferred, I pulled the old valve up and put the new valve on. Then reinstalled the screws that held it down and reinstal
... Read moreled the cover plate. Very simple job !
The replacement part looked absolutely nothing like the defective part. The old part was easily accessible and was easily unplugged from the wiring harness. I assume when the new part came, I would just plug it into the wiring harness, snap some of the trim pieces in place and be done. 5 minutes. But no. The replacement part was c
... Read moreompletely different and came with its own wiring harness and length of wire which had to be installed. The installation of the wiring harness was extremely complicated which involved popping off the control panel of the washer, prying up the top and disconnecting some other pieces to complete the install. There should have been a clear warning on the replacement part, that it was completely different and likely too difficult for a non-professional repair man.