















79094124401 Kenmore Range - Instructions
Keep searches simple. Use keywords, e.g. "leaking", "pump", "broken" or "fit".
While removing burned out light bulb, the glass cover fell to the floor of the oven and broke!!
Husband very ill in bed. It's up to me!! Got a new bulb at HomeDepot and figured out how to get that wire 'thing' back in and the new glass cover installed. I DID IT!! WOW! My husband has always done these jobs around the house.......but now it's up to me.......and I'm not so dumb after all! I DID IT!! Now everyone who comes in the house.....I show them what I DID!! :-)
Parts Used:
-
Phyllis from GAINESVILLE, GA
-
Difficulty Level:Easy
-
Total Repair Time:Less than 15 mins
5 of 7 people
found this instruction helpful.
Was this instruction helpful to you?
Thank you for voting!
Repaired Oven Range Light Bulb
The bulb has a plastic clear cover. That cover can just be carefully removed using a screwdriver. It's held in by a metal bracket. After you remove the cover. You'll just need to replace the bulb and then re-install the cover and bracket.
Parts Used:

-
Alan from SAN MATEO, CA
-
Difficulty Level:Very Easy
-
Total Repair Time:Less than 15 mins
-
Tools:Screw drivers
3 of 3 people
found this instruction helpful.
Was this instruction helpful to you?
Thank you for voting!
oven temp was not right
We removed the old part and replaced it then when warming the oven all of a sudden there was a loud noise and something went and so we called a repair man which I guess we should of done in the first place. Now he has ordered a part that cost 170 soo that is my story don't try to repair if you don't have experience.
Parts Used:
-
Kathy from Greentown, PA
-
Difficulty Level:Really Easy
-
Total Repair Time:Less than 15 mins
-
Tools:Screw drivers
8 of 18 people
found this instruction helpful.
Was this instruction helpful to you?
Thank you for voting!
Crack in inner door glass
Removed two screws that are attached to handle then removed four screws from bottom edge of oven door. I was then able to remove the outer door glass,this gave me access to the three inner glasses. After removing the retainer for the glass assembly,I was able to remove all three and replace the inner one.I reversed this proceedure to reassemble.
Parts Used:
-
Robert from Richmond, IN
-
Difficulty Level:Really Easy
-
Total Repair Time:1- 2 hours
-
Tools:Screw drivers
4 of 7 people
found this instruction helpful.
Was this instruction helpful to you?
Thank you for voting!
Change on e of the inside glass
removed the screws holding the front part of the door and from there worked my way, untill the third glass.
It took a couple hours, my first time,. Overall easy,
It took a couple hours, my first time,. Overall easy,
Parts Used:
-
Ronald from Ozone Park, NY
-
Difficulty Level:Easy
-
Total Repair Time:1- 2 hours
-
Tools:Screw drivers
4 of 7 people
found this instruction helpful.
Was this instruction helpful to you?
Thank you for voting!
Lens cover for the oven light
-
Larry from COZAD, NE
-
Difficulty Level:Really Easy
-
Total Repair Time:30 - 60 mins
3 of 4 people
found this instruction helpful.
Was this instruction helpful to you?
Thank you for voting!
Oven door would not close completely.
Instructions couldn't be better or easier. As others have said pre-tap the holes and though it's not a must invest in a #1 square screwdriver bit. The perfect fit will save time on the job.
Parts Used:
-
Terry from DAVISON, MI
-
Difficulty Level:Really Easy
-
Total Repair Time:30 - 60 mins
-
Tools:Screw drivers
2 of 2 people
found this instruction helpful.
Was this instruction helpful to you?
Thank you for voting!
Stove was dropped and had broken, bent frame and adjuster feet
New ones fit perfectly. Take a minute to bend the frame straight. Then and I used oversize screws on the replacement parts as the drop had stripped out the screw holes of the frame.
Parts Used:

-
Paul from PORT ORANGE, FL
-
Difficulty Level:Really Easy
-
Total Repair Time:15 - 30 mins
-
Tools:Screw drivers
2 of 2 people
found this instruction helpful.
Was this instruction helpful to you?
Thank you for voting!
wrong part received and returned
I wanted the bracket for the oven heating element and received the bracket for the broiler.... part returned and now I am stumped about what my next move will be
Parts Used:
-
Rhonda from PACHECO, CA
-
Difficulty Level:Very Difficult
-
Total Repair Time:More than 2 hours
1 person
found this instruction helpful.
Was this instruction helpful to you?
Thank you for voting!
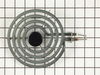
Burner element failed
Plugged the new one in and it worked.
I did search out Frigidaire parts and there are other types tha may or may not work. Calrod burners are not all that unusual. I went with the real thing.
I did search out Frigidaire parts and there are other types tha may or may not work. Calrod burners are not all that unusual. I went with the real thing.
Parts Used:
-
Robert from New Castle, PA
-
Difficulty Level:Very Easy
-
Total Repair Time:15 - 30 mins
1 person
found this instruction helpful.
Was this instruction helpful to you?
Thank you for voting!
An aluminum saucepan had overheated and melted onto the element.
Unplugged the element and the melted on pot. Plugged in the new element. I thought I might need a whole new cooktop but a new element was very easy to find online.
Parts Used:
-
Alice from Batesville, AR
-
Difficulty Level:Really Easy
-
Total Repair Time:Less than 15 mins
1 of 2 people
found this instruction helpful.
Was this instruction helpful to you?
Thank you for voting!
plastic spatula melted onto the unit
-
Thomas from Port Allen, LA
-
Difficulty Level:Really Easy
-
Total Repair Time:Less than 15 mins
1 of 2 people
found this instruction helpful.
Was this instruction helpful to you?
Thank you for voting!
light bilb went out
-
Denise from Landover, MD
-
Difficulty Level:Really Easy
-
Total Repair Time:Less than 15 mins
2 of 6 people
found this instruction helpful.
Was this instruction helpful to you?
Thank you for voting!
Old cooktop burner element died.
First I unplugged the element that wasn't working and switched it with one that was to confirm that it was the burner element, and not the cooktop wiring, that was the problem. Once that was confirmed, I ordered a new element from partselect.com. Upon arrival of the new element several days later, I plugged it into the empty plug on the cooktop and voila, we're cooking on all 4 again.
Parts Used:
-
Lawrence from Plainview, NY
-
Difficulty Level:Really Easy
-
Total Repair Time:Less than 15 mins
1 of 3 people
found this instruction helpful.
Was this instruction helpful to you?
Thank you for voting!
No burner
I just plugged it into the receptacle on the stovetop and turned the thing on, and it worked! I'd been without the 4th burner for quite some time. Nice to have it back!
Parts Used:
-
Janet from North Vernon, IN
-
Difficulty Level:Really Easy
-
Total Repair Time:Less than 15 mins
0 of 1 people
found this instruction helpful.
Was this instruction helpful to you?
Thank you for voting!