Your coupon for will be reflected when you check out!
✖
Your coupon for
✖
Hello!
You're visiting the PartSelect site in U.S.
Would you like to shop on the Canadian site?
Stay on this site
Go to Canadian site
✖
Model Number Locations
1Select Category Type
Select Category Type
2Select Product Type
Select Product Type
3Select {MODEL} Type
Select {MODEL} Type
Sample Model Number Tags
Model numbers can be made up of numbers (1005400, for example) or a combination of letters and numbers (LAT1000AAE). The model number will most likely appear on either a paper sticker or a metal plate. Your appliance's model number tag may look similar to the sample model number tags shown here (model number highlighted in yellow):
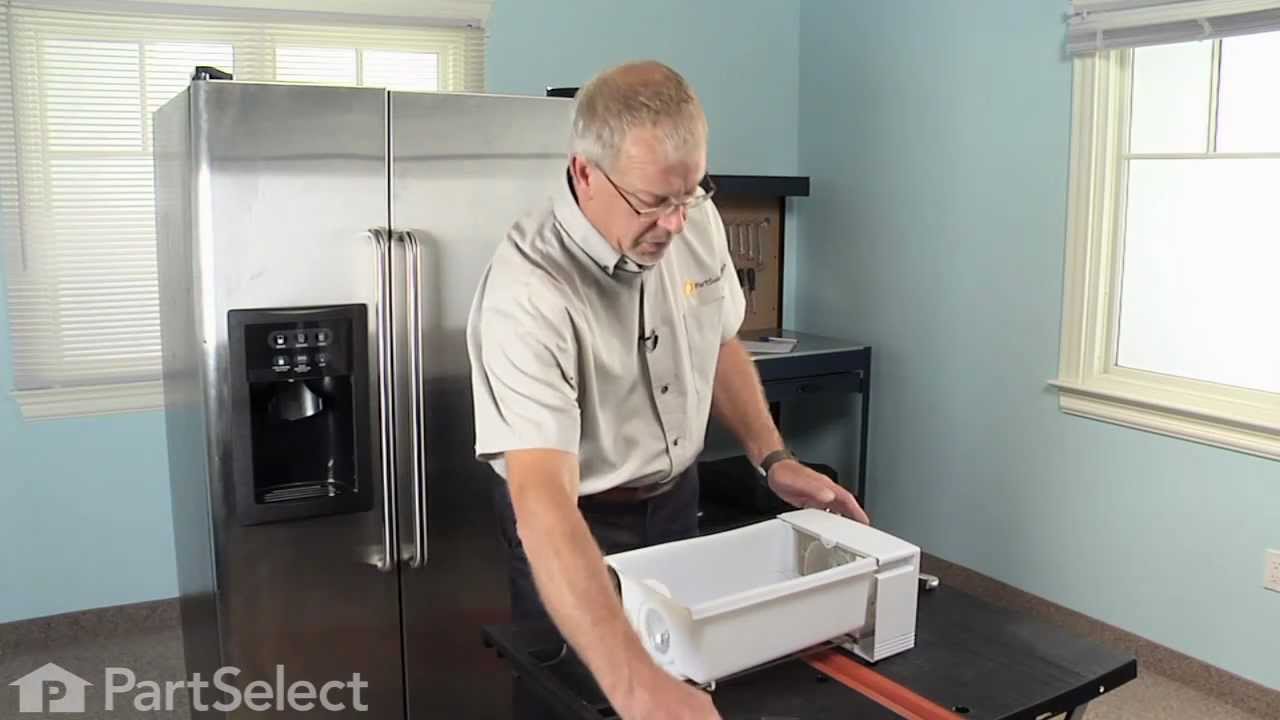
This dispenser housing supports and encloses the crushing mechanism while directing dispensed contents. Its sturdy design helps ensure smooth operation and consistent performance.
How Buying OEM Parts Can Save You Time and Money
Why buy the real thing?
OEM stands for Original Equipment Manufacturer. Simply put, this means that the company who made your appliance is also supplying the replacement part for it.
Keep searches simple. Use keywords, e.g. "leaking", "pump", "broken" or "fit".
Sorry, we couldn't find any existing reviews that matched. Try using some different or simpler keywords.
★★★★★
★★★★★
Edward H - August 24, 2018
Verified Purchase
I ordered the wrong one
I ordered the wrong item and their return process was easy to follow.
★★★★★
★★★★★
K. F - March 28, 2018
Verified Purchase
Reply
I rec part in good time and it worked just fine, Thank You
★★★★★
★★★★★
Marc C - August 16, 2018
Verified Purchase
Re.housing crusher dispencer install
Part easily installed without problems. Problems persist with new solenoid control board will not light up and water is being continuously dispensed. Don't know which partneeds to be replaced to insure function of ice dispensing. Moisture build up is constantly rusting solenoid until it seizes. Will replacing the flapper help. Please advise.
< Prev
1
Next >
Installation Instructions
Average Repair Rating: 3.9 / 5.0, 12 reviews.
What's this?
Sort by:
< Prev
1
2
Next >
Search filter:
Clear Filter
Your search term must have 3 or more characters.
Keep searches simple. Use keywords, e.g. "leaking", "pump", "broken" or "fit".
Sorry, we couldn't find any existing installation instruction that matched.
Ice cubes would not come out of the dispenser due to broken auger.
Some plastic parts of the auger had broken off and the clear cover of the crusher housing dispenser was also cracked and a piece broken off. I watched the video on how to do the repair. I ran into trouble trying to wedge the crushing unit out of the housing with a putty knife, but found another video using two flat tip screw drivers, we
... Read moredged down on each side, lifting simultaneously, and the unit popped right out. After that, it was clear sailing! After completing the repair, my ice dispense is working wonderfully!
I took the ice drawer out and turned it upside down. Then removed two philips screws holding the drawer front on. Then with a small straight edge screwdriver pry out the sides to release the locking tabs and remove the auger and crusher assembly. Then on the end of the auger remove the e-clip, slide the auger out and remove the broken par
... Read moret of the crusher dispenser and replace with new. Easier than it sounds. Parts Select was great to deal with. Had my parts in two days.
Read less
Michael from Lawerence, MI
Difficulty Level:
Really Easy
Total Repair Time:
15 - 30 mins
Tools:
Screw drivers
5 of 8 peoplefound this instruction helpful.
Was this instruction helpful to you?
Thank you for voting!
plastic crusher cover broke
look very carefully at the picture you provided in the parts fish, removed the ice maker tray and the rest was very easy ,i saved alot of money and time doing it myself.
The Ice Bucket Was Cracket And The Auger Also Broken.
I was able to order the correct parts . Needed my son in law (who in an engineer) to put it together. It was sort of a challenge forhim too. W the persons that I spoke to were very helpful and very nice and the parts came quickly. Thank heavens for the internet. The part that was broken was inside the freezer part of my frig.
I had to replace the whole tray. Required complete disassembly and reassembly. Simple to do. No problems whatsoever!!
Steven from Lacey, WA
Difficulty Level:
Really Easy
Total Repair Time:
15 - 30 mins
Tools:
Pliers, Screw drivers
2 of 3 peoplefound this instruction helpful.
Was this instruction helpful to you?
Thank you for voting!
Ice Would Not Come Out
Removed tray, threw out ice , removed 3 screws used 2 screw drivers to seperate part & re installed
RICHARD from SPRING HILL, FL
Difficulty Level:
Easy
Total Repair Time:
15 - 30 mins
Tools:
Screw drivers
7 of 10 peoplefound this instruction helpful.
Was this instruction helpful to you?
Thank you for voting!
Brittle plastic pieces crack and break.
Repair was simple; unscrew and unsnap the various pieces, and snap-and-screw it back to together. But what a disappointing design. Between replacing seized solenoids (twice) and plastic parts, this through-the-door dispenser "feature" is a maintenance money pit. Sure glad that PartSelect can provide the parts quickly.
Replaced crusher disp, but had to order the back plate(didn't realize it was two piece) waiting for that part. It was very easy to do. Had to use two drivers to pop out of ice bucket.
Bobbie from Highlands Ranch, CO
Difficulty Level:
Really Easy
Total Repair Time:
15 - 30 mins
Tools:
Screw drivers
3 of 6 peoplefound this instruction helpful.
Was this instruction helpful to you?
Thank you for voting!
Ice drawer crusher dispenser cover lid broke and allowing ice to freely drop from dispenser
Ordered ice crusher dispenser cover removed 3 screws and face plate of ice crusher was easily replaced and again working like new
Jim from Lewisville, TX
Difficulty Level:
Easy
Total Repair Time:
15 - 30 mins
Tools:
Screw drivers
4 of 9 peoplefound this instruction helpful.
Was this instruction helpful to you?
Thank you for voting!
ice maker stoped dropping ice cubes out of front drop.
Removed the two screws holding the plastic cover in place and snapped off the cover. Waited for the part only two days and we were done. Easy to snap back together.
Kim from Modesto, CA
Difficulty Level:
Really Easy
Total Repair Time:
Less than 15 mins
Tools:
Screw drivers
1 of 2 peoplefound this instruction helpful.
Was this instruction helpful to you?
Thank you for voting!
< Prev
1
2
Next >
Questions and Answers
Ask our experts a question about this part and we'll get back to you as soon as possible!
9 questions answered by our experts.
Sort by:
< Prev
1
Next >
Search filter:
Clear Filter
Your search term must have 3 or more characters.
Keep searches simple. Use keywords, e.g. "leaking", "pump", "broken" or "fit".
Sorry, we couldn't find any existing answers that matched.Try using some different or simpler keywords, or submit your new question by using the "Ask a Question" button above!
Jimmy
April 24, 2018
It dispenses ice but won’t crush
For model number Gss23lstc
Hi Jimmy, Thank you for the question. I suggest testing or replacing the Crushed/Cubed Ice Solenoid Kit, PartSelect Number: PS11699580. Hope this helps!
3 people found this helpful.
Did this question help you?
Thank you for voting!
Michael
October 16, 2019
No crushed ice. Ice maker working good but all ice comes out in cubes.
For model number GSH22JGGC WW
Hello Michael, thank you for writing. This is most likely due to a faulty Crushed/Cubed Ice Solenoid, part number PS11699580 for your model. You may also want to consider the ice crusher blade, Stationary Blades Assembly part number PS285109. Good luck with your repair!
3 people found this helpful.
Did this question help you?
Thank you for voting!
Jimmy Wiles
April 24, 2018
My crusher won’t crush ice and is slow to despense what parts do i need to fix this problem?
For model number GSS23LSTC
Hi Jimmy,
Thank you for your question. If you are having an issue with the maker not crushing ice and the dispenser is not dispensing ice, there are some parts that you will need to check to see which ones are causing the issue. You will need to check the ice dispensing drive cup, the dispenser door solenoid assembly, the ice maker, the electronic control board, the plate helix lock, the crushed cubed ice solenoid kit, the helix, the water inlet valve, the auger motor, the water filter and the drive auger dispenser. I hope this helps. Thank you and have a great day!
2 people found this helpful.
Did this question help you?
Thank you for voting!
Robert
July 10, 2019
My ice despencer control setting doesn't dispence whole ice cubs only it also crushes ice.
For model number GSS25QGMDWW
Could be a solenoid problem, or a frozen water line. Defrost your freezer and it might fix your problem. Also make sure that the ice in the dispenser isn't frozen or frosted in place at the bottom of the dispenser as that will make it crush ice to get it out.
1 person found this helpful.
Did this question help you?
Thank you for voting!
Roger
March 5, 2018
How do I take it apart to get auger out of tray and replace plastic cup on end of auger
Hi Roger, Thank you for the question. Here is a link to a video on how to remove the auger assembly. Good luck with the repair!
https://www.youtube.com/watch?v=NpGZEoplmGM
1 person found this helpful.
Did this question help you?
Thank you for voting!
Tom
April 14, 2018
I need a part of the ice maker for the listed refrigerator that I can not find shown on the exploded diagram. It is the white plastic part that is actuated by part 329 (the metal rod that from front to back.) I think the part I need blocks an opening during the ice crushing procedure. Mine somehow got caught by the crushing teeth and is partially broken. It now jams the crusher teeth.
For model number GSL22JGDBLS
Hi Tom, Thank you for the question. The metal rod is sold as part of the Ice Bucket Auger,PartSelect Number: PS964350. Hope this helps!
1 person found this helpful.
Did this question help you?
Thank you for voting!
Leigh
October 7, 2019
Would part 325 be the reason that the ice maker doesn't dispense ice? Is part 325 just the cover or the complete part? Or would it be the auger? It makes ice just fine, just will not dispense. Thank you
For model number GSH25JGDBWW
Hi Leigh, thank you for your question. There are a few parts that you should check for this issue. You should take a look at your dispenser solenoid, your crushed/cubed solenoid, and you also may need to look at your auger motor as well. Make sure all of those electrical parts are working. If they are then you may need to just do a quick inspection of the dispenser parts to see if anything is broken. If all of those parts are fine the issue might be your control board. Good luck with your repair.
Did this question help you?
Thank you for voting!
Luanne
July 7, 2021
The auger will not turn. I have removed ice bucket from freezer and thawed it out. I am unable to turn the auger manually. I have replaced the auger itself twice now, it is ok. I suspect perhaps the auger motor is burned out. I did not see a way to test it and the exploded diagram is confusing whether you can replace the motor and blade assembly as one unit or if one would have to replace each item individually. Help? Thx
For model number HSS25GFPCWW
Hello Luanne, Thank you for the question. We have researched the model you have provided and have found the part you are looking for is PartSelect Number PS1993875 for the Auger Motor. We hope this helps!
Plastic part at end broke off. Is this housing crusher dispenser? Not dispensing ice tray full AUGER turning.
For model number GSH25VGPACC
Hello Joe, Thank you for contacting us. We have researched the model you have provided and have found the part you are looking for is PartSelect Number PS783777. If you need help placing an order, customer service is open 7 days a week. Please feel free to give us a call. We look forward to hearing from you!
Did this question help you?
Thank you for voting!
< Prev
1
Next >
✖
Ask a Question
Ask our experts a question on this part and we'll respond as soon as we can.