Your coupon for will be reflected when you check out!
✖
Your coupon for
✖
Hello!
You're visiting the PartSelect site in U.S.
Would you like to shop on the Canadian site?
Stay on this site
Go to Canadian site
✖
Model Number Locations
1Select Category Type
Select Category Type
2Select Product Type
Select Product Type
3Select {MODEL} Type
Select {MODEL} Type
Sample Model Number Tags
Model numbers can be made up of numbers (1005400, for example) or a combination of letters and numbers (LAT1000AAE). The model number will most likely appear on either a paper sticker or a metal plate. Your appliance's model number tag may look similar to the sample model number tags shown here (model number highlighted in yellow):
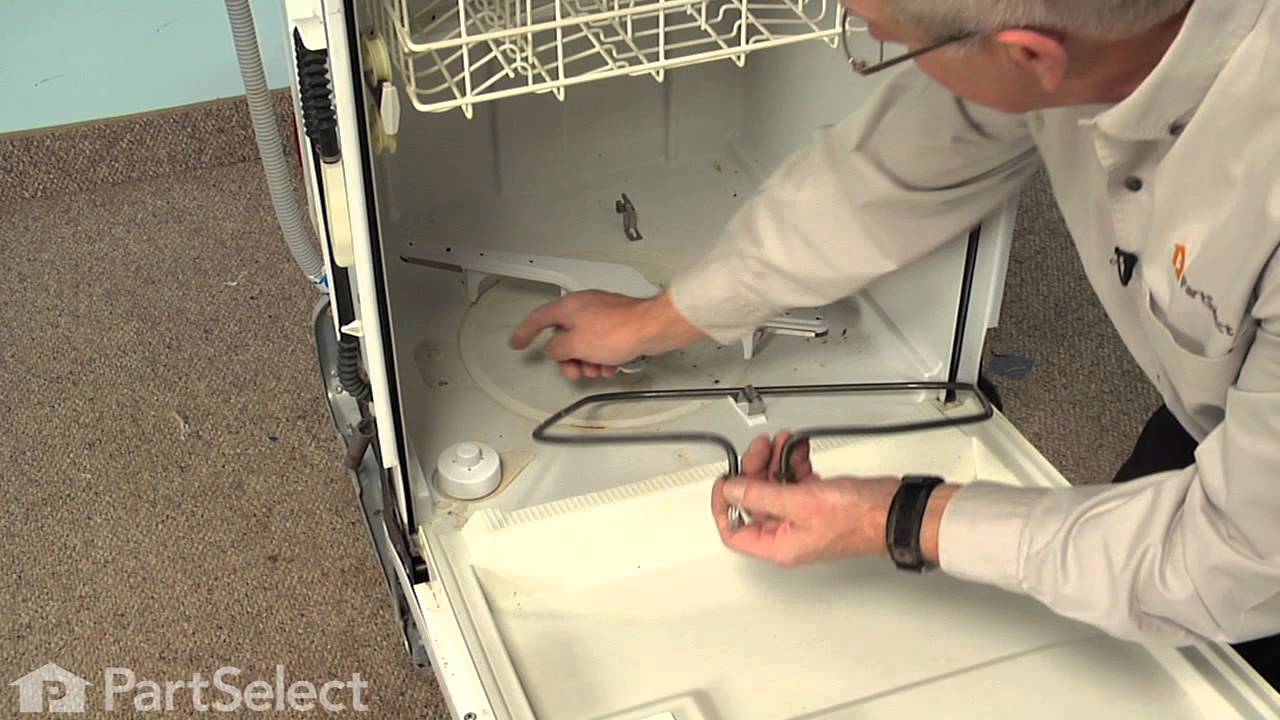
This dishwasher heating element is a genuine replacement component designed to maintain optimal water temperature during the wash cycle and assist in drying dishes at the end of the cycle. Positioned at the bottom of the dishwasher tub, it ensures efficient cleaning and drying performance. Compatible with a wide range of models from Frigidaire, Kenmore, Crosley, Electrolux, and other related brands, this element replaces older versions and restores proper function when symptoms such as poor cleaning, inadequate drying, or water leaks occur. Installation requires disconnecting power to the appliance to ensure safety. Sold individually.
How Buying OEM Parts Can Save You Time and Money
Why buy the real thing?
OEM stands for Original Equipment Manufacturer. Simply put, this means that the company who made your appliance is also supplying the replacement part for it.
Keep searches simple. Use keywords, e.g. "leaking", "pump", "broken" or "fit".
Sorry, we couldn't find any existing reviews that matched. Try using some different or simpler keywords.
★★★★★
★★★★★
Robert C - September 3, 2023
Verified Purchase
Home owner
The part was great and machine is back at work didn't even have to pay sick pay.
★★★★★
★★★★★
Robin C - March 13, 2024
Verified Purchase
OEM
The heating element was just like an OEM part. The element fit perfect.
★★★★★
★★★★★
DONALD F - November 30, 2018
Verified Purchase
exactly what i needed, was fast and easy fix
back to normal operation, easy change out
★★★★★
★★★★★
Demetrius A - June 17, 2018
Verified Purchase
Great Description
Fast delivery accurate item and worked just fine.
★★★★★
★★★★★
Todd R - August 28, 2019
Verified Purchase
fitment was great
the parts showed when they were suppose to and fit great
★★★★★
★★★★★
Salvadore P - January 28, 2019
Verified Purchase
Easy repair
Part came exactly as described and fit my wishwasher as stated. Repair was super easy and with limited tools needed.
★★★★★
★★★★★
Joel C - January 17, 2019
Verified Purchase
Fairly easy installment..doesn't take a pro to install
The part was the correct part that I ordered and arrived in great condition..installed it and appliance working fine
★★★★★
★★★★★
Shawn L - December 2, 2019
Verified Purchase
Easy to replace.
The repair took about 5 minutes.
★★★★★
★★★★★
Perry W - November 29, 2018
Verified Purchase
Correct part....easy to install
Received part on time & good condition
< Prev
1
Next >
Installation Instructions
Average Repair Rating: 3.4 / 5.0, 7 reviews.
What's this?
Sort by:
< Prev
1
Next >
Search filter:
Clear Filter
Your search term must have 3 or more characters.
Keep searches simple. Use keywords, e.g. "leaking", "pump", "broken" or "fit".
Sorry, we couldn't find any existing installation instruction that matched.
Heating Element was corroded.
It took me about 30 minutes to do the repair - took my time and could’ve done it much faster.
Christopher from EVERETT, WA
Difficulty Level:
Really Easy
Total Repair Time:
30 - 60 mins
Tools:
Nutdriver, Screw drivers, Wrench (Adjustable)
2 of 2 peoplefound this instruction helpful.
Was this instruction helpful to you?
Thank you for voting!
the nut holding on the element would not tighten. leaked at the location where the nut was located
Removed the cover at the front bottom to gain access to the nuts holding on the element. Turned off dishwasher breaker. Removed the wires connected to the element. With a 1/2" wrench, removed the element mounting screws. Removed the bottom rack. Removed the lower spray arm. Removed the element from 2 clips.
... Read morer />Removed the element. Put the new element in place. Clipped it in. Put new screws on and tightened up with a wrench. Not too much but enough to squash the washers to make a tight seal. Replaced wires. Replaced spray arm and bottom rack. Turned on the breaker. Ran it through a cycle to check for leaks. Replaced bottom cover.
Removed bottom plate and heating element brass nuts. Disconnected heating element. Connected new one then replaced brass nuts. Put bottom plate back on. Very easy.
Removed the clamp holding it to the floor and removed the c-clips holding element underneath and put new one in. Hard part was figuring out what was holding the element but since I still had the schematic drawing we figured it out. Saved a bunch on a repairman. After watching my friend install the new eleme
... Read morent I could probably do it myself next time.
Read less
Jane from Port Charlotte, FL
Difficulty Level:
A Bit Difficult
Total Repair Time:
30 - 60 mins
Tools:
Screw drivers, Wrench (Adjustable)
16 of 25 peoplefound this instruction helpful.
Was this instruction helpful to you?
Thank you for voting!
< Prev
1
Next >
Questions and Answers
We're sorry, but our Q&A experts are temporarily unavailable.
Please check back later if you still haven't found the answer you need.
8 questions answered by our experts.
Sort by:
< Prev
1
Next >
Search filter:
Clear Filter
Your search term must have 3 or more characters.
Keep searches simple. Use keywords, e.g. "leaking", "pump", "broken" or "fit".
Sorry, we couldn't find any existing answers that matched.Try using some different or simpler keywords, or submit your new question by using the "Ask a Question" button above!
Ted
December 31, 2017
Is there still a video instruction for replacing the heating element. Haven't gotten past separating clips.
For model number PLD4375RFC0
Hi Ted, Thank you for the question. Please see below for a link to a repair video. The appliance may not be the same but will have the same basic steps. Hope this helps!
https://www.youtube.com/watch?v=QYYmKvfj6Xk
8 people found this helpful.
Did this question help you?
Thank you for voting!
John
March 7, 2019
We discovered a leak underneath where the heating element bolts into the bottom. Will replacing the heating element solve this problem?
For model number FDB2810LDC1
Hello John, Thank you for the question. I suggest checking the Heating Element Brass Nut, PartSelect Number PS1524878. The heating element nut is used to connect the heating element to the dishwasher tub. If water is leaking from underneath your dishwasher, you may need to tighten or replace the heating element nut. Thank you for your inquiry, good luck with this repair!
Does this model dishwasher have a drying fan? Machine seems to be washing with hot water but does not dry the dishes at the end of the cycle. Would changing the heating element solve this problem?
For model number GLD4050RHS1
Hi Tom,
Thank you for your question. If the dryer is not drying dishes, the heating element fixes the issue the majority of the time, but you should also check the high limit thermostat as well. I hope this helps. Thank you and have a great day!
4 people found this helpful.
Did this question help you?
Thank you for voting!
Stephen
December 13, 2022
I can't seem to get one of the spade connectors off my existing element. The dishwasher was leaking around one of the leads so the connector might be corroded. Is there a clip I'm missing or should it just pull right off?
For model number FGHD2465NF1A
Hi Stephen,
Thank you for your question. For this repair you will need to use a Phillips head screwdriver and a ½ inch wrench. Before beginning any repair, please turn the water off and either unplug the appliance or turn the circuit breaker off. To begin the repair, open the door and remove the lower dishrack. Then remove the lower spray arm by pulling it straight up. Use the screwdriver to unthread the screws securing the dishwasher to the counter and then pull the dishwasher out half-way. Then remove the wires from the heater terminals. Take note of how they are positioned before removing them. Then, with the half inch wrench, unscrew the mounting nuts securing the terminals. Then pull out the old heater terminals and release the heater terminals from the retaining clips. Install the new heater element terminals into the openings. There should be 2 white dots on the heating element. Where the white dots are positioned is where they slide into to the retaining clips. Once the element has been placed into the clips, push the terminals down and reinstall and tighten the mounting nuts with the wrench. Place the wires back onto the terminals and slide the dishwasher back into the counter. Secure the dishwasher to the counter with the 2 screws. Reinstall the lower spray arm and push it down to lock it in. Place the lower rack back into the dishwasher and restore power and water to the dishwasher. If you have any questions, please let us know. We are open 7 days a week. We look forward to hearing from you!
2 people found this helpful.
Did this question help you?
Thank you for voting!
S
May 10, 2024
What is the appropriate way to give this heating element 154825001 a gentle cleaning without going to the effort of removing it from the machine?
For model number FFBD2408NS10C
Hi S, thank you for reaching out. In order to clean the heating element empty your dishwasher of all the dishes and utensils. Pour vinegar directly over the heating element and wait for 5 minutes for it to start its acidic action and then scrub it with a brush. Start a cycle of your dishwasher at the hottest settings. Finally, to get the odor out of your dishwasher, use a solution of dish soap and water to clean the inside of your dishwasher and rinse with warm water. We hope that helps!
1 person found this helpful.
Did this question help you?
Thank you for voting!
JORGE
February 18, 2020
Hi my dishwasher it's neither drying nor cleaning well the dishes, i checked and it's not heating the water, i change the thermistor and the highlimit thermostat seems to be ok, it has continuity, so the heating element which if i feed it with 110 volts get hot, but when i check the continuity it measures 0, the needle goes all the way.What else can i check?
thanks
For model number GLD2250RDC3
Hello Jorge, thank you for your question. If the heater and the thermostat have been tested and have continuity the issue could be with the main board under the unit which controls the functions, which is PartSelect Number: PS2342475. I hope this helps.
Did this question help you?
Thank you for voting!
Brenda
January 29, 2019
Is it possible to purchase only the brass nuts or do we have to purchase the entire heating element?
For model number GLD2250RDQ3
Hello Brenda, Thank you for contacting us. I have researched the model you have provided and have found the part you are looking for is Part Number: PS1524878. Thank you for your inquiry, good luck with this repair!
Hi Gladys, thank you for your question. Unfortunately we do not have the wattage information. However this part is photographed on a 1 inch grid background to get an approximate size of the part. This part is 16" wide. Good luck with your repair.
Did this question help you?
Thank you for voting!
< Prev
1
Next >
Model Cross Reference
This part works with the following models:
PartSelect Number: PS3653449
Manufacturer Part Number: 154825001
Item is in stock and is estimated to be delivered in 2-3 business days via Standard Shipping.
On Order
Item is not in stock and usually ships 3-5 business days from the time you place your order.
Special Order
Item is not in stock and usually ships 10-15 business days from the time you place your order.
NLA - No Longer Available
This item is no longer being made by the manufacturer, and cannot be added to your shopping cart.
[{"position":0,"name":"Home","title":"Home","url":"/"},{"position":1,"name":"Dishwasher","title":"Dishwasher","url":"/Dishwasher-Parts.htm"},{"position":2,"name":"Element or Burner","title":"Element or Burner","url":"/Dishwasher-Elements-and-Burners.htm"},{"position":3,"name":"154825001","title":"154825001","url":""}]
You added 1 item to your cart
✖
% OFF
$
$
Qty:
Total item(s) in cart:
Order Subtotal
$
*Taxes and shipping will be applied during checkout