


SE1000T Maytag Dryer - Overview
Sections of the SE1000T
[Viewing 1 of 1]
Keep searches simple, eg. "belt" or "pump".

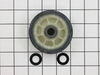
Drum Support Roller Kit
PartSelect #: PS1570070
Manufacturer #: 12001541
The drum support roller (Dryer Drum Support Roller, Drum Roller and Washer Assembly) holds the drum in the proper position while it spins on the support wheels. This part rotates on the roller shaft w...
$22.52
In Stock

Front Glide Kit
PartSelect #: PS1804752
Manufacturer #: 306508
The front glide is located at the front of the dryer, the drum rides along it. If you hear a metal-on-metal noise when your dryer is running, your front glide may be worn out and require replacing. Th...
$12.85
In Stock

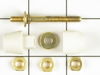
Roller Shaft
PartSelect #: PS11743031
Manufacturer #: WP6-3129480
This roller shaft is also known as a support roller shaft or a drum roller axle, and is a part for your dryer. The function of this piece is to act as the axle for the drum roller; it provides a place...
No Longer Available

Dryer Retaining Ring
PartSelect #: PS11746909
Manufacturer #: WP9703438
This part is a retaining ring, sometimes called a retaining clip, that holds the drum support roller onto the shaft of a dryer. It is made entirely of metal and measures less than an inch in diameter....
$6.40
In Stock

Drum Roller Shaft Washer
PartSelect #: PS11740748
Manufacturer #: WP312535
If you notice that your dryer is noisy or will not tumble, then you may need to replace the drum roller shaft washer. This drum roller shaft washer is just under an inch in diameter and is sold indivi...
$12.85
In Stock

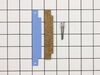
Front or Rear Drum Felt Seal
PartSelect #: PS11740771
Manufacturer #: WP314820
This front or rear dryer drum felt seal is seventy-nine and a half inches long.
$30.53
In Stock

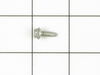
Dryer Screw
PartSelect #: PS11746840
Manufacturer #: WP90767
This screw is sold individually.
$7.47
In Stock
 – Part Number: WP303396")
High Limit Thermostat (Limit: 200-30)
PartSelect #: PS11740647
Manufacturer #: WP303396
This high-limit thermostat is a critical safety component designed for use in residential clothes dryers. Engineered to prevent overheating, it interrupts power to the heating element when the interna...
$30.53
In Stock

Roller Shaft Hex Nut
PartSelect #: PS11741054
Manufacturer #: WP33001443
This roller shaft hex nut measures well under an inch long. It is made of metal and is used for Maytag brand clothes dryers.
$7.47
In Stock

Automatic Dry Sensor with Mounting Screws
PartSelect #: PS1595603
Manufacturer #: 304997
This part helps determines the dryness of the clothes to reduce over – drying.
No Longer Available


Tumbler Seal
PartSelect #: PS11741149
Manufacturer #: WP33313541
The tumbler seal can be used for the front or rear. Sold individually.
$55.29
In Stock
Questions And Answers for SE1000T
We're sorry, but our Q&A experts are temporarily unavailable.
Please check back later if you still haven't found the answer you need.
Common Symptoms of the SE1000T
[Viewing 6 of 6]Noisy
Fixed by
these parts
these parts

Show All
Marks left on clothes
Fixed by
these parts
these parts

Show All
Too hot
Fixed by
these parts
these parts

Show All
Drum Not Spinning
Fixed by
these parts
these parts
Show All
Not Heating
Fixed by
these parts
these parts
Show All
Door latch failure
Fixed by
these parts
these parts
Show All


")


Keep searches simple. Use keywords, e.g. "leaking", "pump", "broken" or "fit".
dryer squeeking
removed front panel,lifted top, removed drum and drive belt,remove old rollers and acc and instlled new and reinstalled dryer parts.
Parts Used:
-
gerald from park city, MT
-
Difficulty Level:Easy
-
Total Repair Time:1- 2 hours
-
Tools:Pliers, Screw drivers, Socket set, Wrench set
523 of 565 people
found this instruction helpful.
Was this instruction helpful to you?
Thank you for voting!
Broken contact on high limit thermostat - dryer no start
First I unplugged the dryer! Then unscrewed the two screws at the bottom of the front door. To remove the front door, swing the bottom up about 30 degrees until the two triangular hooks at the top of the door release. Then release the two wires going to the door switch from their harness so as to gain more slack to move the door out of
... Read more
the way. The switch was secured by 2 hex head sheet metal screws1/4inch in diameter. I used a small right angle socket wrench to get these loose. I only had to remove the front screw completely to be able to take the switch out for exchange purposes. Once this was done, reverse the process and plug it in! (BTW, the electrical schematic for this dryer is up under the top console)
Read less
Parts Used:
-
Nova from Hudson, OH
-
Difficulty Level:Really Easy
-
Total Repair Time:Less than 15 mins
-
Tools:Screw drivers, Socket set
30 of 39 people
found this instruction helpful.
Was this instruction helpful to you?
Thank you for voting!
Rattling sound.
Turned off circuit breaker. Removed two screws at base of front panel with stubby Phillips-head screwdriver. Swung panel up about 30-degrees, and removed panel, disconnecting red and yellow wire to door switch. Removed four sheet metal screws and took off large drum support bracket. Checked drum support rollers and shafts. They were fine.
... Read more
Reset circuit breaker and turned on dryer. Rattling noise still present.
Removed six small screws holding blower fan assembly. Shaft receiver on squirrel cage fan was worn completely round (it should fit onto a half-round shaft). Ordered new blower fan from PartSelect.com. Replaced tonight, and it works beautifully. This dryer is 29-years old. All it's ever needed in the 10-years I've owned it is a belt replacement and this repair. Long live the 1970s Maytags, and good parts suppliers like this one.
Removed six small screws holding blower fan assembly. Shaft receiver on squirrel cage fan was worn completely round (it should fit onto a half-round shaft). Ordered new blower fan from PartSelect.com. Replaced tonight, and it works beautifully. This dryer is 29-years old. All it's ever needed in the 10-years I've owned it is a belt replacement and this repair. Long live the 1970s Maytags, and good parts suppliers like this one.
Read less
Parts Used:
-
Laurence from Leesburg, VA
-
Difficulty Level:Easy
-
Total Repair Time:30 - 60 mins
-
Tools:Pliers, Screw drivers, Socket set
21 of 25 people
found this instruction helpful.
Was this instruction helpful to you?
Thank you for voting!