


NY58J9850WS Samsung - Overview
Models starting with NY58J9850WS
Click on the best match to narrow your results.
- NY58J9850WS (AA-0000) Samsung Range (RANGE)
- NY58J9850WS (AA-00) Samsung Range (Samsung Ny58j9850ws/Aa-00 Range)
- NY58J9850WS ( AA 0001 ) Samsung Wall Oven (5.8 Cu. Ft. Double Oven Dual Fuel Convection Range)
- NY58J9850WS ( AC 0002 ) Samsung Wall Oven (Chef Collection 5.8 Cu. Ft. Self-Cleaning Slide-In Double Ov)
- NY58J9850WS ( AA 0002 ) Samsung Wall Oven (5.8 Cu. Ft. Double Oven Dual Fuel Convection Range)
- NY58J9850WS ( AC 0001 ) Samsung Range (Range)
Keep searches simple, eg. "belt" or "pump".

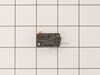
Micro Door Switch
PartSelect #: PS4131192
Manufacturer #: 3405-001034
This door switch, also known as a safety switch, is a genuine OEM replacement part for microwaves. It is a safety mechanism that sends signals to the microwaves control system, telling it when the doo...
$17.95
In Stock

Leveling Leg
PartSelect #: PS4240934
Manufacturer #: DG61-00525A
The Black Leveling Leg from Samsung is a durable, genuine part designed for use with many Samsung kitchen appliances. This quality leg-leveling device offers an easy-to-use design to correct uneven su...
$27.95
In Stock

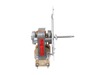
Range Convection Fan Motor Assembly
PartSelect #: PS11720787
Manufacturer #: DG96-00110E
This convection fan motor assembly is designed to circulate hot air throughout the oven cavity, promoting even heat distribution for more consistent baking and roasting results. By keeping air moving ...
$150.64
In Stock

Rubber Cushion
PartSelect #: PS4241222
Manufacturer #: DG73-00003A
This rubber cushion is supplied by the original manufacturer and has a shaft approximately 1 inch long. The cushion acts as a layer of protection between the oven door and oven frame/cavity. It preven...
$7.65
In Stock

Left Rear Burner Cap - Black
PartSelect #: PS4240973
Manufacturer #: DG62-00070A
Enjoy the precision and durability of Samsung with this high-quality Left Rear Burner Cap. Known as the "surface burner cap", this essential component is designed to cover the surface burner of your S...
$53.51
In Stock

Wire Rack
PartSelect #: PS12721757
Manufacturer #: DG75-01001D
This stainless steel wire rack is a sturdy platform for baking or roasting food, making sure heat circulates evenly. It measures approximately 7/16 inches by 24 3/4 inches and is usually found inside ...
$108.95
In Stock

Range Surface Burner Cap
PartSelect #: PS4240971
Manufacturer #: DG62-00067A
The burner cap protects the burner head from spills and helps spread out the burner flame for even heating.
$82.95
In Stock

Burner Head
PartSelect #: PS5576948
Manufacturer #: DG62-00076B
The Samsung Burner Head (Aux) is a top-notch enhancement for your Samsung range. Specifically designed to endure high temperatures, this quality part, crafted from sturdy metal, ensures durability and...
$51.95
In Stock

Convection Fan Motor - Lower
PartSelect #: PS11735747
Manufacturer #: DG31-00005C
This genuine OEM left-threaded convection fan motor is responsible for spinning the fan blade, ensuring even circulation of hot air within your oven for consistent cooking. It is typically located beh...
$151.33
In Stock

Grate Side Assembly
PartSelect #: PS9606629
Manufacturer #: DG94-00937A
Enhance your Samsung range with this durable burner side grate, crafted in resilient porcelain enamel to resist chipping and scratching. Measuring 6 inches in width and 19.75 inches in length, this Sa...
$198.95
In Stock

Oven Temperature Sensor
PartSelect #: PS4240744
Manufacturer #: DG32-00004C
The temperature sensor, also referred to as a thermostat, probe, or thermistor sensor, is responsible for measuring the temperature inside your oven. It is a platinum-resistance sensor with a resistan...
$101.95
In Stock

Tapping Screw
PartSelect #: PS4133205
Manufacturer #: 6002-000520
This manufacturer-approved screw is for refrigerators, including Kenmore refrigerator model. Avoid cross-threading refrigerator screw during installation.
$6.40
In Stock
Common Symptoms of models starting with NY58J9850WS
[Viewing 4 of 4]No heat
Fixed by
these parts
these parts
Show All
Doesn’t shut off
Fixed by
these parts
these parts
Show All
Won’t turn on
Fixed by
these parts
these parts
Show All
Oven not heating evenly
Fixed by
these parts
these parts
Show All


Keep searches simple. Use keywords, e.g. "leaking", "pump", "broken" or "fit".
Touchpad for oven wasn't working, but top gas burners were.
I initially thought I needed a new touch control panel but after a bit of research on the web and numerous videos and articles on replacing the control panel, I found an obscure video and forum where they mentioned that this thermostat fuse has been known to overheat and shut down the oven (touch controls) for safety reason. By the way,
... Read more
my unit is 3 years old and the warranty expired one month ago! I took the top off, found the fuse and tested it with a Multi-meter (again, thanks to some very helpful youtube videos out there). Dead. I figured it was worth a try and ordered the $20 part as opposed to the much more expensive control.
> remove all of the gas burners on the stove (a total of about a dozen screws)
> then remove the top back vent and the screws that hold the top metal piece in place
> you will see the thermostat fuse towards the back in the middle.
> loosen one screw and replace
> put back together in reverse order.
*** You do NOT have to remove the front piece as some videos and articles mention.
The total time should be about 20 minutes. With a little patience and pre-homework, it's easy and you'll save a couple hundred in labor costs.
Good Luck.
Read less
Parts Used:

-
Bob from WILTON, CT
-
Difficulty Level:Easy
-
Total Repair Time:30 - 60 mins
-
Tools:Screw drivers
14 of 14 people
found this instruction helpful.
Was this instruction helpful to you?
Thank you for voting!
Convection oven fans were noisy.
This oven has two fans that counter rotate. One spins clockwise, the other counterclockwise. Because of this, the motors and the fan blades are different. The schematic shows the counter clockwise rotating fan with a right hand threaded shaft/nut on the bottom and the clockwise motor and fan with the left hand nut on the top. My range
... Read more
had the motors in the exact opposite orientation, but the fan blades on the motors as shown on the schematic. The incorrect assembly at the factory (I bought new in the box, so I know this is the first repair) meant that nether fan blade was turning the correct direction. So do yourself a favor, be sure you’re buying the right motor (clockwise or counterclockwise) and be sure you put the right fan blade on the right motor. The Samsung motor ending in F is the counterclockwise motor that has the right hand threaded shaft the clockwise motor with the left hand threaded shaft ends in E.
Read less
Parts Used:
-
Sue from De Soto, IL
-
Difficulty Level:A Bit Difficult
-
Total Repair Time:30 - 60 mins
-
Tools:Screw drivers, Socket set
17 of 27 people
found this instruction helpful.
Was this instruction helpful to you?
Thank you for voting!
Bearing went out on the fan
Slide out the stove. Unplug the electricity. Remove the back panel with a screwdriver. Then go inside the oven and remove the two Philips head screws holding the fan cover. Then remove the nut holding the fan. Note, it is a left handed nut, so turn it right to loosen it. Pull off the fan. Return to the back and remove the nut and two scr
... Read more
ews that hold the fan. The fan slides right out. The only problem I had was that the electrical contacts on the new motor were wider than the original. I had to break the plastic so I could separate the wire leads, so that they would fit the new motor. Works like a charm.
John
John
Read less
Parts Used:
-
John from NASHVILLE, TN
-
Difficulty Level:Easy
-
Total Repair Time:30 - 60 mins
-
Tools:Screw drivers, Socket set
7 of 14 people
found this instruction helpful.
Was this instruction helpful to you?
Thank you for voting!