Your coupon for will be reflected when you check out!
✖
Your coupon for
✖
Hello!
You're visiting the PartSelect site in U.S.
Would you like to shop on the Canadian site?
Stay on this site
Go to Canadian site
✖
Model Number Locations
1Select Category Type
Select Category Type
2Select Product Type
Select Product Type
3Select {MODEL} Type
Select {MODEL} Type
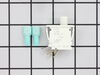
Sample Model Number Tags
Model numbers can be made up of numbers (1005400, for example) or a combination of letters and numbers (LAT1000AAE). The model number will most likely appear on either a paper sticker or a metal plate. Your appliance's model number tag may look similar to the sample model number tags shown here (model number highlighted in yellow):
Model has been saved to My Models. If you're not signed in, your lists are available on this device and will expire within 30 days.
Model has been saved to My Models.
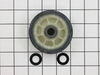
The drum support roller (Dryer Drum Support Roller, Drum Roller and Washer Assembly) holds the drum in the proper position while it spins on the support wheels. This part rotates on the roller shaft w...
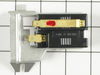
This thermostat (Dryer Operating Thermostat, Dryer Cycling Thermostat, Cycling Thermostat, Dryer Thermostat) is used to maintain a temperature of 155 degrees in the dryer drum. The internal bias heate...
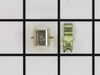
When the igniter reaches a high enough temperature, these coils (Coil Valve, Dryer Gas Valve Coil Kit, Dryer Valve Coil Kit, Gas Valve Solenoid) work together to open the gas valve and allow the gas t...
The tumbler and motor belt in your dryer allows the drum to spin during the drying cycle. At 100 inches in length, this dryer drum belt is 3/8 of an inch wide and has five ridges. The belt is black in...
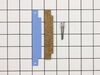
The front glide is located at the front of the dryer, the drum rides along it. If you hear a metal-on-metal noise when your dryer is running, your front glide may be worn out and require replacing. Th...
This roller shaft is also known as a support roller shaft or a drum roller axle, and is a part for your dryer. The function of this piece is to act as the axle for the drum roller; it provides a place...
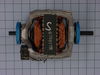
This comes with a metallic hub clamp to hold it firmly in place. The blower wheel with clamp is part of your dryer assembly. You will find this part attached to the drive motor shaft, which disperses ...
This part is a retaining ring, sometimes called a retaining clip, that holds the drum support roller onto the shaft of a dryer. It is made entirely of metal and measures less than an inch in diameter....
This is a replacement lint filter for your dryer. Replacing this part is easy as it requires no disassembly of the unit. Make sure to clean the filter after every use of your dryer, and check the filt...
If your gas dryer is not heating up or igniting, then replacing the flame sensor, located in the burner assembly, could solve it. This part senses heat from the igniter to monitor if it is hot enough ...
If you notice that your dryer is noisy or will not tumble, then you may need to replace the drum roller shaft washer. This drum roller shaft washer is just under an inch in diameter and is sold indivi...
Removed the front cover (screws on bottom 0f face)...removed blower cover....spring pliers to remove and install blower fan. the rest of the time was spent cleaning the inside of the shell as well as the vent. Reassembled and dryer runs better than it has for many years.
1. Removed front of machine (2 screws at the bottom). 2. Removed 4 screws from inside the dryer, to take off the blower housing. 3. Removed 4 screws and took out the large metal piece which supports the drum at the front. Removed the drum. 4. Replaced the two rollers that support the drum in the rear. Cleaned the pins they
... Read morerun on, and oiled very lightly. Also replaced the idler roller. I was surpirsed to see that these rollers use plain bearings, not ball bearings. 5. On the front support piece, drilled out the rivets for the glides, and replaced the worn out glides with new parts. Applied a little glue (3M weatherstrip adhesive) to the cork pieces, to glue them to the metal. Attached the plastic pieces over the cork pieces, and riveted in place using rivets that came with the glide kits. 6. Replaced front and rear felt seals. This was not as tricky as I expected it to be. They were held in by metal tabs. Glued the ends where they came together. 7. Replaced the felt blower seal. Glued to the blower housing. 8. Reinstalled the drum, installed new belt, which came with good instructions (luckily). 9. Reassembled front support piece and the front of the cabinet.
I also cleaned the lint from the cabinet and from the vent hose.
In general, the job went without a hitch, and the machine probably has quite a few years left, despite the fact that it's 18 years old. This gives me a good feeling.
I'd say this would be challenging, though, for someone who is not pretty experienced with machinery repair. Also, the cost of the parts was significant enough that it would not have been unreasonable to have opted for a new machine.


 Diagram and Parts List for Maytag Dryer")
 Diagram and Parts List for Maytag Dryer")
 Diagram and Parts List for Maytag Dryer")
 Diagram and Parts List for Maytag Dryer")


 Diagram and Parts List for Maytag Dryer")
 Diagram and Parts List for Maytag Dryer")