Your coupon for will be reflected when you check out!
✖
Your coupon for
✖
Hello!
You're visiting the PartSelect site in U.S.
Would you like to shop on the Canadian site?
Stay on this site
Go to Canadian site
✖
Model Number Locations
1Select Category Type
Select Category Type
2Select Product Type
Select Product Type
3Select {MODEL} Type
Select {MODEL} Type
Sample Model Number Tags
Model numbers can be made up of numbers (1005400, for example) or a combination of letters and numbers (LAT1000AAE). The model number will most likely appear on either a paper sticker or a metal plate. Your appliance's model number tag may look similar to the sample model number tags shown here (model number highlighted in yellow):
This broil element is found on the roof of the oven.
How Buying OEM Parts Can Save You Time and Money
Why buy the real thing?
OEM stands for Original Equipment Manufacturer. Simply put, this means that the company who made your appliance is also supplying the replacement part for it.
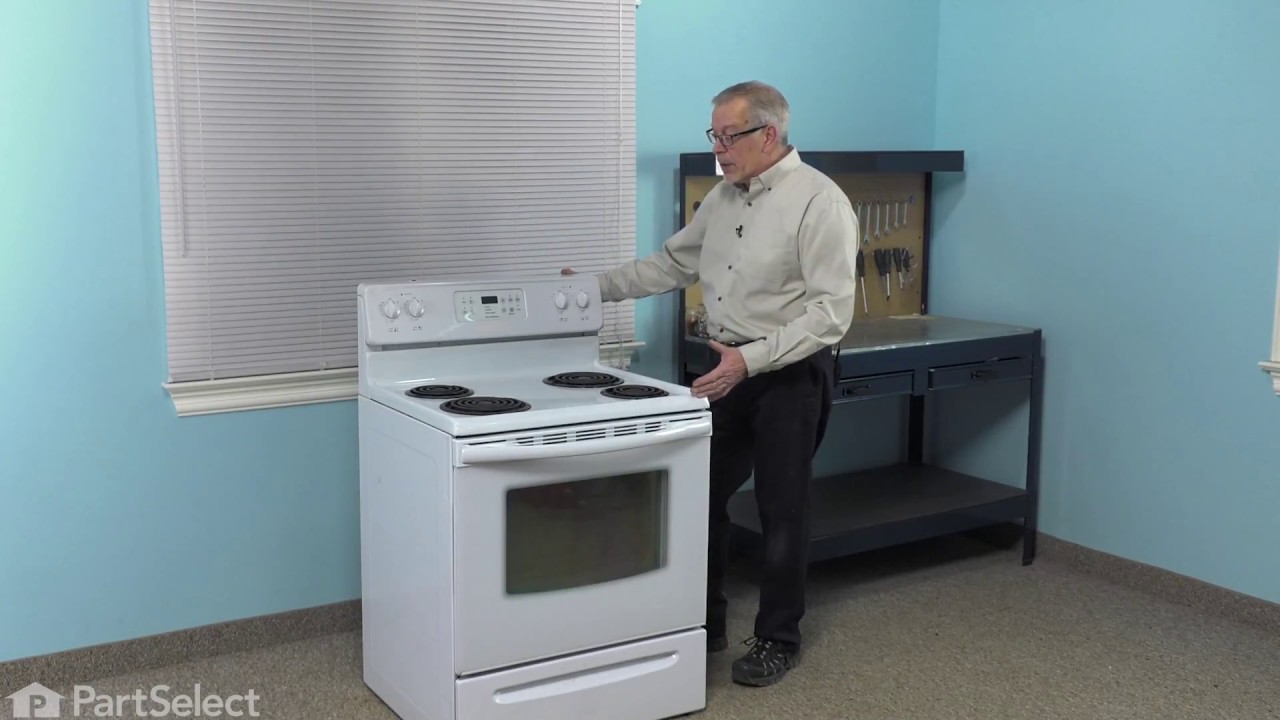
Replacing your Frigidaire Range Broil Element - 4000W
Troubleshooting
This part fixes the following symptoms:
Element will not heat
Little to no heat when broiling
This part works with the following products:
Range
Part# 316430900 replaces these:
AP3776987, 1062589, 316206800
Customer Reviews
Average Rating:
★★★★★
★★★★★
4 Reviews
4.0
Filter By Rating:
5 Stars
3
4 Stars
0
3 Stars
0
2 Stars
0
1 Star
1
Sort by:
< Prev
1
Next >
Search filter:
Clear Filter
Your search term must have 3 or more characters.
Keep searches simple. Use keywords, e.g. "leaking", "pump", "broken" or "fit".
Sorry, we couldn't find any existing reviews that matched. Try using some different or simpler keywords.
★★★★★
★★★★★
Robert S - August 20, 2021
Verified Purchase
broil element
Broil element. Part was perfect, installation video was priceless!
★★★★★
★★★★★
Carrie S - March 20, 2020
Verified Purchase
Just what I needed; got here fast
Was easy to find the right element on the website. I watched video and followed the instructions to remove old element and install new one. No problems and I was back baking in no time at all. Thanks for the great service.
★★★★★
★★★★★
Robert A - March 28, 2018
Verified Purchase
Fast and easy
Part select made this repair quick and easy, the site helped me diagnose the problem, the part I needed came quickly and was easy to install with one nut driver! The oven works great now!
★★★★★
★★★★★
Brian B - February 1, 2018
Verified Purchase
Broiler element
Part was correct but before I received it one of your personel told me it was not going to fix the problem. The new part cost to much, so bought a new oven.
< Prev
1
Next >
Installation Instructions
Average Repair Rating: 3.8 / 5.0, 4 reviews.
What's this?
Sort by:
< Prev
1
Next >
Search filter:
Clear Filter
Your search term must have 3 or more characters.
Keep searches simple. Use keywords, e.g. "leaking", "pump", "broken" or "fit".
Sorry, we couldn't find any existing installation instruction that matched.
Element burned out
Turned off power at breaker, took back off range, removed red and blue wires, removed oven door, removed two screws holding in broil element, removed wires supporting old element, installed new element and reversed procedure.
Stephen from AUGUSTA, ME
Difficulty Level:
Really Easy
Total Repair Time:
30 - 60 mins
Tools:
Nutdriver
1 personfound this instruction helpful.
Was this instruction helpful to you?
Thank you for voting!
top elment didn't heat
turned power off at fuse box took of back panel about8-10 nuts unhooked wires with pliers that went to element then took2 nuts out that held element up and 2nuts holding element took out and put new one in works great
gail from SIOUX FALLS, SD
Difficulty Level:
Really Easy
Total Repair Time:
30 - 60 mins
Tools:
Nutdriver, Pliers
4 of 5 peoplefound this instruction helpful.
Was this instruction helpful to you?
Thank you for voting!
Broil Element shorted out
I unplugged the Stove/Oven electrical cord from the wall, then removed the oven door by unlocking the door brackets with a flat head screw driver then closing the door to the last position before it closes and removing the door from the stove (found instructions on YouTube - very easy, which is optional), then removed the oven racks. Rem
... Read moreoving the door made it a lot easier to access the broil element and element support bracket screws using a socket wrench. I removed the screws from the rear cover on the back of the stove with a socket wrench to access and disconnect the broil element wires with my hand (pliers if needed). I removed the old broil element and inserted and reconnected the new broil element wires, then re-installed the rear cover. I tightened the broil element in place then re-installed the element support bracket and screws, replaced the oven racks, re-installed the oven door and plugged the stove into the wall. This took about twenty minutes and the broil element is working fine.
Read less
Frederick from Pompano Beach, FL
Difficulty Level:
Easy
Total Repair Time:
15 - 30 mins
Tools:
Screw drivers, Socket set
0 of 1 peoplefound this instruction helpful.
Was this instruction helpful to you?
Thank you for voting!
Odor when range turned on.
Unplugged unit and removed back panel with nut driver. Removed door, racks and unscrewed element braces from back of unit. Removed element and installed the new one. Reversed the process and then ran the unit through a preheat cycle to test it.
Garry from Morganton, NC
Difficulty Level:
Easy
Total Repair Time:
15 - 30 mins
Tools:
Nutdriver, Screw drivers
9 of 12 peoplefound this instruction helpful.
Was this instruction helpful to you?
Thank you for voting!
< Prev
1
Next >
Questions and Answers
We're sorry, but our Q&A experts are temporarily unavailable.
Please check back later if you still haven't found the answer you need.
8 questions answered by our experts.
Sort by:
< Prev
1
Next >
Search filter:
Clear Filter
Your search term must have 3 or more characters.
Keep searches simple. Use keywords, e.g. "leaking", "pump", "broken" or "fit".
Sorry, we couldn't find any existing answers that matched.Try using some different or simpler keywords, or submit your new question by using the "Ask a Question" button above!
Dan
June 27, 2019
Oven only heats up to 250 when set for 400 already replaced the sensor probe on the back does the broiler element control the main heat and does it need to be replaced
For model number Frigidare LGEF3045KFK
Hello Dan, thank you for your question. If the sensor probe was replaced but the unit still won't heat up correctly the electronic board would have to be replaced. The bake and broil elements do not control the main heat, the board and the sensor does. I hope this helps!
3 people found this helpful.
Did this question help you?
Thank you for voting!
Bert
October 2, 2019
If heating elements pass continuity test, does that mean that they're ok?
For model number LGEF3045KFK
Hello Bert, thank you for your question. Yes, if the elements show continuity they are ok. I hope this helps!
1 person found this helpful.
Did this question help you?
Thank you for voting!
Paul Cortright
October 24, 2019
Broiler element test good but when put control on broil element won’t heat. Test wires and they show voltage going to the element
For model number Lgef3045kf
Hello Paul, thank you for your question. If the element tested ok but the element will not turn on when you select the bake option the electronic board should be replaced which is Part Number: PS9494055. I hope this helps!
Did this question help you?
Thank you for voting!
Robin
July 8, 2021
My broil element has 120 volts going to it and through it. But does not get hot after minutes of it being on its still cool to the touch. It tests about 14.6 ohm. Is it a element or board issue
For model number CGEF3055MFE
Hello Robin, Thank you for the question. The Broil Element should read between 20 to 40 ohms. We hope this helps!
Did this question help you?
Thank you for voting!
DJ
December 13, 2021
OVEN ONLY GETS UP TO 200 AND THATS IT
For model number CGEF3055KFA
Hello Dj, Thank you for the question. We suggest testing the Oven Sensor with a Multimeter. Testing the temperature sensor probe on your oven is easy. With the sensor at room temperature, measure the resistance between the two prongs at the end of the sensor connector. The resistance of the sensor should read approximately 1080 – 1090 ohms at room temperature. We hope this helps!
HOW DO YOU CHECK THE HEATING ELEMENTS ,BROIL AND BAKE ? BY OHMS ? have replace the temperature sensor.
For model number FPEF3081KFC
Hello Tim, thank you for contacting us. Turn the multimeter to the lowest ohm settings. Connect its two probes to the terminals of the heating elements. A good element should give a reading in the range of 10-75 ohms. If the reading does not change or is out of the normal range, the element is likely to be defective. Customer service is always available to help you place an order if you are having trouble doing so. Good luck with your repair.
Did this question help you?
Thank you for voting!
Ben
March 7, 2023
My oven hit the F10 over-heat code so I unplugged it and let it cool down. turned on and cycled again to find that the top element only in the oven was not shutting off when the desired temp was reached. I will check resistance of top element when I get home but I think I need to replace that element, your thoughts?
For model number GLEFZ384GCA
Hi Ben, thank you for reaching out. According to our research, you need to check the oven temperature sensor, part number PS1528542, to fix this issue. First, test the temperature sensor for continuity with the multimeter to check if it's working correctly or not. There should be a resistance value between 1000 to 1100 ohms to be working correctly. Otherwise, the sensor is defective and you need to replace it. Additionally, if the issue still persists, then there may be an issue with the control board, and you need to replace the control board, part number PS2378933. We hope this helps, good luck with this repair!
Just install a new broil element and still got no heat the reading is 14 oms the reading should be 20 to 40 right? And the bake element is new and got 18 oms still not good?
For model number CGEF3077KBE
Hello Loïc, thank you for reaching out to us. According to our research, you will need to replace the control board, part number PS12364804, to fix the issue. The control board might be faulty, not giving enough power to the heating element to heat properly. We hope this information helps!
Item is in stock and is estimated to be delivered in 2-3 business days via Standard Shipping.
On Order
Item is not in stock and usually ships 3-5 business days from the time you place your order.
Special Order
Item is not in stock and usually ships 10-15 business days from the time you place your order.
NLA - No Longer Available
This item is no longer being made by the manufacturer, and cannot be added to your shopping cart.
[{"position":0,"name":"Home","title":"Home","url":"/"},{"position":1,"name":"Range","title":"Range","url":"/Range-Parts.htm"},{"position":2,"name":"Element or Burner","title":"Element or Burner","url":"/Range-Elements-and-Burners.htm"},{"position":3,"name":"316430900","title":"316430900","url":""}]
You added 1 item to your cart
✖
% OFF
$
$
Qty:
Total item(s) in cart:
Order Subtotal
$
*Taxes and shipping will be applied during checkout