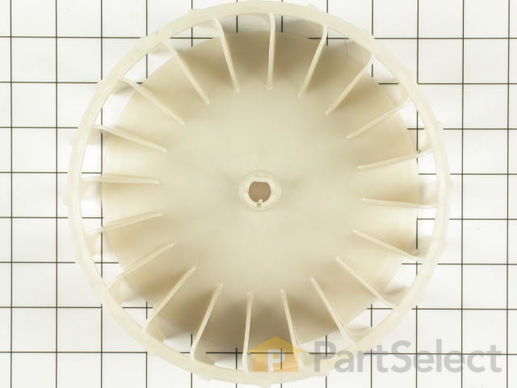
Part Location Diagram of 31001043 Whirlpool Blower Wheel - B/10 Models
See part 10 in the diagram
( Grid squares measure 1x1 inch )
Customer Service Representative

Get in touch, we're here to help!

Daily 8am - 9pm EST

customerservice@partselect.com

Blower Wheel - B/10 Models 31001043

★★★★★
★★★★★
8 Reviews

Rated by 10 customers 

Easy 

30 - 60 mins 

Ratings submitted by customers like you who bought this part.

$ 75.65
  In Stock
Get FREE EconoShip on orders over $100! T&C apply

Get this part fast! Average delivery time for in-stock parts via standard shipping: 1.8 days.

PartSelect Number PS2030820
Manufacturer Part Number 31001043
Manufactured by Whirlpool
Product Description

Blower Wheel - B/10 Models Specifications

This blower wheel is suitable for some clothes dryers of the 10 and earlier series. Manufactured to fit a 1/2 inch motor shaft, this blower wheel is 3-1/8 inches deep. The diameter of the wheel is 7-1/8 inches, and the spring clamp is not included.
How Buying OEM Parts Can Save You Time and Money

How Buying OEM Parts Can Save You Time and Money

Troubleshooting
This part fixes the following symptoms:
Noisy
This part works with the following products:
Dryer.
This part works with the following products:
Magic Chef, Norge, Maytag, Admiral.
Part# 31001043 replaces these:
AP4038116, 1371, 31001043, 31001043, 53-2045
Back to Top
Customer Reviews
Average Rating:
★★★★★
★★★★★
8 Reviews
4.8
Filter By Rating:
  • 5 Stars
    6
  • 4 Stars
    2
  • 3 Stars
    0
  • 2 Stars
    0
  • 1 Star
    0
Sort by:
  • 1
Sorry, we couldn't find any existing reviews that matched. Try using some different or simpler keywords.
  • 1
Customer Repair Stories
 Average Repair Rating: 3.5 / 5.0, 10 reviews. What's this?
Sort by:
  • 1
Sorry, we couldn't find any existing installation instruction that matched.
Dryer Blowere replacement
Used retatining ring pliers to remove the old blower wheel. Cleaned excess lint from that area and installed the new blower wheel by tapping it on with the aid of some PVC pipe to span the axle. Replaced the retaining ring...about 30 minutes ...easy and well worth it...The part purchase and selection was easy, and delivery was fast...glad these guys are around...thanks
  • Anthony from North Andover, MA
  • Difficulty Level:
    Really Easy
  • Total Repair Time:
    15 - 30 mins
1 of 2 people found this instruction helpful.
Was this instruction helpful to you?
Thank you for voting!
noise in dryer
popped front off took blower front off took fan off put new one on replaced cover & front. job done. ordered fan on thursday got it on friday great service.
  • william from melfa, VA
  • Difficulty Level:
    Really Easy
  • Total Repair Time:
    30 - 60 mins
  • Tools:
    Nutdriver, Pliers
3 of 4 people found this instruction helpful.
Was this instruction helpful to you?
Thank you for voting!
Dryer made weird harmonic noise
0) unplugged the dryer
1) lifted the top which put up a bit of a fight
2) removed a screw on each side of the front panel near the top
3) picked off the front panel from the lower clips
4) removed panel from in front of the blower
5) removed clip and snap rig
6) removed old blower and installed new one
7) reversed the disassembly procedure
This is the second replacement blower for this dryer. This blower was a much tighter fit than the first replacement so maybe the inner flat that the motor drives with will last longer. I actually had to pound the new blower onto the motor shaft.
  • Daniel from Trafford, PA
  • Difficulty Level:
    Really Easy
  • Total Repair Time:
    15 - 30 mins
  • Tools:
    Nutdriver, Pliers, Screw drivers
2 of 4 people found this instruction helpful.
Was this instruction helpful to you?
Thank you for voting!
Sounded like rocks tubling in dryer and kept getting louder
Lifted the top, then removed two screws holding on front panel, then removed cover holding this part in place, then used retaing ring plyers to remove the ring, then plyers to remove wheel clamp, took off the blower wheel. After that did everything in reverse to put it back together. And now the dryer is quite.
Other Parts Used:
Blower Wheel - B/10 Models Retaining Ring Blower Wheel Clamp
  • Jerrel from Houston, TX
  • Difficulty Level:
    Really Easy
  • Total Repair Time:
    15 - 30 mins
  • Tools:
    Nutdriver, Pliers
2 of 4 people found this instruction helpful.
Was this instruction helpful to you?
Thank you for voting!
Dryer was making horrible noise,
First I removed the 2 screws behind the door just below the slot for the lint trap(t-15 torx screws). I then popped the top of the dryer off using a flat tipped screw driver and using a 8mm. socket and extension I removed the 2 sheet metal screws from inside of the top corners of the front panel which attach it to the side panels. After that I could lean the front panel away from the unit and unplug the door switch being careful to mark the wires so I wouldn't have to take it apart again in the instance that I hooked them up wrong. I then leaned the front panel out a little more and lifted it off of the pins that lock the bottom of the front panel in. After that, I removed the sheet metal screws(8 mm.) that secure the fan housing cover and removed the old fan which was easy as it had spun the center out of itself and basically fell off, this is what was making all the racket. I removed the c-clip which rides in the groove at the end of the shaft with a flat tip and a pair of pliers, slid the new fan blade over the shaft, gave it a few light taps with the end of a hammer handle to seat it properly and installed the tension clamp with some pliers and popped the c-clip back on. I reversed the tear down procedures and reassembled the drier. Thanks to a little no-how, mechanical inclination, and the right parts, I was able to restore my drier to like new, virtually silent operation for about $40 as opposed to buying a new unit or paying a repairman $80 to $100 per hour plus parts to do the job. PartSelect.com made specifying and ordering the correct parts the first time a breeze and their prices are a bargain to boot.
Thanks,
Other Parts Used:
Blower Wheel - B/10 Models Blower Wheel Clamp
  • Tim from Jacobus, PA
  • Difficulty Level:
    A Bit Difficult
  • Total Repair Time:
    30 - 60 mins
  • Tools:
    Nutdriver, Pliers, Screw drivers
29 of 31 people found this instruction helpful.
Was this instruction helpful to you?
Thank you for voting!
center of blower wheel had become oval causing blowerr wheel to rub and create a screeching sound
Absolute First thing to do - Unplug drier from power source.
1st I looked up the parts drawing on line. 2nd Took the front of the drier off . It was held on by two
hex head screws. iIused a four-in-one screwdriver as a nut driver. 3rd. Lifted the front off the two post that held the front on, being careful not to strecth the wiring. 4th Took old wheel off, by removing snap ring with a pair of pliers,it came right of, no puller was needed because the hub was out of round. 5th Pushed the new wheel on, being sure to line up the "D" shape to match the motor shaft.
I could not push the wheel all the way on so I took a short piece of 1/2 copper tubing and used that to drive the wheel into place. The tubing fit over the motor shaft and was smaller than the hub. Be careful to tap the plastic wheel on, you do not want to crack the wheel. 6th Put snap ring on -with pliers. Reassembled front. Finished.
  • Joseph from Dighton, MA
  • Difficulty Level:
    Really Easy
  • Total Repair Time:
    30 - 60 mins
  • Tools:
    Nutdriver
2 of 3 people found this instruction helpful.
Was this instruction helpful to you?
Thank you for voting!
noisy blower wheel
unplug dryer---pop the top up---remove 2-1/4 metal screws that attach front to sides---unclip door switch & wires-lift up on front & set it aside--locate blower housing-remove 6-7 1/4 & 5/16 head metal screws--tough part is i had to buy a snap ring plier to get snap ring off motor shaft--use regular pliers,remove spring clip from blo-wheel hub--wiggle & pull blo-wheel from shaft--befoe re-assembling,,vac out all areas inside dryer case-carful not to damage wires & heat element--when clean re-assemble in order removed--also when ordering parts,,my dryer is series 11 (first two digits in serial #)--parts list showed wheel for series 10 & another for series 12---per instructions from a very nice lady on the other end of the parts select phone,always select the lower series--i my case,series 10
  • Ernie from St Ignace, MI
  • Difficulty Level:
    Easy
  • Total Repair Time:
    1- 2 hours
  • Tools:
    Nutdriver, Pliers, Screw drivers
9 of 10 people found this instruction helpful.
Was this instruction helpful to you?
Thank you for voting!
Fan worn and slips on shaft - very noisy
Unplug - use screwdriver to release top latches.
Raise top to more than 90 degrees - hard on hands or head if it falls. Remove wires from door swithch and remove front panel screws, lift off front cover. Remove screws from front paned of blower housing. Remove snap ring - shaft clamp already loose, remove old blower whee and install new one. Use DEEP(spark plug) socket tap new wheel onto shaft, replace clamp and snapring and reinstall panel on housing, put front panel back-install door switch wires before screws, replace top, plug in and test run.(note 1st word correction)
  • RONALD from SIOUX FALLS, SD
  • Difficulty Level:
    Easy
  • Total Repair Time:
    1- 2 hours
  • Tools:
    Nutdriver, Pliers, Screw drivers, Socket set
2 of 2 people found this instruction helpful.
Was this instruction helpful to you?
Thank you for voting!
Rattling sound at front of the dryer and noticable longer time to dry clothes
The hardest part of my repair was to move all the stuff (sh**) that had accumulated around the machine. We have had our Maytag dryer for 10+ years and a lot of things have been stacked or piled near it. Once the dryer was pulled out and the top could open, it was a matter of disconnecting the door light switch (just remove from clamp and pull out of the way),15 screws, 1 snap ring and a spring clamp. removal was simple, however installation was slightly harder because the new blower wheel's opening for the motors arbor was very tight. I had to use a hammer to drive it on the arbor, no hard hits but to hard to slip on. then another 10 mins to vaccum out all the lint. all together from start to finish was about 40 mins. If you have done any home repairs this job will be simple, hope this helps
  • Michael from Stockton, CA
  • Difficulty Level:
    Easy
  • Total Repair Time:
    30 - 60 mins
  • Tools:
    Pliers, Screw drivers
7 of 8 people found this instruction helpful.
Was this instruction helpful to you?
Thank you for voting!
blower wheel broken
unplugged the dryer.
opened it up.
unscrewed the housing that was holding the blower wheel.
removed the broken blower wheel.
placed the blower wheel on the shaft.
got a socket wrench and an extender to tap the blower wheel into place. I put a towel over the socket wrench so as to be gentle on the blower wheel. I tapped it down until I could fee the grove on the shaft where the washer used to go to hold in the old blower wheel (the new one has enough grip on its own to stay put).
put the housing back on after doing a few spin tests to make sure the blower wheel was spinning freely.
did some spin tests after putting the housing back on.
reassembled the dryer, plugged it in.
turned it on to test again.
done.
  • Aaron from Santa Rosa, AL
  • Difficulty Level:
    Easy
  • Total Repair Time:
    15 - 30 mins
  • Tools:
    Screw drivers, Socket set
6 of 7 people found this instruction helpful.
Was this instruction helpful to you?
Thank you for voting!
  • 1
Questions and Answers

Ask our experts a question about this part and we'll get back to you as soon as possible!

2 questions answered by our experts.
Sort by:
  • 1
Sorry, we couldn't find any existing answers that matched.Try using some different or simpler keywords, or submit your new question by using the "Ask a Question" button above!
Mark
November 6, 2017
May l use this part number
For model number YG205KV
PartSelect logo
Hi Mark, Thank you for your question. This part is listed underneath your model number as one that will work for you. So you would be able to use this part. Good luck with your repair.

1 person found this helpful.

Was this helpful?
Thank you for voting!
Michael
November 19, 2018
The fan is loose and makes sounds.
For model number JDG2000W
PartSelect logo
Hi Michael, thank you for your question. You may need to then tighten or check your blower fan. Here is an installation video for this part: https://youtu.be/Fxn2YBkAITM . I hope that helps. Good luck with your repair.

Was this helpful?
Thank you for voting!
  • 1
You May Also Need ?
Model Cross Reference
This part works with the following models:
PartSelect Number: PS2030820
Manufacturer Part Number: 31001043
Brand
Model Number
Description
Norge
7740A
Dryer - ELECTRIC DRYER
Norge
7741
Dryer - DRYER
Norge
7741A71
Dryer - DRYER
Norge
7744A
Dryer - ELECTRIC DRYER
Norge
7745
Dryer - DRYER
Norge
7745A71
Dryer - DRYER
Norge
7745A77
Dryer - DRYER
Norge
7748A
Dryer - ELECTRIC DRYER
Norge
7749
Dryer - DRYER
Norge
7749A71
Dryer - DRYER
Norge
7749A77
Dryer - DRYER
Norge
7750A
Dryer - ELECTRIC DRYER
Norge
7751
Dryer - DRYER
Norge
7751A71
Dryer - DRYER
Norge
7751A77
Dryer - DRYER
Norge
7761A-71
Dryer - LNC DRYER
Norge
7761A-77
Dryer - LNC DRYER
Norge
8740A
Dryer - GAS DRYER
Norge
8741A71
Dryer - DRYER
Norge
8744A
Dryer - GAS DRYER
Norge
8745A71
Dryer - DRYER
Norge
8745A77
Dryer - DRYER
Norge
8748A
Dryer - GAS DRYER
Norge
8749A71
Dryer - DRYER
Norge
8749A77
Dryer - DRYER
Norge
8750A
Dryer - GAS DRYER
Norge
8751A71
Dryer - DRYER
Norge
8751A77
Dryer - DRYER
Admiral
ADE20N3V
Dryer - Residential
Admiral
ADG20N3V
Dryer - Residential
Customer Service Representative

Get in touch, we're here to help!

Daily 8am - 9pm EST

Contact Customer Service