Your coupon for will be reflected when you check out!
✖
Your coupon for
✖
Hello!
You're visiting the PartSelect site in U.S.
Would you like to shop on the Canadian site?
Stay on this site
Go to Canadian site
✖
Model Number Locations
1Select Category Type
Select Category Type
2Select Product Type
Select Product Type
3Select {MODEL} Type
Select {MODEL} Type
Sample Model Number Tags
Model numbers can be made up of numbers (1005400, for example) or a combination of letters and numbers (LAT1000AAE). The model number will most likely appear on either a paper sticker or a metal plate. Your appliance's model number tag may look similar to the sample model number tags shown here (model number highlighted in yellow):
OEM stands for Original Equipment Manufacturer. Simply put, this means that the company who made your appliance is also supplying the replacement part for it.
OEM from PartSelect
Genuine brand name
Guaranteed to fit
Superior quality and durability
1 year warranty
Generic
Unknown manufacturer
No fit guarantee
Inconsistent quality and lifespan
Limited warranty and support
Troubleshooting
This part works with the following products:
Refrigerator
Part# 241685201 replaces these:
AP3959118, 1196677, 5304404343, 7241685201
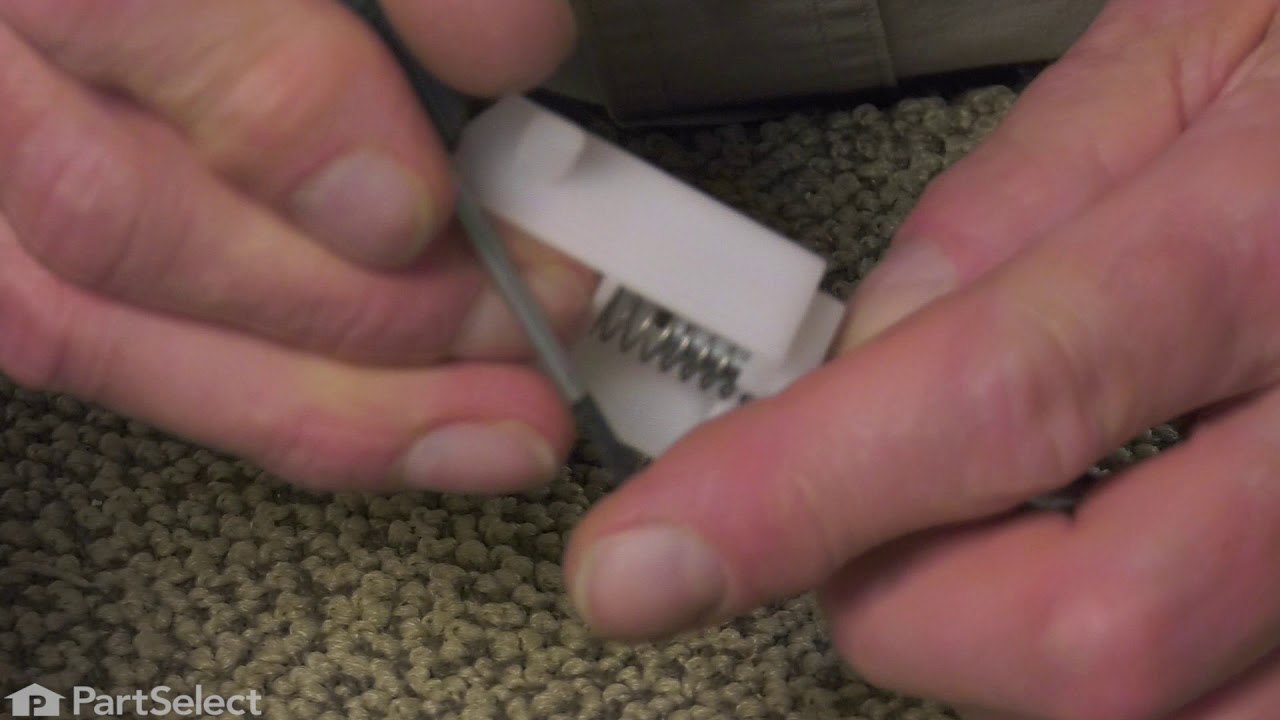
Installation Instructions
Average Repair Rating: 3.3 / 5.0, 1 reviews.
What's this?
Sort by:
< Prev
1
Next >
Search filter:
Clear Filter
Your search term must have 3 or more characters.
Keep searches simple. Use keywords, e.g. "leaking", "pump", "broken" or "fit".
Sorry, we couldn't find any existing installation instruction that matched.
Water Dripping from through the door water outlet and Ice Maker doesn't make ice.
I had two problems, the first was that water was dripping from the through the door outlet and the second problem is that the ice maker wasn't making ice.
Replacing the water valve was a simple process:
1. Turn off the water to the fridge at the household shutoff valve. 2. Move the fridge away from the wall.
... Read more/>3. Unplug the mains power (AC) plug from the wall power outlet. 4. Remove the 5 screws with a nut driver that hold the cardboard backing off the refrigerator. 5. (This is a great time to vacuum off the coils and underside of the fridge.) Disconnect the water supply from household plumbing with a box end wrench or channel lock pliers. I kept a large plastic cup and rag handy for the left over water in these hoses. 6. Remove the two screws from the water valve bracket on the right hand side and pull the water valve straight back from the fridge and line up the new valve in the same orientation. 7. Remove all the color coded electrical connectors (3 of them) and attach them to the new water valve. 8. Remove the remaining water hoses and attach them to the corresponding connectors on the new valve. 9. Dispose of the old valve and reinstall the new valve in reverse order.
The problem with the ice maker not making ice was because water was flowing so slowly from the valve that it was stopping in the fill tube at the back of the freezer and freezing stopping all water flow into the ice maker. I pulled the fill tube out of the back of the freezer from behind by rotating it 45 degrees counter clockwise and pulling straight out removing the ice blockage and drying the fill tube before I reinstalled.
Since I replaced the valve I had to take the cover off of the icemaker and set the water fill level down (screw toward the minus sign) and then adjusted it by checking the ice after each time it dropped and increasing the fill amount by 1 full turn (roughly 0.7 ounces) until it was just enough to make fully formed ice cubes.
Ask our experts a question about this part and we'll get back to you as soon as possible!
4 questions answered by our experts.
Sort by:
< Prev
1
Next >
Search filter:
Clear Filter
Your search term must have 3 or more characters.
Keep searches simple. Use keywords, e.g. "leaking", "pump", "broken" or "fit".
Sorry, we couldn't find any existing answers that matched.Try using some different or simpler keywords, or submit your new question by using the "Ask a Question" button above!
MARY ANN
January 20, 2018
Ice maker not making ice. Believe the auger rotation is out of sync with the drive mechanism but do not know how to correctly rotate auger & what position the cam needs to be in.
For model number NGS26ZZAW1
Hello Mary Ann, Thank you for your inquiry. There's no particular position the auger driver cam should be in, once the auger is connected to the motor it will turn, if the auger is not connected properly to the motor it would spin freely. I would test the auger motor and double check the fitting between the motor and the auger. You can test the motor with a multimeter. If you are unfamiliar with how a multimeter functions, there are YouTube videos available to assist you. Hope this helps!
2 people found this helpful.
Did this question help you?
Thank you for voting!
Dianna
December 30, 2022
My ice maker will not make crushed ice
For model number ffhx2325teo
Hello Dianna, thank you for your question. We suggest testing or replacing the Ice solenoid PS8691995. We have an installation video for you to access to see if this is a repair for you. We look forward to hearing from you soon.
My ice maker makes ice very well. I can not get it to come out of bin. My question prior to ordering a part is how do I know if it is a motor problem to auger problem
For model number FFHS2611LWMA
Hello Josie, Thank you for the question. if the Ice is not dispensing from the Bucket and the Auger Motor is not running to turn the Auger, we suggest testing to see if there is 120V at the motor. You can also test the Board. Check for 120 VAC at the dispenser control board, you should read 120 VAC across the J3 pin 3 and J3 pin 16 connector on the board, when the lever is pressed. We hope this helps!
Ice not coming through the chute.What could be the problem?
For model number FFSS2314QPBA
Hello Lorenza, thank you for your question. When your ice maker is not dispensing ice there could be a few problems. First, make sure the bail arm is down in the off position. Then check your filter. Your filter should be changed every 6 months. It could also be that your auger is frozen, stuck, or broken. Part number PS1991430. If you need help placing an order, our customer service is open 7 days a week. Please feel free to give us a call. We look forward to hearing from you!
Did this question help you?
Thank you for voting!
< Prev
1
Next >
✖
Ask a Question
Ask our experts a question on this part and we'll respond as soon as we can.


 – Part Number: 241649007")