Your coupon for will be reflected when you check out!
✖
Your coupon for
✖
Hello!
You're visiting the PartSelect site in U.S.
Would you like to shop on the Canadian site?
Stay on this site
Go to Canadian site
✖
Model Number Locations
1Select Category Type
Select Category Type
2Select Product Type
Select Product Type
3Select {MODEL} Type
Select {MODEL} Type
Sample Model Number Tags
Model numbers can be made up of numbers (1005400, for example) or a combination of letters and numbers (LAT1000AAE). The model number will most likely appear on either a paper sticker or a metal plate. Your appliance's model number tag may look similar to the sample model number tags shown here (model number highlighted in yellow):
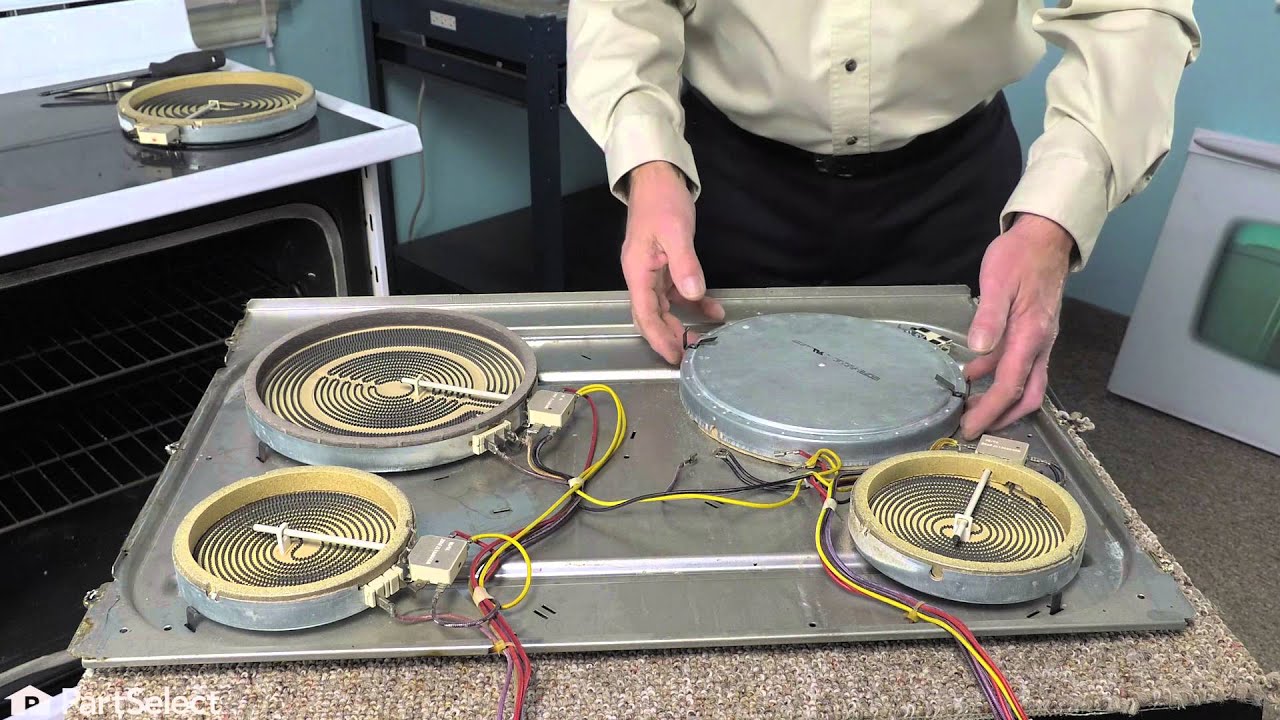
The Whirlpool ELMNT-SURF is a radiant surface element designed for enhancing your cooking experience. This genuine OEM part fits seamlessly with select models of Whirlpool, making it a trusted choice for maintaining your appliance's optimum performance. Due to its radiant surface technology, this surface element supplies the heat for your cooking, ensuring even distribution and precise temperature control. As it is a crucial part of your range, remember to unplug your range or shut off your house circuit breaker before the installation. For safety, do keep your work gloves on while handling this part. Trust the reliability of the Whirlpool ELMNT-SURF for your cooking needs.
How Buying OEM Parts Can Save You Time and Money
Why buy the real thing?
OEM stands for Original Equipment Manufacturer. Simply put, this means that the company who made your appliance is also supplying the replacement part for it.
Keep searches simple. Use keywords, e.g. "leaking", "pump", "broken" or "fit".
Sorry, we couldn't find any existing reviews that matched. Try using some different or simpler keywords.
★★★★★
★★★★★
Glen H - April 9, 2019
Verified Purchase
Easy repair and much cheaper than buying the entire cartridge.
I got the larger of the 2 burners in the cartridge for our Jenn Air cooktop range. Repair was simple, just unplug and remove the cartridge, remove 6 sheet metal screws on the back to expose the burners, unhook the wires, install the replacement and reconnect wires. The wiring was a bit different from the original but simple to figure out using the new short wire included with the replacement burner.
★★★★★
★★★★★
Jeffrey R - October 7, 2020
Verified Purchase
Not exact match
There were 4 connectors instead of just 2 that were on the original part. Once I figured out what the right 2 were after getting shocked it worked fine.
★★★★★
★★★★★
William P - July 3, 2018
Verified Purchase
Wrong replacement part
The part that was sent was supposed to replace the original. It would not because the conniection had to be cut and soldering. I return for credit.
< Prev
1
Next >
Installation Instructions
Average Repair Rating: 4.3 / 5.0, 6 reviews.
What's this?
Sort by:
< Prev
1
Next >
Search filter:
Clear Filter
Your search term must have 3 or more characters.
Keep searches simple. Use keywords, e.g. "leaking", "pump", "broken" or "fit".
Sorry, we couldn't find any existing installation instruction that matched.
Radiant burner not heating
Very easy just followed manufacturers instructions.
John from KENT, NY
Difficulty Level:
Really Easy
Total Repair Time:
30 - 60 mins
Tools:
Screw drivers, Socket set
1 personfound this instruction helpful.
Was this instruction helpful to you?
Thank you for voting!
Electric coil burned
The repair was easy but the replacement coil had 4 connections while the old one had only two. After calling the distributor with no explanation of how to solve the problem I was given a telephone number of Jenn Air. They explained that my unit was too old and they no longer provided the part I needed. I then decided to do the follow
... Read moreing. Of the 4 connections on the replacement coil, two are larger and two are smaller. I then decided to connect the wires to the two larger connections leaving the small ones free. I replaced the cooktop and WOW it worked. Not sure what the smaller connectors are used for but with old cooktops it seems they are not needed. I can submit a photo but have no means to do it here
Read less
George from LEXINGTON, MA
Difficulty Level:
Really Easy
Total Repair Time:
30 - 60 mins
Tools:
Nutdriver, Pliers
5 of 5 peoplefound this instruction helpful.
Was this instruction helpful to you?
Thank you for voting!
Heating element not working on one burner
Removed module replaced radiant element very easy repair.
James from FLORISSANT, MO
Difficulty Level:
Very Easy
Total Repair Time:
Less than 15 mins
Tools:
Nutdriver
3 of 3 peoplefound this instruction helpful.
Was this instruction helpful to you?
Thank you for voting!
Element burned up
This is a two module cook top That I have, 2 burners in each module. I took it apart take the damaged one out and replaced with the new one, put it back together and turn it on. Heeeyyyy it works. Thanks.(and I'm not an electrician)
Walter from LEWISVILLE, TX
Difficulty Level:
Really Easy
Total Repair Time:
30 - 60 mins
Tools:
Pliers, Screw drivers, Socket set
3 of 3 peoplefound this instruction helpful.
Was this instruction helpful to you?
Thank you for voting!
large element failed
Easy removal (lift and pull) of the the two element unit from the Jenn-air stove top. Placed unit right side up on a work surface. used a nut driver to remove 12 screws from the unit. removed the glass cook-top, revealing the two elements. Un-hooked two wires off the old damaged element, placed wires (plug and play) onto the new unit, th
... Read moreen replaced the glass cook-top, used the nut driver to replace the 12 screws. Pluged the unit back into the Jenn-air stove top.
Read less
Charles from Mamaroneck, NY
Difficulty Level:
Really Easy
Total Repair Time:
Less than 15 mins
Tools:
Nutdriver
13 of 28 peoplefound this instruction helpful.
Was this instruction helpful to you?
Thank you for voting!
Range element shorted out
I priced a new two-burner unit and it was going to cost $300. I took the broken unit apart, saw that it was an element that had suffered catastophic failure and found partselect on the internet. $60 and three days later I had the part in hand. The repair was "a piece of cake." Thanks for saving me a lot of money.
Dennis from Seattle, WA
Difficulty Level:
Really Easy
Total Repair Time:
Less than 15 mins
Tools:
Nutdriver
13 of 28 peoplefound this instruction helpful.
Was this instruction helpful to you?
Thank you for voting!
< Prev
1
Next >
Questions and Answers
We're sorry, but our Q&A experts are temporarily unavailable.
Please check back later if you still haven't found the answer you need.
4 questions answered by our experts.
Sort by:
< Prev
1
Next >
Search filter:
Clear Filter
Your search term must have 3 or more characters.
Keep searches simple. Use keywords, e.g. "leaking", "pump", "broken" or "fit".
Sorry, we couldn't find any existing answers that matched.Try using some different or simpler keywords, or submit your new question by using the "Ask a Question" button above!
Jihe
August 4, 2018
I guess this is the replacement part for jenn air a122. My question is how to install this since it got four connectors but my original jenn air part got only two connectors. Thanks
For model number A122
Hi Jihe, Thank you for your question. Unfortunately we do not have anything for this model directly however we do have a video that shows how to install this part: https://www.youtube.com/watch?v=_kPOgh3lX_Q&t=2s. I hope that helps. Good luck with your repair.
1 person found this helpful.
Did this question help you?
Thank you for voting!
Luis
December 24, 2019
Instructions to put the wires back.
Hi Luis,
Thank you for your question. Here is a link to one of our videos from our YouTube that you may reference on how to install the radiant surface element, https://www.youtube.com/watch?v=_kPOgh3lX_Q. The stove in the video may not show exactly like the one you have, but it will give you a general idea on how to install the part. We hope this helps. Thank you and have a great day!
Did this question help you?
Thank you for voting!
Daniel
September 27, 2022
My 8 inch halogen burner needs replacement, but doesn't necessarily need to be halogen. Looking at images, the wire configuration on my burned out burner is the same as your 6 inch model. How would I hook up the replacement burner using your 8 inch model?
For model number AH150
Hello Daniel, thank you for contacting us. We have researched the model you have provided and have found that the part you are looking for is part number PS11764908. If you would like assistance placing an order, please contact customer service. Good luck with your repair!
I am replacing the elements in my Whirlpool cooktop.. part nos ps11764903 and ps11764910..will i need any other parts to complete this repair? nuts, screws, element support, clips?
For model number RCM30DB13
Hi Vicki, thank you for your question. If you also need to replace those parts then you may need to purchase them as well. However if they are not broken then you should not need to replace them. I hope that helps. Good luck with your repair.
Did this question help you?
Thank you for voting!
< Prev
1
Next >
Model Cross Reference
This part works with the following models:
PartSelect Number: PS11764903
Manufacturer Part Number: W10823693
Item is in stock and is estimated to be delivered in 2-3 business days via Standard Shipping.
On Order
Item is not in stock and usually ships 3-5 business days from the time you place your order.
Special Order
Item is not in stock and usually ships 10-15 business days from the time you place your order.
NLA - No Longer Available
This item is no longer being made by the manufacturer, and cannot be added to your shopping cart.
[{"position":0,"name":"Home","title":"Home","url":"/"},{"position":1,"name":"Cooktop","title":"Cooktop","url":"/Cooktop-Parts.htm"},{"position":2,"name":"Element or Burner","title":"Element or Burner","url":"/Cooktop-Elements-and-Burners.htm"},{"position":3,"name":"W10823693","title":"W10823693","url":""}]
You added 1 item to your cart
✖
% OFF
$
$
Qty:
Total item(s) in cart:
Order Subtotal
$
*Taxes and shipping will be applied during checkout