Your coupon for will be reflected when you check out!
✖
Your coupon for
✖
Hello!
You're visiting the PartSelect site in U.S.
Would you like to shop on the Canadian site?
Stay on this site
Go to Canadian site
✖
Model Number Locations
1Select Category Type
Select Category Type
2Select Product Type
Select Product Type
3Select {MODEL} Type
Select {MODEL} Type
Sample Model Number Tags
Model numbers can be made up of numbers (1005400, for example) or a combination of letters and numbers (LAT1000AAE). The model number will most likely appear on either a paper sticker or a metal plate. Your appliance's model number tag may look similar to the sample model number tags shown here (model number highlighted in yellow):
Model has been saved to My Models. If you're not signed in, your lists are available on this device and will expire within 30 days.
Model has been saved to My Models.
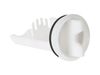
This is a knob designed for use with washing machines. This knob is used to select, adjust, and change the various settings of your washer cycle. This knob is made of plastic with a chromated finish, ...
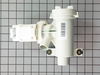
This pump helps expel water from the washing machine and is activated after the spin speed is maintained for a specific period of time. This pump has sound isolation mounting washers and a filter.
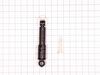
This washer shock absorber is designed to reduce vibrations and stabilize the movement of the outer tub during operation, helping to ensure quieter and smoother performance. It plays a crucial role in...
This washer drive belt connects the motor to the drive system, enabling the drum to spin during wash and spin cycles. Designed with a 7-ribbed, 6-grooved structure, it ensures efficient power transfer...
This door plunger detects proper door closure to ensure safe and correct appliance operation. Reliable engagement prevents start failures or unexpected interruptions. Replacing a faulty plunger restor...
This washing machine door lock is a genuine OEM safety component designed for select GE models. It secures the washer door during operation, preventing it from opening mid-cycle and ensuring safe, uni...
Enhance the functionality of your GE appliance with this high-quality inside drain hose. This integral component plays a vital role in facilitating the efficient draining of your appliance. Expertly d...
This drive pulley kit is a critical component that transfers power from the motor to the washer drum via the drive belt, enabling smooth agitation and spin cycles. Designed for durability and a precis...
Imagine the ease of cooking with a perfectly functioning cooktop, courtesy of our genuine Whirlpool Infinite Burner Switch. This authentic OEM part will seamlessly fit your Whirlpool model, promising ...
Remove the front coverfrom the machine. This is done by removing the 3 screws at the bottom of the panel. The panel then drops down and pulls straight off. The pump is located on the front right wall of the of the machine. You will notice a 2-3 inch diamete threaded cap on the right side of the front wall of the machine. This is the f
... Read moreront of the pump and access to the filter. Place a large bucket under this cap and slowly loosen the cap. All of the water remaining in the machine will begin to drain (this could be a lot of water. Do not remove the cap completely so that you can quickly stop the flow of water if needed). Once all water is drained from the appliance, Disconnect the two hoses from the pump using a pair of pliers to looses the presure clamps, sliding the clamps back an then pulling off the hoses (be careful of any remaining water in the hoses). Then remove the two screws from the rear base of the pump that secure it to the bottom floor panel of the washer. Slide the pump slightly to the rear to free it from the fittings on the front wall of the machine and the lift the pump up. At this point, firmly pull out the wiring harness plugged into the top right side of the pump. Install the new pump by plugging in the wiring harness and resecuring the pump. Plug in the machine and run on the rinse and spin cycle to test.
I took the two drain hoses off with the pliers then only two screws that holds the pump. After that the two hot wires which are black and white. But remember to unplug you're washer since the pump is not grounded you don't want to risk being shocked. Hope thi helps. Plus i saved around 250.00 by repairing myself.
~Unplugged ~Removed front bottom and rear center panel ~Removed broken dampers. Varying difficulty; other components in the way. Used socket to help push pin out with screwdriver and pliers to help remove the pin. ~Installed New Dampers: Used Small (6") crescent wrench for top. Fitting two (2) hands in there, one to h
... Read moreold and one to turn was a challenge for all four (4) dampers. Had to extend a couple to wedge to damper in there to hold the arrow hear flush. Installing the pins in the bottom was somewhat easier than the top. I broke the retaining pin completely off an old pin to align the new damper to the base mounting hole (hard to see in there). Used Pliers, a long screwdriver and rubber mallet. Note my situation was in a very small room. So small I had to remove the door to the room so that I could pull the washer out to get behind it. The warnings about sharp edges should not be ignored! Long sleeves (chainmail) and steel fish fillet gloves might help!