Your coupon for will be reflected when you check out!
✖
Your coupon for
✖
Hello!
You're visiting the PartSelect site in U.S.
Would you like to shop on the Canadian site?
Stay on this site
Go to Canadian site
✖
Model Number Locations
1Select Category Type
Select Category Type
2Select Product Type
Select Product Type
3Select {MODEL} Type
Select {MODEL} Type
Sample Model Number Tags
Model numbers can be made up of numbers (1005400, for example) or a combination of letters and numbers (LAT1000AAE). The model number will most likely appear on either a paper sticker or a metal plate. Your appliance's model number tag may look similar to the sample model number tags shown here (model number highlighted in yellow):
WM6998HBA (ABLEEUS) LG Washer Dryer Combo - Overview
Save your modelModel Saved!
Save your model for later to make things easier.
Model has been saved to My Models. If you're not signed in, your lists are available on this device and will expire within 30 days.
Model has been saved to My Models.
This is a locking pin, and it works in conjunction with your washer. The part measures to be roughly 3 inches long, and less than an inch wide. The pin is cylindrical, off-white in color, and made ent...
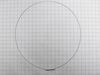
This is an outer seal clamp designed for use within LG washing machines. This clamp tightens and secures the gasket that seals the washer tub from the door. If your gasket is loose fitting and is not ...
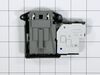
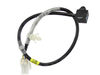
This is a door lock switch, compatible with various models of LG washing machines. This door lock switch is designed to communicate to the control board when the door of the washer is closed, so the d...
This part is the replacement rear tub gasket for your washer. It is made of black plastic and is approximately 3-1/4 inches in diameter. The rear tub gasket forms a watertight seal between the rear tu...
This drain hose plug, also known as a hose cap, is a genuine OEM part for your washing machine. This plug caps the drain hose from the pump housing, and helps prevent leaks from your washer. Before be...
This ball bearing and seal set is a crucial component in your washing machine’s tub assembly, designed to support smooth and stable drum rotation during wash and spin cycles. The bearing minimizes fri...
This heating element assembly warms water during wash cycles to improve cleaning performance. It's designed to deliver steady, consistent heat so your laundry comes out fresh and thoroughly cleaned.
Ask our experts a question about this model and we'll get back to you as soon as possible!
1 question answered by our experts.
Sort by:
< Prev
1
Next >
Search filter:
Clear Filter
Your search term must have 3 or more characters.
Keep searches simple. Use keywords, e.g. "leaking", "pump", "broken" or "fit".
Sorry, we couldn't find any existing answers that matched.Try using some different or simpler keywords, or submit your new question by using the "Ask a Question" button above!
Laura P
March 14, 2026
Won’t drain but drain pump has been replaced and is functioning
For model number WM6998HBA
Hello Laura, thank you for the question. Check the drain pump filter. Unplug the washer and empty the small drainage hose near the pump filter. Remove the filter and check for debris, even if it looks clean inside. Inspect the sump hose. The ribbed hose connecting the tub to the pump is a common spot for small items to get trapped. Check the drain hose. Ensure the external drain hose is not kinked, pinched, or clogged. Ensure it is not pushed too far down the standpipe, which can cause siphon issues. Check the pressure switch, part number PS12581329. It could be faulty, not draining the unit properly. We hope this is what you were looking for!
I removed the Wire and spring from the tub seal and then removed the seal on the side of the washer that contains the Door switch. I removed the two screws that held the door switch in place while holding the switch with my other hand. Once the screws where out I pulled the switch assembly out thru the gap and removed the wires from old
... Read more assembly. I then plugged the wires into the new assembly aligned the holes up and put the screws back in the new door switch assembly. I then put the door seal and tub seal holder back on. This took about 15 minutes. I do recomend that you unplug the washer before starting this process.