Your coupon for will be reflected when you check out!
✖
Your coupon for
✖
Hello!
You're visiting the PartSelect site in U.S.
Would you like to shop on the Canadian site?
Stay on this site
Go to Canadian site
✖
Model Number Locations
1Select Category Type
Select Category Type
2Select Product Type
Select Product Type
3Select {MODEL} Type
Select {MODEL} Type
Sample Model Number Tags
Model numbers can be made up of numbers (1005400, for example) or a combination of letters and numbers (LAT1000AAE). The model number will most likely appear on either a paper sticker or a metal plate. Your appliance's model number tag may look similar to the sample model number tags shown here (model number highlighted in yellow):
Model has been saved to My Models. If you're not signed in, your lists are available on this device and will expire within 30 days.
Model has been saved to My Models.
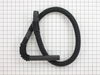
The tub dampening straps support the wash tub and reduce vibration by keeping the tub at the center of the cabinet. If your washer shakes and moves, or is making a loud banging noise during the wash c...
The drain hose is black in color and made of flexible material. This is a part for your top-load washer. The hose measures 57 inches long. This part moves the water out of the washer and into the drai...
This is a dual-action agitator for a washer. It is an OEM replacement part that is sourced from the manufacturer. The agitator tosses your clothes to clean them efficiently. This plastic dual-action a...
This pump helps expel water from the washing machine and is activated after the spin speed is maintained for a specific period of time. If you notice that your washing machine will not drain, there is...
The main tub seal is located between the transmission and the outer tub. Its the primary water seal in the outer tub for the transmission-shaft. If your washer is leaking during the fill cycle, or at ...
This lid switch with wire harnesses is used in washing machines. The pin on the lid switch pushes onto the lever of the switch to communicate to the machine that the washer lid is closed. If your wash...
This is the start/stop button for your washer. If your washer will not start after the button is depressed, you may need to replace it. However, you may also want to check your door switch, because wh...
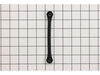
This part is a replacement socket rod support for your washer. The socket rod support is found at the top of the washer frame in the front part of the washer. It supports the suspension rod, so the ro...
After removing frt panel which prys off I checked for anything obvious like a loose belt. Then I jiggled the magnet switch located on the inside of the loading cover. I saw the machine start agitating the it stopped again when I stopped touching it. I ordered the new part and spliced it in with the wire crip tool. Now the machine is A ok.
Aside from getting the wet clothes and most of the water out,the toughest part of the job for me was to figure out how to get inside the machine. I nearly wrecked the thing trying to lift the top panel. After some frustration I removed the star-type screws on back of the control panel and found, tucked away neatly, the documentation/parts
... Read more list complete with instructions on how to remove the FRONT panel. Once I got inside it was easy to locate the pump. I ran the drain cycle for a moment to see if the pump turned at all. The original had an exposed fan so it was easy to see that indeed the motor was not turning. I inspected all the hose and electrical connections to make sure I had the tools I'd need and the savvy to replace the part(s) if I could locate them. I'm not much of a web-head, so I was a little surprised when I typed G.E. appliances and the search took me to partselect.com where I was pretty much coached through the procedure before I even ordered the part. The box arrived ahead of schedule (yay) and when I looked at the pump it didn't look much like the one I was replacing. But then I realized it was the same thing just ten years more advanced. I used a small pair of vise grips to pinch and lock the pipe clamps open. I know there is a plier made for this, but... Anyways, after loosening the clamps and sliding them away from the pump I pulled the hoses off and let the last of the rinse water still in them run down my shirt sleeve to my elbow. (optional, not recommended) Thus refreshed I then rummaged through my socket set and found what I needed to remove the 2 sheet metal mounting screws and disconnected the 2 power leads. I removed the faulty pump and proudly showed it to my wife. Unimpressed, she asked how much longer. I quickly reversed the procedure to install the new unit and confidently piled in a load of laundry. The cycle completed just fine and has done so since. I will and have recommmended partselect.com to friends and will use it again for sure.
To diagnose, first I unhooked the washer: power, water supply, and drain pipe. I then slid the washer out, laying it on its front. With nutdriver, I unscrewed two screws that held the other end of the drain tube and removed it completely. Then, again with the nutdriver removed 4 screws from the back near the legs, two in between the leg
... Read mores in the middle, and approx. 4 to 6 on the bottom. This let me pull the bottom off partially to access the motor area. (I did did not take the bottom completely off, only about 2/3 off and let it bend over, as it was flexible tin) The belt was broken. After receiving the new belt, I positioned it between the pulley and the motor and between the drum and the big pulley. Then I rotated the big pulley, pulling the belt onto it as I rotated. At the same time, as I rotated, I pulled the other end of the belt on to the little pulley. Once it was on, I would put pressure on it as I turned the pulley, to jump the belt to the appropriate grooves on the little pulley. Note: the replacement belt had been modified, so it had one less groove than the pulley. I would have known this if I had read the insert that came with the belt first! Anyway, this was not a problem, only a design change. Also it was important to start the belt on the inside, so if it slipped, you didnt loose your bite. Total diagnostic, repair, and reassembly time: 30 minutes plus or minus. I had read other online forums that said you had to loosen the motor, etc. And I do know some type of a belt installation tool was offered on line, but I got along fine with my installation method. An extra set of hands would have been helpful, but not necessary.