Your coupon for will be reflected when you check out!
✖
Your coupon for
✖
Hello!
You're visiting the PartSelect site in U.S.
Would you like to shop on the Canadian site?
Stay on this site
Go to Canadian site
✖
Model Number Locations
1Select Category Type
Select Category Type
2Select Product Type
Select Product Type
3Select {MODEL} Type
Select {MODEL} Type
Sample Model Number Tags
Model numbers can be made up of numbers (1005400, for example) or a combination of letters and numbers (LAT1000AAE). The model number will most likely appear on either a paper sticker or a metal plate. Your appliance's model number tag may look similar to the sample model number tags shown here (model number highlighted in yellow):
Model has been saved to My Models. If you're not signed in, your lists are available on this device and will expire within 30 days.
Model has been saved to My Models.
The Dryer Thermal Fuse (Thermal Cutoff, Temperature Fuse) is a 2 by ½ inch, white, plastic safety mechanism that stops the flow of electricity to the motor circuit when a dryer overheats. If the fuse ...
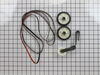
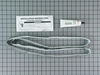
This dryer drum belt (Whirlpool Dryer Belt, Drive Belt) has four ridges, three grooves and is 1/4" wide, and 92 1/4 inches in length. It comes in black and is made of rubber. The belt transfers the ro...
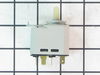
This thermostat (Dryer Operating Thermostat, Dryer Cycling Thermostat, Cycling Thermostat, Dryer Thermostat) is used to maintain a temperature of 155 degrees in the dryer drum. The internal bias heate...
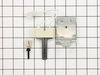
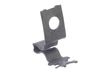
The drum support roller kit (Dryer Repair Kit) allows the dryer to tumble properly by supporting the drum cylinder. The idler pulley provides the tension required for a multi-ribbed belt. The belt att...
The drum support roller kit allows the dryer to tumble properly by supporting the drum cylinder. The kit includes two drum rollers, four tri-rings, and one palnut (or retaining washer). The kit does n...
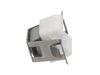
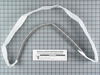
This white OEM dryer door handle is used to open and close the dryer's door. Comprised of plastic and 6-by-2-inches in dimension, the handle is sold individually and attaches to the dryer door. Your d...
This manufacturer-certified dryer lint filter is used to collect lint during the dryer cycle, to prevent damage to the machine and to prevent lint from sticking to clothes. This model comes in white a...
This part provides the tension required for a multi-ribbed belt. It also helps the belt rotate the drum and attaches to the idler pulley wheel. If your dryer will not start or tumble, takes too long t...
If your dryer will not heat, takes too long to dry, or does not provide enough heat, you might want to replace your igniter kit. This silicone carbide igniter with ceramic holder kit includes the 3-in...
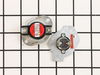
This kit includes a high-limit thermostat rated at 250°F and a thermal cut-off fuse rated at 360°F, both designed to prevent overheating in dryers. The thermostat monitors internal temperatures and in...
If you notice that your dryer is noisy or will not tumble, you may need to replace the tri ring. This part is triangular, and is less than an inch in size. Tri rings can be found both on the idler pul...
If your gas dryer is not heating up or igniting, then replacing the flame sensor, located in the burner assembly, could solve it. This part senses heat from the igniter to monitor if it is hot enough ...
$35.80
In Stock
Order now and your part arrives by Apr 23
Questions And Answers for WGD4815EW2
Ask our experts a question about this model and we'll get back to you as soon as possible!
18 questions answered by our experts.
Sort by:
< Prev
1
2
3
Next >
Search filter:
Clear Filter
Your search term must have 3 or more characters.
Keep searches simple. Use keywords, e.g. "leaking", "pump", "broken" or "fit".
Sorry, we couldn't find any existing answers that matched.Try using some different or simpler keywords, or submit your new question by using the "Ask a Question" button above!
Ed
January 9, 2020
Dryer runs, heats, drys clothes, but will not shut off. The timer dial does not advance when set on timed dry or sensor dry settings. I usually use the sensor setting and found it not shutting off, so i used the timed setting to see if possibly the sensor was not signalling the timer to advance. The timed setting also did not advance. As i said, the dryer heats, tumbles & drys the clothes as usual, but the timer does not signal to shut down. Is the timer bad?
For model number WGD4815EW2
Hello Ed, thank you for your question. The most likely issue is a bad timer. If the unit works, but the timer doesn't advance or shut off when the cycle is off the timer is what we would recommend replacing first. I hope this helps!
8 people found this helpful.
Did this question help you?
Thank you for voting!
Dennis
January 10, 2022
The handle to open the dryer broke and no replacement seems to be available.
For model number WGD4815EW2
Hello Dennis, Thank you for your inquiry. We have researched the model number you have provided and show the door handle as part# PS11731583. If you need help placing an order, customer service is open 7 days a week. Please feel free to give us a call. We look forward to hearing from you!
Why dose my dryer not shut off even when you set timer the timer doesn't move when it use to
For model number WGD4815EW2
Hello Bob, thank you for contacting us. We would recommend checking the following parts to fix your issue: Cycling Thermostat, part number PS11741405, Thermal Fuse, part number PS11741460, and Timer, part number PS11749830. We hope this helps! If you need help placing an order, customer service is open 7 days a week. Thanks again for your great question.
I need a new timer control knob. The plastic piece on the shaft just below the face of the knob broke and cracked. The other cracked piece is on the metal plate that the knob connects to. What exactly do I need ? Thanks.
For model number WGD4815EW2
Hi Brian, thank you for the question. You need to replace the timer control knob, part number PS16221236. You may only need to replace the D-shaped knob insert, part number PS11746209. We hope this is what you were looking for!
Hi there! Our dryer will start and run for a few minutes, then shut off. When we open it, the clothes are super hot and drier than usual in the short amount of time. Can you help us figure out what to try first? We have used this site before and successfully replaced a belt on our own last February and have found it super useful and cost-effective! Great videos, too! Thank you!
For model number WGD4815EW2
Hi Olympia, thank you for your question! Thanks for your positive review. If your dryer’s internal duct has a blockage, hot air becomes trapped inside the machine. Secondly, if the transition hose that connects your dryer to the wall is kinked or partially clogged with lint, it will reduce the pace at which the hot air escapes the dryer, causing internal operating temperatures to rise. There may also be a lint blockage in part or all of the dryer duct/vent system. Excessive lint within the dryer vent system can reduce airflow. To ensure proper dryer performance, you should properly clean both your dryer and venting system periodically. Restricted airflow is the number one cause of dryers overheating. If this is not the issue, we would recommend checking the thermal fuse, part number PS11741460. Good luck with your repair!
First I unplugged the dryer, then removed the back panel, this exposed most all of the wiring and I could see the heater coils. Not knowing what the problem was I started looking at the coils and could not see any broken parts. So then checked the thermal fuse for continuity I removed the two wires from it with a small pair of
... Read moreneedle nose pliers, it was held in place by two screws, once they were removed the fuse came out easily, I checked continuity with a volt meter placing the meter on X1 Ohms and could not get a reading. I replaced with a new one and put it all back together the way I took it apart. Then I plugged it in and it worked first time, I now have warm dry clothes.
Removed the two screws that attatch the lent channel to the top of the dryer, then lifted the top of the dryer by pushing in on the two locking tabs located at the front , left and right , corners of the dryer top with a small flat head screw driver. The top of the dryer will fold back out of the way. At this point I removed the two 1/4 i
... Read morench screws that are located on the inside of the dryer front left and right corners that hold the front panel/door to the two side panels. Now I was able to lift the front panel up and set it to the side. The bottom of the front panel that contains the dryer door that I just removed was held on the bottom by two clips that slide into slots on the front panel and did not require any removal to disconnect the bottom of the front panel, just pull up on the front panel. Since the tub was held in place by floating on a seal at the back of the dryer and a seal on the front panel , which I just removed the tub is now free floating except for the two alignment roller wheels at the bottom of the tub. It is easier if you lay the dryer on its back at this point with front of the tub pointing up. I pulled the tub out and cleaned the years of built up lent and removed all the pieces of the old , destroyed, belt. Note, the belt tentioner is located at the front of the motor which on the bottom right hand side. If your belt is broke like mine the tensioner may/will fall to the back of the dryer when you tilt it back, but do not worry. Once the dryer was cleaned up I put the tub back in place , still on its back and made sure the two alignment rollers were in place and rolled freely when the tub was turned by hand. Another note, my original belt tensioner did not have a rolling wheel that the belt rode on , but was a semi-circle smooth surface that the belt remained in constant friction with when the dyer was running, so I made sure the replacement tensioner I ordered with my new belt did have a rolling wheel that the belt would ride on, which I believe will reduce wear and extend the belt life. The new belt came with a diagram of the belt and tensioner routing which was helpful. Note: do not take the tensioner wheel off/apart when trying to route the belt. Follow the instructions routing diagram. The tensioner is held in palce by inserting the bottom back half into the slot in the bottom floor of the dryer making sure it is aligned with the belt pully on the shaft of the dryer motor. The dryer is still on its back side. Now, it was easier for me to route the belt around the center of the tub, following the marks from the original belt, and hold in in place in a few spots with masking tape and then route it thru the tensioner and onto the front pully of the motor. Make sure you have the grooves of the belt against the tub and the grooves are aligned with the pully on the motor. Now you can remove the masking tape that was holding the belt around the tub and spin the tub by hand watching the belt making sure it is not in a bind and is traveling around the motor pully , tensioner and tub freely. Make sure the tub is still sealed on the back side wall. As you turn the tub by hand you can adjust the belt by hand so that is following the original marks around the tub left by the orignal belt. Also double check the two alingment rollers and make sure they are spinning and on track. Now put the front panel with the door on by sliding it onto the two clips that are one the bottom at each side and put the two screws in that hold the front panel to the two side panels. Now stand the dryer back up and spin the tub by hand again making sure it has a good seal on the back side and on the front panel. Pull the top back down and put the two screws in that hold the lent channle to the top. I am not sure when the belt started failing on my dryer, but was amazed at how quiet it runs now. Guess I was use to the extra noise made by a dryer that was about to die. This was a cheap and easy repair and glad I did it myself.
Cleaning the lint out of the whole machine took quite a bit of time--it was everywhere. Underneath the lint trap was a collection that ultimately ruined the thermal fuse where it restricted the air flow considerably.
Ascertaining the problem was the most time consuming part.
The actual repair was quite simple and did
... Read moren't take but 15-20 minutes.


 Diagram and Parts List for Whirlpool Dryer")