Your coupon for will be reflected when you check out!
✖
Your coupon for
✖
Hello!
You're visiting the PartSelect site in U.S.
Would you like to shop on the Canadian site?
Stay on this site
Go to Canadian site
✖
Model Number Locations
1Select Category Type
Select Category Type
2Select Product Type
Select Product Type
3Select {MODEL} Type
Select {MODEL} Type
Sample Model Number Tags
Model numbers can be made up of numbers (1005400, for example) or a combination of letters and numbers (LAT1000AAE). The model number will most likely appear on either a paper sticker or a metal plate. Your appliance's model number tag may look similar to the sample model number tags shown here (model number highlighted in yellow):
Model has been saved to My Models. If you're not signed in, your lists are available on this device and will expire within 30 days.
Model has been saved to My Models.
This an authentic OEM 40-Watt replacement light bulb, used in a number of household appliances. It is specially designed to withstand extreme temperatures, which is why these replacement bulbs are mos...
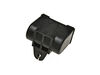
This capacitor (Refrigerator and Freezer Compressor Run Capacitor, Run Capacitor) provides the voltage or energy current required to start the compressor and keep it running. It allows the compressor ...
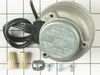
This condenser fan motor kit is designed for use with refrigerators. This fan draws air through the condenser coils and over the compressor. It does this with the goal of cooling the warm refrigerant ...
This condenser fan motor kit includes a motor, fan blade, wire harness, and screws. Used in a refrigerator, the condenser fan motor moves the condenser fan blade to direct and move air across the cond...
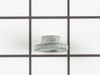
This is a multi-use and multi-appliance screw. It can be used on a microwave, refrigerator, range/oven, air conditioner, dehumidifier, washer, or dryer. The measurements of this screw are 8 x 1/2 inch...
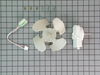
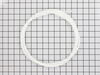
This is the replacement water tube kit for your refrigerator. This tubing is made of plastic, is 1/4 inch in diameter, and comes with 2 inserts. This tube may be longer than the original tube, and may...
A recirculating pump is used with standalone ice cube makers. It circulates the water over the top of the evaporator plate, which produces a layer of ice that is then broken down into ice cubes. If yo...
This is a bin thermostat made for standalone ice makers to activate the ice maker shut-off when bin is full. It senses how much ice is in the bin to determine if it should produce more ice or activate...
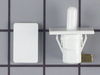
The purpose of the light switch in your refrigerator is to automatically turn on the light when the door is opened. If the light does not come on automatically when you open the door, the contacts ins...
If your freestanding ice maker is not producing ice properly, the ice cutter grid assembly may need replacing. The cutter grid is located within the main unit of the ice maker and contains thin, heate...
$163.15
In Stock
Order now and your part arrives by Apr 9
Questions And Answers for TRGI22J
Be the first to ask our experts a question about this model!
✖
Ask a Question
Ask our experts a question on this model and we'll respond as soon as we can.
I knew the chances of all the freon leaking out was unlikely so I looked at the wiring to the compressor and there was a capacitor and a starter/overload so i figured I would start there. I went on line and found the parts at this site and they were less than the minimum service call charge for a service tech so I figured what the heck le
... Read moret's give her a shot so I did give it a shot. I ordered the parts and they were there in less time than a service tech could come out and i installed the parts and guess what for 90.00 in parts and 15 minutes in time I repaired my refrigerator. Thanks guys, It took less time to order the parts than it did to make the repair so thanks, your website rocks and is very well designed so my hat is off to you guys!
The process to repair was very simple, I removed the back of the refrigerator to expose the motor area. I then removed three screws that held the condenser motor in place. once it was loose I detactched the electrical harness and removed the old motor. I then placed the new motor in place and secured it with the screws and reattached the
... Read morenew electrical harness that came with the new part. Once completed I reviewed it to make sure I didn't miss anything. I then replaced the cover over the motor area and enjoyed my success in repairing my own appliance with no added cost for labor, which would have been expensive I'm sure. The part purchased came with clear and consice instructions very easy to follow.
Unplug the appliance. Removed the screws holding the back panel. Removed the fan blade. removed 3 screws holding the condenser fan. Remove the 3 metal brackets attached to the fan. (First note which studs the brackets are attached to. Attach the 3 metal brackets to the new fan. (New screws were supplied) Cut
... Read moreand strip the wire about two inches from the fan. Cut and strip the new wire. I cut the new wire in half (about 6 inches.) Connect the two wires, twist and used 2 wire nuts. Tie wrap the wire to the wire harness. Mount the new fan (three screws) Screw the back panel back on. Mount the new