Your coupon for will be reflected when you check out!
✖
Your coupon for
✖
Hello!
You're visiting the PartSelect site in U.S.
Would you like to shop on the Canadian site?
Stay on this site
Go to Canadian site
✖
Model Number Locations
1Select Category Type
Select Category Type
2Select Product Type
Select Product Type
3Select {MODEL} Type
Select {MODEL} Type
Sample Model Number Tags
Model numbers can be made up of numbers (1005400, for example) or a combination of letters and numbers (LAT1000AAE). The model number will most likely appear on either a paper sticker or a metal plate. Your appliance's model number tag may look similar to the sample model number tags shown here (model number highlighted in yellow):
Model has been saved to My Models. If you're not signed in, your lists are available on this device and will expire within 30 days.
Model has been saved to My Models.
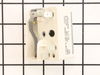
The 8-inch surface element switch is also known as an infinite heat switch, and is a part for your range. It controls the large surface element. It will turn the element on and off, and allow you to c...
The drip bowl on your range is designed to catch any spills that may occur when cooking. This drip bowl is chrome in color and is 6 inches in diameter. The chrome drip bowl is intended for use with ro...
Drip bowls are located under the heating elements and catch grease and spills that come from cooking on your stove top. If your drip bowl is damaged or rusted, it could allow grease to drip inside you...
This 40-Watt light bulb is sold individually.
It is specially designed to withstand extreme temperatures, so this bulb is compatible with a variety of appliance types including refrigerators, ranges,...
This surface element control switch, also known as an infinite switch, regulates the power supplied to a 6-inch, 1560-watt heating element on electric ranges. It allows for precise adjustment of heat ...
The GE brand is known for its high-quality appliance parts and this OEM Indicator Light for Ranges is no exception. This small yet significant piece lights up to signal when the oven or surface burner...
Worried by a leaky or loose appliance door? We've got just the thing for you. The Frigidaire Door Boot Gasket Seal could be the fix you need to get your appliance running smoothly again. It's not just...
Having issues with your dryer overheating? Meet the GE Safety Thermostat. This key piece of kit ensures your dryer runs safely and efficiently by kicking in to automatically switch off the heating ele...
Remove nobs from both switches. Pull out the range (the hardest part). REMOVE THE POWER PLUG FROM THE WALL Remove 7 screws with nut driver and take off upper back panel. Remove 2 phillips screws from front, they hold the switch brackets. The new switches don't fit in the bracket so discard the bracket keeping the
... Read morescrews. Removing 1 wire at a time from the old switch transfer to the new noting the letter/number ie "H1 P1" combos they are all there just not in the same places on the new switch. When wiring is complete, using the bracket ,screws from the front screw on the switches. Replace the back panel with 7 screws. In my case the old nobs did not fit the shafts of the new switches. I found some at the local hardware store. I bought 4 for $0.29 each! I expect to be replacing the other burner switches shortly.
unplugged unit pulled it away from wall took off the backplates traced wire to plug replaced with part ordered very smooth operation. the most impressive thing to me was i ordered part on computer and it was at my door in 30 hours awesome.
I removed the rear cover from the stove then removed the knob and two screws on the front panel that hold the control in place. I then took the wires off the old control one at a time and placed them on the new control. Then I placed the control in position and tightened the two screws on the front panel, replaced the knob and screwed t
... Read morehe back panel in place.