Your coupon for will be reflected when you check out!
✖
Your coupon for
✖
Hello!
You're visiting the PartSelect site in U.S.
Would you like to shop on the Canadian site?
Stay on this site
Go to Canadian site
✖
Model Number Locations
1Select Category Type
Select Category Type
2Select Product Type
Select Product Type
3Select {MODEL} Type
Select {MODEL} Type
Sample Model Number Tags
Model numbers can be made up of numbers (1005400, for example) or a combination of letters and numbers (LAT1000AAE). The model number will most likely appear on either a paper sticker or a metal plate. Your appliance's model number tag may look similar to the sample model number tags shown here (model number highlighted in yellow):
Model has been saved to My Models. If you're not signed in, your lists are available on this device and will expire within 30 days.
Model has been saved to My Models.
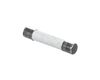
This 40w light bulb is a replacement bulb constructed of glass and metal. It is an easy-to-install electrical part which produces 40w of light. If the bulb won't light up then it may be broken and sho...
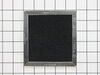
This Charcoal Filter traps grease from your oven's exhaust to help prevent it from entering the vent, which could cause damage over time. If the exhaust fan on your microwave is not working, you may n...
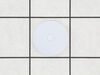
This Grease Filter is constructed of Acrylonitrile Butadiene Styrene and is used to trap grease and help eliminate odors from the exhaust air while cooking. It attaches onto the exhaust and is rated ...
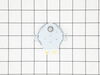
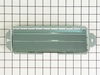
This mounting plate is sourced directly from the original manufacturer for use with microwaves. It is a metal plate designed to support a microwave by attaching the microwave to the wall studs. If the...
This three-terminal switch fits your microwave door. This part is mostly black in color and is about 1.5 inches with metal terminals. You might need to replace this part if your microwave is not heati...
This door interlock switch is a genuine replacement part designed for use in microwaves. It serves a critical safety function by preventing the microwave from operating when the door is open. Because ...
This diode, or high voltage diode, is used in microwaves. It is an electrical current control device that ensures power flows in one direction and not the other way. If your microwave produces no heat...
If your microwave is not turning on it could be due to your fuse needing to be replaced. This part protects the microwave by shutting it off if there is an electrical surge. This fuse is just over an ...
The light socket in your microwave houses the light bulb and connects it to the power source. The light bulb will screw into it, so the light bulb will be held in place. Be very careful when installin...
This glass tray drive coupling, also known as a tray support, is a genuine OEM replacement part. It can help solve the issue of your microwave tray not turning properly. This motor couple connects the...
$9.62
In Stock
Order now and your part arrives by Jul 2
Questions And Answers for MMV4205DE1
Ask our experts a question about this model and we'll get back to you as soon as possible!
2 questions answered by our experts.
Sort by:
< Prev
1
Next >
Search filter:
Clear Filter
Your search term must have 3 or more characters.
Keep searches simple. Use keywords, e.g. "leaking", "pump", "broken" or "fit".
Sorry, we couldn't find any existing answers that matched.Try using some different or simpler keywords, or submit your new question by using the "Ask a Question" button above!
Josh
July 15, 2021
Hi my model MMV4205DE1 microwave has not worked for a while. If I push start it will beep at me and say close door. The door is closed. I've turned it on and off, I've tried demo mode on, demo mode off. I'm just not sure what else is there to do.
For model number MMV4205DE1
Hello Josh, Thank you for the question. This normally indicates the Doro Switches are not recognizing the Door is closed. We suggest removing and testing the Door switches to check for continuity. We hope this helps!
Hi, my microwave keeps telling me to open door. I do, it still doesn't work. After a few tries it will tell me to reset the filter. After that it will work for a couple of days and then reset the filter again. Does this mean I have to replace the filter and if so, how do I do that?
For model number MMV4205DE1
Hello Debra, thank you for the question. According to our research, a filter status indicator appears in the display when it is time to replace the charcoal filter, part number PS1871363, and clean or replace the grease filters, part number PS3650910. You can easily replace the filters by using the following instructions:
1. Grease filters: Grease filters are on the underside of a microwave oven. Clean monthly, or as prompted by filter status indicator. Slide the filter away from the tab area and drop out of the filter. To reinstall, place the end of the filter into the opening opposite the tab area, swing up the other end, and slide it toward the tab area.
2. Charcoal filters: The charcoal filters are behind the vent grille at the top front of the microwave oven. The charcoal filters cannot be cleaned, and should be replaced about every 6 months, or as prompted by the filter status indicator. Remove two screws on the vent grille, tilt the grille forward, lift it out, and remove filters. To reinstall, place each filter into its slotted area–wire mesh side up, replace vent grille, and secure with screws.
We hope this information is useful!
Did this question help you?
Thank you for voting!
< Prev
1
Next >
✖
Ask a Question
Ask our experts a question on this model and we'll respond as soon as we can.
The nightmare was that this microwave is installed under the cabinet....in order to get to the light bulb I had to pull out my stove then squeeze into the space between the stove and counter....my old microwave light bult was much easier to change.....Shame on Whirlpool for making this so difficult.....must be a better way to cover the li
... Read moreght bulb so that we do not need a screwdriver to remove the door to get to the light bulb
Ordered top & bottom micro-switches and mounting plate parts. Internet reviews could not find specifics if the issue was due to a top/bottom or combination of micro-switch or mounting plate failure. Pulled the plug. Removed the top vent assembly cover held in by 2 Phillips screws inside the vent. Removed the control panel held in by 1 P
... Read morehillip screw at the top vent assembly area. Lifted control panel upward to release the catch and moved it off to the side - didn't disconnect any leads. Used a Torx bit to remove the door switch mounting plates at the front and pulled the plates through the opening from the control panel. Documented the wire color code connections, the top plate uses 2 micro's with one using both the closed & open contact. Installed the respective micros on the mounting plates and worked backwards with the wiring and removal steps. Once completed, the open/close sensing has worked every time.