Your coupon for will be reflected when you check out!
✖
Your coupon for
✖
Hello!
You're visiting the PartSelect site in U.S.
Would you like to shop on the Canadian site?
Stay on this site
Go to Canadian site
✖
Model Number Locations
1Select Category Type
Select Category Type
2Select Product Type
Select Product Type
3Select {MODEL} Type
Select {MODEL} Type
Sample Model Number Tags
Model numbers can be made up of numbers (1005400, for example) or a combination of letters and numbers (LAT1000AAE). The model number will most likely appear on either a paper sticker or a metal plate. Your appliance's model number tag may look similar to the sample model number tags shown here (model number highlighted in yellow):
Model has been saved to My Models. If you're not signed in, your lists are available on this device and will expire within 30 days.
Model has been saved to My Models.
This temperature sensor, also known as a thermistor, is compatible with various makes and types of appliances. This thermistor uses electrical currents to detect the interior temperature of the applia...
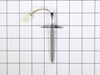
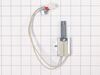
This gas range oven igniter is compatible with various models of LG gas ranges. It is made up of the igniter element, wire harness, connector and mounting bracket. The igniter is responsible for gener...
This is a genuine OEM leveling leg for various models of LG ranges. This leg is used to stabilize and support the range, and if damaged, broken, or missing, will cause your range to rock back and fort...
This transparent inner door glass is designed for LG range ovens and serves as a key component in maintaining heat insulation while allowing visibility into the oven during cooking. Made from heat-res...
This oven rack is a genuine OEM replacement part for your oven. It provides a stable platform for baking or roasting food, ensuring even heat distribution. It is positioned inside the oven cavity, wit...
This surface burner cap is designed for use on high-output gas burners rated at 18,500 BTU and plays an important role in safe and efficient cooking performance. Positioned on top of the burner head, ...
This oven inner door glass panel is designed to replace cracked, broken, or damaged interior door glass and restore proper oven performance and safety. Made from heat-tempered safety glass, the panel ...
This LED display module is a genuine replacement component designed for select ranges, serving as the primary interface for monitoring and controlling cooking functions. It receives signals from the m...
Introducing the Burner Cap from LG, a genuine OEM item crafted with precision and durability. It's an essential part for various LG range models, elevating the functionality and efficiency of your app...
$43.18
In Stock
Order now and your part arrives by Apr 23
Questions And Answers for LRGL5825F
Ask our experts a question about this model and we'll get back to you as soon as possible!
2 questions answered by our experts.
Sort by:
< Prev
1
Next >
Search filter:
Clear Filter
Your search term must have 3 or more characters.
Keep searches simple. Use keywords, e.g. "leaking", "pump", "broken" or "fit".
Sorry, we couldn't find any existing answers that matched.Try using some different or simpler keywords, or submit your new question by using the "Ask a Question" button above!
ROBERT
June 26, 2023
BURNER CONTROL KNOB PART NUMBER?
For model number LRGL5825F
Hello Robert, thank you for the query. The control knob that is compatible with your model is part number PS16222859. We hope this helps!
Is there a grill (not the griddle) available for this stove?
For model number LRGL5825F
Hello Gwen, Thank you for your inquiry. We show the compatible grill grates as part# PS16222774 for the left and right hand side and the middle grill grate as part# PS16222775. We hope this helps.
Go onto youtube, such as https://www.youtube.com/watch?v=-ITkrwhDNMQ and watch similar videos for DYI. The process is very similar to other models.
Once the door is removed, place oven door on a towel or soft place so it does not scratch the door. Unscrew the screws and make sure you notice where each screw goes, so you know
... Read morethe process of where each screw goes when you re-assemble.
Once the inner cover is removed, remove the insulation, too so you don't damage it. Use Wet/Dry Shop Vac to clean the shattered glass. (WORD OF ADVICE: I did not remove the insulation and the suction of the Shop Vac removed part of the insulation, so now instead of a quick turn around repair turns into a few weeks repair, because the insulation is on back order 10-14 days from the supplier. DON"T MAKE THE SAME MISTAKE!)
Once the glass has been removed, the new inner glass is replaced, begin by re-assemble the oven door with the correct screws and attached the oven door to the range.
Took off the oven door then took out the racks and two screws in the oven bottom and removed it . Then removed the heat deflector. Then un plugged the old igniter and removed the burner to make it easier to remove the old igniter. Then installed the new igniter and reversed the process
As soon as my husband put it in the oven, the very thin prongs broke. There was no guard on either side of the prongs for protection like the one that had been in there. Very costly to us of $185 with no fix. Very disappointed in that ignitor. It would have been an easy fix. Had replaced one previously but it only lasted 6 months. Now
... Read morewe have a new stove