Your coupon for will be reflected when you check out!
✖
Your coupon for
✖
Hello!
You're visiting the PartSelect site in U.S.
Would you like to shop on the Canadian site?
Stay on this site
Go to Canadian site
✖
Model Number Locations
1Select Category Type
Select Category Type
2Select Product Type
Select Product Type
3Select {MODEL} Type
Select {MODEL} Type
Sample Model Number Tags
Model numbers can be made up of numbers (1005400, for example) or a combination of letters and numbers (LAT1000AAE). The model number will most likely appear on either a paper sticker or a metal plate. Your appliance's model number tag may look similar to the sample model number tags shown here (model number highlighted in yellow):
Model has been saved to My Models. If you're not signed in, your lists are available on this device and will expire within 30 days.
Model has been saved to My Models.
The interior light in your refrigerator is controlled by a switch that is activated when the door is opened and closed. If your refrigerator light will not turn on, or stays on when the door is closed...
This water tube, or plastic tube, is used in refrigerators and freezers. The tube ensures water is directed to parts of the refrigerator that need it, such as the water dispenser and ice maker. If you...
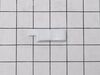
The door stop, or door stopper, is used in refrigerators. This door stop helps keep the door in position and in balance. This part is attached to the bottom of the door and it keeps it from opening an...
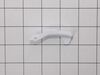
This freezer handle support is a 2.5-inch by 1-inch white plastic bracket designed to provide support and stability to the right side of the freezer door handle. It is an authentic manufacturer replac...
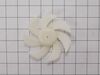
This is a genuine OEM evaporator motor that directly powers the evaporator mechanism within your refrigerator. This mechanism is responsible for pulling air over the evaporator coils, which are cold, ...
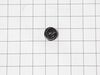
The purpose of the door latch cam is to keep the door latched when you shut it. If your door is not staying shut, you may need to replace the door latch cam. This part is made of white plastic and is ...
This is the replacement vegetable tray for your refrigerator. It is made of white and clear plastic and is approximately 22 inches long, 19 inches wide, and 12 inches deep. The vegetable tray slides i...
Note: Frame no longer includes rollers and screws. May be ordered separately.
No Longer Available
Questions And Answers for LMX25964ST
Ask our experts a question about this model and we'll get back to you as soon as possible!
2 questions answered by our experts.
Sort by:
< Prev
1
Next >
Search filter:
Clear Filter
Your search term must have 3 or more characters.
Keep searches simple. Use keywords, e.g. "leaking", "pump", "broken" or "fit".
Sorry, we couldn't find any existing answers that matched.Try using some different or simpler keywords, or submit your new question by using the "Ask a Question" button above!
Rachel
March 17, 2023
My refrigerator is an LG the model number was provided my refrigerator is not getting cold nor is my freezer freezing what could it be compressor is working?
For model number LMX25964ST
Hello Rachel, thank you for contacting us. Checking out the following parts may help you get to the root of the problem: the temperature sensor, part number PS3529162, the evaporator fan motor, part number PS3523323, and the control board, part number PS3625142. We hope this solves your problem!
I have a
LG Refrigerator
Model
LMX25964ST /02
Serial 105KRAT2X496
It has the Ice maker inside the side by side left door, with double freezer drawers at bottom. Behind the drawers on the left, it has a 7"h x 8"w rectangle area exteding foreword 2" into the area with 4 white Phillips screws. Your video accessing the Freezer Fan behind the double lower freezer drawers & does not show this raised area. It shows it flat. Your video had the ice maker inside the freezer. Your video had the ice maker inside the freezer. Behind the drawers, how do I release that side to access the Freezer Fan. Do I unscrew these to release that side? Is there a video for this?
For model number LMX25964ST
Hello Robert, thank you for the question. We are providing you with the instructions that will help you to access the freezer fan.
1- Pull the drawers out and unthread the screws securing the drawer's basket.
2- Disconnect the wire of the door switch and remove the bar.
3- Remove the screws securing the back panel.
4- Pull out the entire back panel and remove the evaporator fan motor from it.
5- Replace it with the new one.
We hope this helps!
Did this question help you?
Thank you for voting!
< Prev
1
Next >
✖
Ask a Question
Ask our experts a question on this model and we'll respond as soon as we can.
1. Shut off water to refrigerator. 2. Removed bottom sheet metal cover (6 screws). 3. Removed leaking water inlet valve assembly from refrigerator (1 screw). 4. Remove water inlet tube (loosen nut) and tube back to refrigerator (pull from water valve after remove cotter pin washer). 5. Detach two electrical wire harnesses. 6. Install new
... Read morewater inlet valve assembly to refrigerator (1 screw). 7. Replace both water tubes to water inlet assembly. 8. Re-attach both wiring harnesses. 9. Turn water to refrigerator on. 10. Check for leaks. 11. Re-attach bottom sheet cover (6 screws).
Video makes it look easy. Kenmore refrigerator does not have "groove" along the right hand side of switch that allows for pushing down on release. Used a thin screwdriver to get under to push while holding switch edge with pliers. Kept slipping. Tape sides to avoid scratching inside of refrigerator.
The Refrigerator now runs very quite. After watching several videos I started on mine and found that it was a bit different than any in the videos. However all but the back panel was shown and that was helpful. The back panel was a bit difficult but a hair dryer seemed to help . All in all it was a good choice to do it myse
... Read morelf as it was done quicker than waiting on a repair man.