


KESH307GBS0 KitchenAid Range - Overview
Sections of the KESH307GBS0
[Viewing 6 of 6]


Keep searches simple, eg. "belt" or "pump".

Light Bulb - 40W
PartSelect #: PS884734
Manufacturer #: 8009
This an authentic OEM 40-Watt replacement light bulb, used in a number of household appliances. It is specially designed to withstand extreme temperatures, which is why these replacement bulbs are mos...
$17.80
In Stock

Range Inner Door Glass
PartSelect #: PS11747420
Manufacturer #: WP9781593
This inner door glass is used in ranges. It creates a transparent heat barrier inside your oven door. For this installment, the only tool needed is a #2 Phillips screwdriver. To repair, first remove t...
$77.97
In Stock

Touch-Up Paint - White
PartSelect #: PS385132
Manufacturer #: 72017
This touch-up paint can be used on a wide variety of household appliances. It is most often used on washers, dryer, refrigerators, dishwashers, ranges, freezers, trash compactors, or microwaves. It is...
$11.50
In Stock

Range Surface Burner Knob
PartSelect #: PS11747113
Manufacturer #: WP9750372FF
This knob allows you to turn the burner on your range or cooktop on, and it allows you to control the temperature of the burner. If your knob is broken, damaged, or lost, this is the replacement part ...
$24.10
In Stock

2 Piece Broiler Pan
PartSelect #: PS971245
Manufacturer #: 4396923
This is cookware designed for use in your range or oven. It is a two-piece dish that is used to grill or cook food while the broil function is on, meaning it can withstand high temperatures. This set ...
$48.36
In Stock

Cooktop Cleaner
PartSelect #: PS3492527
Manufacturer #: W10355051
This bottle of non-abrasive cooktop cleaner breaks down and gets rid of the hardest baked-on stains and residue without causing any harm to your appliance. The bottle is 10 oz and does not require a l...
No Longer Available

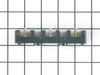
SOCKT-LITE
PartSelect #: PS16730838
Manufacturer #: W11594027
The light socket on your electric range connects the power source to the light bulb. If your oven light is malfunctioning, you may need to replace the light socket. The light socket is located in the ...
$65.23
In Stock

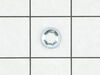
Range Light Gasket
PartSelect #: PS11740863
Manufacturer #: WP3184533
This part creates a seal around the light lens and bulb.
$9.40
In Stock

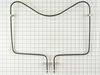
Oven Bake Element
PartSelect #: PS11747109
Manufacturer #: WP9750213
This bake element has push-on wire terminals and is found at the bottom of your oven cavity.
No Longer Available

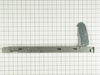
Range Rear Leveling Leg
PartSelect #: PS11748094
Manufacturer #: WPW10058460
Sold individually.
$9.40
In Stock

Range Light Cover Lens
PartSelect #: PS11747414
Manufacturer #: WP9781049
The light cover lens in your oven is designed to protect the light bulb. If your light cover lens is damaged, you will need to replace it. This part is made of clear glass and is roughly 3 inches in d...
$56.05
In Stock

Spray Paint - 12 oz. - White
PartSelect #: PS347819
Manufacturer #: 350930
Appliance spray paint is a great way to cover up any chips and scratches that have appeared on your appliances. Instead of replacing the part entirely, this is an easy fix. This is also a great way to...
$36.00
In Stock
Manuals & Care Guides for KESH307GBS0
Click to downloadQuestions And Answers for KESH307GBS0
We're sorry, but our Q&A experts are temporarily unavailable.
Please check back later if you still haven't found the answer you need.
Common Symptoms of the KESH307GBS0
[Viewing 8 of 8]Element will not heat
Fixed by
these parts
these parts


Show All
Little to no heat when baking
Fixed by
these parts
these parts

Show All
Door won’t close
Fixed by
these parts
these parts

Show All
Little to no heat when broiling
Fixed by
these parts
these parts
Show All
Oven not heating evenly
Fixed by
these parts
these parts

Show All
Noisy
Fixed by
these parts
these parts
Show All
Will Not Start
Fixed by
these parts
these parts

Show All
Oven is too hot
Fixed by
these parts
these parts
Show All


Keep searches simple. Use keywords, e.g. "leaking", "pump", "broken" or "fit".
Inside door glass broke
I removed the oven door by lifting it off with the hinges. Disassembled the door parts one at time making sure I remember where I removed the screws until I am able to get to the broken glass. The most difficult part is making sure that the insulation strip & the gasket stayed in place after I replaced the broken glass & doing the reverse
... Read more
process of installing the parts together. Relatively easy process as long as you remember where the parts go. When in doubt, I had to refer to the pictorial of the disassembled door shown on your website.
Read less
Parts Used:
-
MANNY from LIVERMORE, CA
-
Difficulty Level:Easy
-
Total Repair Time:15 - 30 mins
-
Tools:Screw drivers
133 of 151 people
found this instruction helpful.
Was this instruction helpful to you?
Thank you for voting!
Inner Oven Door Shattered during cooking.
First, layed tape across all broken glass to keep glass from shattering more and releasing more bits of glass. Pull up and out the oven door. Had table set aside covered with an old sheet to lay door on, After laying door on table, Removed outer screws. Needed phillips #2 & #3 tip widths and electric screwdriver, for inner screws that whe
... Read more
re difficult to remove. Making notes of what came off first! ( (rt & left, bottom,/top) when removing metal frame braces, and in what order they go in when reassembled . Did the same with screws & set them aside in groups. Then marked the groups of screws. Removed the metal door panel. Carefully removed the in between panel of glass. Set Outer glass aside along with metal "door"and inner door glass,and proped them up in a safe place. Carefully removed the broken & shattered inside glass wearing rubber gloves. Had a garbage can next to the table to with news paper to wrap glass. Cleaned area. Replaced glass taking care not to tighted screws so much as to break the glass. Put added insulation.(Whcih was not the same as in diagram), around the edge. put back the inner glass panel, care not to leave prints, tighten screw ( care not to break glass) Cleaned the door sides and bottom, all had alot of grease buildup.
Put back the metal door portion. Cleaned the outer glass door front and back. Being careful not to break it (or leave prints inside). Replaced the side and bottom metal frames. Wiped it down and put door back on stove.
Put back the metal door portion. Cleaned the outer glass door front and back. Being careful not to break it (or leave prints inside). Replaced the side and bottom metal frames. Wiped it down and put door back on stove.
Read less
Parts Used:

-
Gloria from Melbourne, FL
-
Difficulty Level:A Bit Difficult
-
Total Repair Time:15 - 30 mins
-
Tools:Wrench set
47 of 51 people
found this instruction helpful.
Was this instruction helpful to you?
Thank you for voting!
Socket Light had a bad thread
Socket Lite come with clips attached to the outside
of the housing. After you unhook the 3 lead wires
that are attached to the unit. All you have to do is push in on the clips and release the unit. Then you
snap in the new unit. Attach the 3 wire leads, put a
oven bulb in the socket end, and the install the light cove ... Read more r
of the housing. After you unhook the 3 lead wires
that are attached to the unit. All you have to do is push in on the clips and release the unit. Then you
snap in the new unit. Attach the 3 wire leads, put a
oven bulb in the socket end, and the install the light cove ... Read more r
Read less
Parts Used:
-
Edmund from Emporium, PA
-
Difficulty Level:Easy
-
Total Repair Time:15 - 30 mins
-
Tools:Pliers, Screw drivers
44 of 65 people
found this instruction helpful.
Was this instruction helpful to you?
Thank you for voting!