Your coupon for will be reflected when you check out!
✖
Your coupon for
✖
Hello!
You're visiting the PartSelect site in U.S.
Would you like to shop on the Canadian site?
Stay on this site
Go to Canadian site
✖
Model Number Locations
1Select Category Type
Select Category Type
2Select Product Type
Select Product Type
3Select {MODEL} Type
Select {MODEL} Type
Sample Model Number Tags
Model numbers can be made up of numbers (1005400, for example) or a combination of letters and numbers (LAT1000AAE). The model number will most likely appear on either a paper sticker or a metal plate. Your appliance's model number tag may look similar to the sample model number tags shown here (model number highlighted in yellow):
Model has been saved to My Models. If you're not signed in, your lists are available on this device and will expire within 30 days.
Model has been saved to My Models.
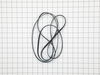
This drum belt, often referred to as a drive belt, is used in the assembly of dryers. It goes around the drum, the idler pulley, and the motor pulley. As the armature on the motor spins, this belt is ...
If your dryer does not tumble, will not start, is noisy, or is leaving marks on your clothing, you may need to replace the drum support bearing. The drum is supported at the rear by a bearing, which a...
This white drum glide is used in a clothes dryer to ensure the front of the dryer drum is supported as it does rotations. *Please note: these are sold individually, however there are two of these in y...
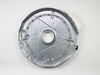
This dryer heating element produces heat to dry clothes and is located in the rear of a dryer. If the heater element is burned, the dryer does not heat or over heats, or clothes are taking too long to...
This high limit thermostat is used in a dryer and monitors the temperature to make sure it does not exceed 260 degrees Fahrenheit. When your dryer temperature reaches 260 it will cut it out and only c...
Located at the front of the dryer, this lint filter traps lint and debris from the exhaust air flowing out of the dryer drum. This part measures approximately 12 inches long x 7 inches high, has a pla...
This part could be found underneath a fridge, dryer, or freezer. The original foot may be cracked, broken, or perhaps missing altogether. If you notice the appliance is uneven to the floor or wobbling...
This is a replacement screw for your washer or dryer. The screw is approximately half an inch in length and is a Phillips-head screw. It screws in from the outside of the drum, into the vane/baffle. T...
This part is the replacement door handle for your dryer. It is made of white plastic and measures about 2 ½ inches long and 4 inches wide. The door handle allows you to open and close the dryer door. ...
I unlatched top panel then removed two screws holding front panel on. I then lifted drum out of hanger to make room to remove element. Disconnect wires to limit switch and element. I then removed four screws on back of dryer that hold the pan. I removed old assembly and replaced with new one. Assemble in reverse.
I waded into this project without knowing what I was doing and as a result did much more work than was needed. What I should have done was 1) open access panel at lower left of back of dryer and rmove belt from pully 2) push screwdriver in against clips in seem at top front of dryer (where top meets face) and lift top up and off hinges a
... Read moret back 3) remove screws holding front of dryer to the sides of the dryer cabinet (about 1 foot down) and swing front down on hinges at bottom 4) lift dryer drum straight up out of the bracket at the back of the dryer 5) remove wires from the dryer element and heat sensor on the heater pan (about 4 and 1 o'clock respectively wires are on tight, may need plieres) 6) unscrew heater pan from back of dryer 7) remove heat sensor from old heater pan and put on new heater pan 8) screw new heater pan to back of dryer 9) replace wires to elements and sensor, you may want to "crimp" the connectors onto the tabs 10) replace dryer drum slipping back into back bracket, be sure that dryer belt is around drum as when you openned the dryer 11) lift up front so that drum fits around and is supported by flange molded into front 12) replace screws that attach front to dryer cabinet 13) replace top of dryer (put back on hinges at back and lower onto clips in front 14) put dryer belt back on pully and replace access plate.