Your coupon for will be reflected when you check out!
✖
Your coupon for
✖
Hello!
You're visiting the PartSelect site in U.S.
Would you like to shop on the Canadian site?
Stay on this site
Go to Canadian site
✖
Model Number Locations
1Select Category Type
Select Category Type
2Select Product Type
Select Product Type
3Select {MODEL} Type
Select {MODEL} Type
Sample Model Number Tags
Model numbers can be made up of numbers (1005400, for example) or a combination of letters and numbers (LAT1000AAE). The model number will most likely appear on either a paper sticker or a metal plate. Your appliance's model number tag may look similar to the sample model number tags shown here (model number highlighted in yellow):
Model has been saved to My Models. If you're not signed in, your lists are available on this device and will expire within 30 days.
Model has been saved to My Models.
This Charcoal Filter traps grease from your oven's exhaust to help prevent it from entering the vent, which could cause damage over time. If the exhaust fan on your microwave is not working, you may n...
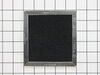
This Grease Filter is constructed of Acrylonitrile Butadiene Styrene and is used to trap grease and help eliminate odors from the exhaust air while cooking. It attaches onto the exhaust and is rated ...
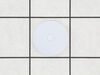
This microwave surface light bulb (120v 25w) is an OEM replacement part used in microwaves and microwave/hood combos. It is one of the two halogen lightbulbs that are positioned on either end of the b...
This mounting plate is sourced directly from the original manufacturer for use with microwaves. It is a metal plate designed to support a microwave by attaching the microwave to the wall studs. If the...
This three-terminal switch fits your microwave door. This part is mostly black in color and is about 1.5 inches with metal terminals. You might need to replace this part if your microwave is not heati...
This door interlock switch is a genuine replacement part designed for use in microwaves. It serves a critical safety function by preventing the microwave from operating when the door is open. Because ...
This diode, or high voltage diode, is used in microwaves. It is an electrical current control device that ensures power flows in one direction and not the other way. If your microwave produces no heat...
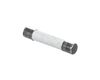
If your microwave is not turning on it could be due to your fuse needing to be replaced. This part protects the microwave by shutting it off if there is an electrical surge. This fuse is just over an ...
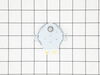
This glass tray drive coupling, also known as a tray support, is a genuine OEM replacement part. It can help solve the issue of your microwave tray not turning properly. This motor couple connects the...
This damper is an authentic OEM replacement assembly used in microwave/range hood combos. It includes the damper door and frame. It is designed to direct the flow of air through the vent duct, and the...
$60.51
In Stock
Order now and your part arrives by Jun 29
Questions And Answers for JMV9196CS2
Be the first to ask our experts a question about this model!
✖
Ask a Question
Ask our experts a question on this model and we'll respond as soon as we can.
Ordered top & bottom micro-switches and mounting plate parts. Internet reviews could not find specifics if the issue was due to a top/bottom or combination of micro-switch or mounting plate failure. Pulled the plug. Removed the top vent assembly cover held in by 2 Phillips screws inside the vent. Removed the control panel held in by 1 P
... Read morehillip screw at the top vent assembly area. Lifted control panel upward to release the catch and moved it off to the side - didn't disconnect any leads. Used a Torx bit to remove the door switch mounting plates at the front and pulled the plates through the opening from the control panel. Documented the wire color code connections, the top plate uses 2 micro's with one using both the closed & open contact. Installed the respective micros on the mounting plates and worked backwards with the wiring and removal steps. Once completed, the open/close sensing has worked every time.
Unless you have a very comfortable background with electronics and electricity, I don't necessarily recommend taking apart a microwave. If you are very handy and are going to be VERY cautious to follow the rules of discharging caps and testing voltages before moving forward, then go for it. That said, I took the microwave off and apart.
... Read more Not knowing where to find the parts, I was fortunate that the installer put the instruction book for the microwave inside the front vent slot above the touchpad for reference. it details the location of every part and it tells you very clearly what each part you test should show specific to this microwave on your multimeter. Find this guide online if you don't have it. Turn on the microwave for 20 seconds with a glass of water to make sure it's not heating - that with the noise means it's eeither the magnetron, cap, or diode. Read the notes on this site for all of the basic things to look for with the magnetron, diode, and capacitor. Once comfortable with the guide, locations of those devices, and how to test, then take it down and apart. Unfortunately, I didn't do all those things in that order, and it only wasted a lot of time trying to find the parts. Once I found the parts and put all the screws and covers back for all the areas that didn't need to be accessed for the repair, testing went quickly. The diode was bad. Ordered a new one and had it in 3 days or so. That means your microwave will be apart and sitting somewhere for a little while until you get the part and have time to repair it. Putting the diode back isn't too bad. Reassemble the microwave and put it back up again. If i had to do it again, it would take me 20 to 30 minutes once the microwave was down and on a table. Also, I used some bricks with towels over them or you could use some sawhorses to keep the microwave elevated so you can plug it in and run it after installing the new component. Again, make sure you discharge the cap before touching anything again even if you didn't run it, but just plugged it in.
I turn off the income electricity by shutting down the corresponding circuit breaker. Then, I removed the control panel from the microwave which gave me access to the capacitor and adjacent diode. After that i unscrewed the defective diode and replaced it with the new one and BINGO!