


JKP69BW1BB General Electric Microwave Oven Combo - Overview
Sections of the JKP69BW1BB
[Viewing 6 of 6]


Keep searches simple, eg. "belt" or "pump".

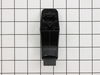
Door Handle End Cap
PartSelect #: PS256613
Manufacturer #: WB7X7183
This oven door handle end cap is used on both the left and right hand sides. Sold individually.
$34.75
Special Order

Bake Element
PartSelect #: PS249249
Manufacturer #: WB44K5013
This bake element is used in ranges and located at the bottom of the oven. The bake element supplies heat for baking. If your symptoms include: your oven is not heating evenly, not starting, or the he...
$75.16
In Stock

Broil Element - 240V
PartSelect #: PS249244
Manufacturer #: WB44K5009
This OEM-sourced broil element with push-on terminals is located on the roof of your oven cavity, providing heat from above to cook and heat your food. It requires a 240-volt power supply to function ...
$78.92
In Stock

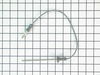
Meat Probe Thermistor
PartSelect #: PS1481046
Manufacturer #: WB20T10024
This probe is used to check the internal temperature of the meat to ensure proper temperature is reached. Also known as a Meat Probe.
$64.55
In Stock

Screw
PartSelect #: PS271689
Manufacturer #: WH2X930
This screw is sold individually.
$16.05
In Stock

Light Cover
PartSelect #: PS247415
Manufacturer #: WB36X192
This light bulb lens covers the interior light bulb in an oven, range, or stove. No tools are necessary to replace this part. Simply slide off the wire bracket to remove the existing light bulb lens. ...
$26.39
In Stock

Broiler Pan - Large
PartSelect #: PS1517612
Manufacturer #: WB48X10056
This large broiler pan is found in the bottom of your oven and is used to catch drippings from broiling foods. This part includes the grate and bottom pan and is made of porcelain. The grate measures ...
$43.18
In Stock


Screw
PartSelect #: PS234226
Manufacturer #: WB1K5157
This screw is black in color and sold individually.
$15.00
In Stock

Door Handle
PartSelect #: PS231849
Manufacturer #: WB15K5068
This handle comes with the endcaps.
No Longer Available

Door Lock and Switch Assembly
PartSelect #: PS2577623
Manufacturer #: WB49T10020
Enhance the functionality of your GE range with this Oven Door Lock Assembly. Primarily designed to provide additional safety, this component locks the oven door during the self-cleaning cycle, helpin...
$158.94
In Stock

Door Gasket
PartSelect #: PS244569
Manufacturer #: WB32K5038
This gasket seals the oven door.
$124.60
In Stock
Questions And Answers for JKP69BW1BB
We're sorry, but our Q&A experts are temporarily unavailable.
Please check back later if you still haven't found the answer you need.
Sort by:
- < Prev
- 1
- Next >
Search filter:
Clear Filter
Your search term must have 3 or more characters.
Keep searches simple. Use keywords, e.g. "leaking", "pump", "broken" or "fit".
Sorry, we couldn't find any existing answers that matched.Try using some different or simpler keywords, or submit your new question by using the "Ask a Question" button above!
Cathy
April 19, 2023
Microwave will run, but will not heat
For model number JKP69BW1BB
Hello Cathy, thank you for reaching out. According to our understanding, you may need to replace the magnetron, part number PS239377. We hope this solves your problem!
Did this question help you?
Thank you for voting!
Related Parts:
Magnetron


$263.32
In Stock
- < Prev
- 1
- Next >
Common Symptoms of the JKP69BW1BB
[Viewing 7 of 7]Little to no heat when baking
Fixed by
these parts
these parts


Show All
Element will not heat
Fixed by
these parts
these parts
Show All
Little to no heat when broiling
Fixed by
these parts
these parts
Show All
Oven not heating evenly
Fixed by
these parts
these parts
Show All
Door won’t close
Fixed by
these parts
these parts
Show All
Oven is too hot
Fixed by
these parts
these parts
Show All
Will not program
Fixed by
these parts
these parts
Show All

Keep searches simple. Use keywords, e.g. "leaking", "pump", "broken" or "fit".
bake element shorted out, sparking like a sparkler
first, made sure circuit breaker was off
second, used nut driver to remove 2 screws on old element, pulled it from the back of the oven
third, removed 2 wires from old element (spade connectors)
fourth, connected new element and pushed back into oven.
fifth, reinstalled 2 screws securing new element
this was ... Read more all done by my 15 yr old son under my supervision.
Read less
Parts Used:
-
Carl from Wynnewood, PA
-
Difficulty Level:Really Easy
-
Total Repair Time:Less than 15 mins
-
Tools:Nutdriver
89 of 99 people
found this instruction helpful.
Was this instruction helpful to you?
Thank you for voting!
The broiler element caught fire and burned out while I was broiling a steak.
First I removed the two screws that hold the element in place. I then pulled the element out about 3 inches, but I had not turned off the power.
So, I shorted out one of the wires. Then I turned off the power but was afraid to go any farther.
An appliance repairman was at my house that day fixing my dryer seal. He was able to pu ... Read more ll the wires through the insulation successfully and install the broiler element. He did not charge me any extra for this little extra job. But I learned my lesson. Cut the power before you begin! He told me that I could have wound up with a much bigger repair if the short had been in the wire that is connected to the control panel of the oven. I was very lucky!
Read less
Parts Used:
-
Dianne from Rockville, MD
-
Difficulty Level:Easy
-
Total Repair Time:Less than 15 mins
-
Tools:Nutdriver
67 of 75 people
found this instruction helpful.
Was this instruction helpful to you?
Thank you for voting!
The end caps broke on my oven door handle.
1st I opened the oven door and removed the 2 screws that hold the outside and inside of the door together. With the door separated I removed the 2 screws that hold the end caps in place, then removed the old end caps. I put the new end caps on the oven door handle, aligned the holes for the end cap screws and reinstalled the screws,then
... Read more
reinstalled the oven door screws,closed the oven door and started cooking.
Read less
Parts Used:
-
Harry from Thomasville, GA
-
Difficulty Level:Easy
-
Total Repair Time:15 - 30 mins
-
Tools:Screw drivers
45 of 46 people
found this instruction helpful.
Was this instruction helpful to you?
Thank you for voting!