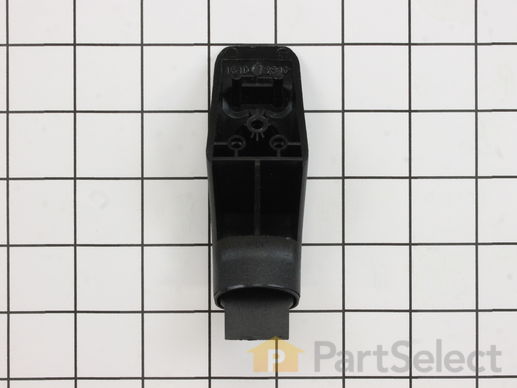
Door Handle End Cap
$
26.43
In Stock
Get this part fast! Average delivery time for in-stock parts via standard shipping: 1.8 days.
PartSelect Number PS256613
Manufacturer Part Number WB7X7183
Manufactured by
GE

Check if this fits your product and find model diagrams
Need help finding your model number?
Product Description
Door Handle End Cap Specifications
This oven door handle end cap is used on both the left and right hand sides. Sold individually.

How Buying OEM Parts Can Save You Time and Money
Troubleshooting
This part fixes the following symptoms:
Door won’t close
This part works with the following products:
Range, Wall Oven, Microwave Oven Combo.
This part works with the following products:
General Electric, Hotpoint, Kenmore.
Part# WB7X7183 replaces these:
AP2019449, 268072, WB7X7183, WB07T10420, WB07X7183, WB07X7321, WB15K5069, WB7X7321
Questions and Answers
Ask our experts a question about this part and we'll get back to you as soon as possible!
- < Prev
- 1
- Next >
Sort by:
Search filter:
Clear Filter
Your search term must have 3 or more characters.
Keep searches simple. Use keywords, e.g. "leaking", "pump", "broken" or "fit".
Sorry, we couldn't find any existing answers that matched.Try using some different or simpler keywords, or submit your new question by using the "Ask a Question" button above!
Marsha
September 11, 2019
We are looking for a replacement oven handle endcap for our older model GE stove (model number JBP26GV3WH and serial number VM2143376. Is this part compatible with our stove?
For model number JBP26GV3WH

Hi Marsha,
Thank you for your question. The part number listed under your model number for the black oven handle end cap is PS256613. I hope this helps. Thank you and have a great day!
2 people found this helpful.
Was this helpful?
Thank you for voting!
- < Prev
- 1
- Next >
✖
Ask a Question
Ask our experts a question on this part and we'll respond as soon as we can.
Something went wrong. Please try again later.
Your Question Has Been Submitted!
Our experts will send you an email as soon as your question has been answered.
Part Videos
Replacing your General Electric Range Door Handle End Cap

Customer Repair Stories
Average Repair Rating: 3.7 / 5.0, 29 reviews.
What's this?
- < Prev
- 1
- 2
- 3
- Next >
Sort by:
Search filter:
Clear Filter
Your search term must have 3 or more characters.
Keep searches simple. Use keywords, e.g. "leaking", "pump", "broken" or "fit".
Sorry, we couldn't find any existing installation instruction that matched.
The end caps broke on my oven door handle.
1st I opened the oven door and removed the 2 screws that hold the outside and inside of the door together. With the door separated I removed the 2 screws that hold the end caps in place, then removed the old end caps. I put the new end caps on the oven door handle, aligned the holes for the end cap screws and reinstalled the screws,then reinstalled the oven door screws,closed the oven door and started cooking.
-
Harry from Thomasville, GA
-
Difficulty Level:Easy
-
Total Repair Time:15 - 30 mins
-
Tools:Screw drivers
44 of 45 people
found this instruction helpful.
Was this instruction helpful to you?
Thank you for voting!
handle on range was broken
1] removed door and put it on bench
2] removed two[2] screws to open up face of door
3] wedged aa 2" x 4" between face of door and back of door
4] used nut-driver to remove the damaged end-cap [this part holds the stove handle in place]
5] put handle on one side to good end-cap and slipped new end-cap on handle and put it opening where old end-cap came off
6]screwed in new part and screwed together face and back of oven door
7] put door back on oven
Other Parts Used:
-
nancy from rochester, NY
-
Difficulty Level:Really Easy
-
Total Repair Time:15 - 30 mins
-
Tools:Nutdriver, Screw drivers
15 of 19 people
found this instruction helpful.
Was this instruction helpful to you?
Thank you for voting!
Our 12 year old oven bake element sparked and died on us
So easy, first I turned off the main switch to the electric. Unscrewed old bake element and screwed in the new one. Worked like a charm. We also bought from Part Select new burners and drip pans. Can't believe how good it looks. I placed my order on a Sunday and received it on Tuesday!! 2 days. Awesome website...Have told everyone about it..THANK YOU PART SELECT..
Other Parts Used:
-
Laura from Downingtown, PA
-
Difficulty Level:Easy
-
Total Repair Time:Less than 15 mins
-
Tools:Screw drivers, Wrench (Adjustable)
14 of 14 people
found this instruction helpful.
Was this instruction helpful to you?
Thank you for voting!
Oven door handle and end caps were broken
Removed screws in door and pulled apart inside and outside, broken plastic pieces fell everywhere. Removed interior screws that held the end caps for the handle. Put the new end caps and handle together, placed on door and screwed in the interior screws to hold handle. Pushed inside and outside of door together and replaced screws. It appears that there were spaces on those screws that correctly placed the inside and outside which were broken to shreds. I could not find those on the the parts list so the door is not as good as it should be.
Other Parts Used:
-
Carol from Southaven, MS
-
Difficulty Level:Easy
-
Total Repair Time:Less than 15 mins
-
Tools:Screw drivers
9 of 11 people
found this instruction helpful.
Was this instruction helpful to you?
Thank you for voting!
old enc caps cracked; one broken off the oven door
Removed oven door from oven. Removed the inner oven door portion from the outer part to gain access to inner screws attaching end caps to front of stove door. Removed those screws and the old end caps & broken off pieces. Pressed oven door handle bar into new end caps. Reattached oven door handle assembly to front of oven door. Reinstalled inner oven door which included long screws that also went into the new end caps. Reinstalled oven door on oven. Job was easy. Price was certainly right for the end caps at $10.01/each.
-
Randy from Olympia, WA
-
Difficulty Level:Easy
-
Total Repair Time:15 - 30 mins
-
Tools:Nutdriver, Screw drivers
6 of 6 people
found this instruction helpful.
Was this instruction helpful to you?
Thank you for voting!
The oven door handle snapped off one day, no extra force was applied to it, it just snapped off!
First I unscrewed the end of the oven door and realized I could replaced the parts easily that hold the handle on the door. Then I held the sharp, broken plastic ends with a towel and used my drill with a thingy that fits on a small hex nut and unscrewed the broken handle parts and removed them. All I had to do after that is screw on the new handle holders with the handle bar fit snuggly between them, presto, new handle bar installed. Great service from partselect. com. Would use them again.!
-
Carla from Cotuit, MA
-
Difficulty Level:Easy
-
Total Repair Time:Less than 15 mins
-
Tools:Screw drivers, Socket set
5 of 6 people
found this instruction helpful.
Was this instruction helpful to you?
Thank you for voting!
Door handle snapped
I read the previous repair stories and figured it couldn't be that tough. Mine actually had a slight deviation and I'm sure based on model...
To remove the oven door handle, I had to remove 3 screws (phillips) on the top of the hinged door. This allowed the face plate to easily pull away from the inside of the door. The existing handles were held in place by a single hex head screw each.
Voila, in 2 minutes the entire handle was off.
This is where things had a slight deviation.
The door end caps I bought had 2 alignment prongs that extended beyond the actual surface. My door did not have holes for them to go into. No big deal, I took some wire snippers and clipped the little plastic prongs off so it was flush like my old ones. That took about 3 minutes because I had to go back into the garage to get the tool :-)
My metal door handle bar did not want to go all the way in very easily into the end caps. I went back into the garage and got some WD40 and sprayed into all pieces and wiggled things back and forth for a few minutes, placing it against the oven a couple of times to ensure I had the bar was seated enough where the holes lined up with the oven.
I would recommend putting the end caps on the bar PRIOR to attaching one side to the oven. I originally did not do this and when it was difficult to get the bar on, I had to take it off so I could perform the procedure I just mentioned.
Honestly, the entire "job" took 10 minutes.
-
MICHAEL from CORINTH, TX
-
Difficulty Level:Easy
-
Total Repair Time:Less than 15 mins
-
Tools:Screw drivers, Wrench (Adjustable)
4 of 4 people
found this instruction helpful.
Was this instruction helpful to you?
Thank you for voting!
No istructions included
Although the parts did fit, some modification was needed to remove the excess tabs as it appears these parts were for multiple applications. However the end result was a good fit and reapirs were successful.
-
Tim from Selma, NC
-
Difficulty Level:A Bit Difficult
-
Total Repair Time:30 - 60 mins
-
Tools:Nutdriver, Pliers, Screw drivers
4 of 5 people
found this instruction helpful.
Was this instruction helpful to you?
Thank you for voting!
End cap on oven handle broke
Prices on drip pans were so reasonable I easily replaced them . No screws involved here. For end cap, had to remove both screws that held porcelin inner door wall to get to one other screw that held broken handle on outside of door. Put same screw into new end cap. Closed inner porcelin liner. Those two longer screws go through both panels and screw into end cap (one for each end cap) There are two screws in each end cap. This saved me so much money and is the 2nd appliance I have fixed myself. 60 year old female. The other was my dishwasher. This site is a blessing.
Other Parts Used:
-
Valerie from Apollo Beach, FL
-
Difficulty Level:Easy
-
Total Repair Time:15 - 30 mins
3 of 3 people
found this instruction helpful.
Was this instruction helpful to you?
Thank you for voting!
Oven door handle broke
Had to take back off of the door to get to screw that held the broken piece of handle before installing the new part. Then had to put the back on the door and slip the door into place.
-
William from Bartlett, TN
-
Difficulty Level:Easy
-
Total Repair Time:15 - 30 mins
-
Tools:Pliers, Screw drivers
3 of 4 people
found this instruction helpful.
Was this instruction helpful to you?
Thank you for voting!
- < Prev
- 1
- 2
- 3
- Next >
Customer Reviews
Filter By Rating:
- < Prev
- 1
- 2
- 3
- Next >
Sort by:
Search filter:
Clear Filter
Your search term must have 3 or more characters.
Keep searches simple. Use keywords, e.g. "leaking", "pump", "broken" or "fit".
Sorry, we couldn't find any existing reviews that matched. Try using some different or simpler keywords.
James H - October 26, 2022
Verified Purchase
It was just what we wanted
The service was great
Jeffrey B - September 23, 2022
Verified Purchase
Over priced
Over priced for a plastic endcap.
Nina R - September 12, 2022
Verified Purchase
just what we needed!
easy order, great customer service,
Patricia P - September 1, 2022
Verified Purchase
Great service
We ended up ordering a second end cap and the handle. Customer service was very helpful and easy to work with
Stephanie S - February 22, 2022
Verified Purchase
easy repair
appliance is back in order
Connie B - January 26, 2022
Verified Purchase
Easy repair
It fit perfectly, and with the video, was easy to fix.
Bonnie P - December 5, 2021
Verified Purchase
Harder to replace than expected
Part was in great shape when received but little clips are plastic and broke off easily.
Dana F - September 12, 2021
Verified Purchase
Easy repair
Would have appreciated instructions, but was pretty easy to figure out. Worked great.
Ron S - July 28, 2021
Verified Purchase
Worked as advertised
Received two end caps and oven door handle in less time than I expected. Easy to install. It took me no more than 5 minutes to replace the oven door handle on my range
Roxie B - June 29, 2021
Verified Purchase
putting the handle back together
i received the part in a timely manner but they did not fit the way they should but i fixed anyway and it is fine would buy more from you all
- < Prev
- 1
- 2
- 3
- Next >
You May Also Need?
Model Cross Reference
This part works with the following models:
PartSelect Number: PS256613
Manufacturer Part Number: WB7X7183
Brand
Model Number
Description