Your coupon for will be reflected when you check out!
✖
Your coupon for
✖
Hello!
You're visiting the PartSelect site in U.S.
Would you like to shop on the Canadian site?
Stay on this site
Go to Canadian site
✖
Model Number Locations
1Select Category Type
Select Category Type
2Select Product Type
Select Product Type
3Select {MODEL} Type
Select {MODEL} Type
Sample Model Number Tags
Model numbers can be made up of numbers (1005400, for example) or a combination of letters and numbers (LAT1000AAE). The model number will most likely appear on either a paper sticker or a metal plate. Your appliance's model number tag may look similar to the sample model number tags shown here (model number highlighted in yellow):
Model has been saved to My Models. If you're not signed in, your lists are available on this device and will expire within 30 days.
Model has been saved to My Models.
This 40-Watt light bulb is sold individually.
It is specially designed to withstand extreme temperatures, so this bulb is compatible with a variety of appliance types including refrigerators, ranges,...
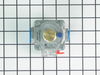
This Genuine OEM GE Electrode Clip is a precision-engineered component designed for use across a wide range of gas ranges. Constructed from durable metal, the clip plays a critical role in securing th...
This is a replacement cooktop mounting screw, used to secure the burner. If you are missing that screw on your range, this is the part to replace it. This screw is about a half an inch in length and i...
The GE brand is known for its high-quality appliance parts and this OEM Indicator Light for Ranges is no exception. This small yet significant piece lights up to signal when the oven or surface burner...
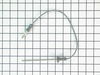
I removed the old igniter by working a thin screwdriver under the edge of the igniter, and carefully prying it up. I then used pliers to pull off the electrical wire. Connected up the new igniter, and pushed it back into the hole. A very simple repair.
I've replaced 2 igniters on this stove. My symptoms were that when I tried
... Read moreto light one of the bad burners I heard clicking, and could see the spark on the other (working) burners. So I knew the basic sparking function was working. Just that the igniter on the broken burner would not spark.
Other writers have claimed that this is a "really easy" job. They apparently had one or more of: 1. Less used appliance. 2. Never spilled anything on the cooktop 3. Much better luck. In my case, the apparently faulty igniter absolutely would not pull out. I removed it by removing the burner retaining screws and prying under the burner cas
... Read moreting. Having done that, I cleaned the igniter and tested it again. None of the igniters worked, and I could hear arcing under the cooktop, indicating one or more of the igniter HV wires had somehow grounded. After a fruitless search for instructions on raising the cooktop, I stumbled upon an envelope glued to the back of the range that told me to remove all four burners and igniters and to release the cooktop by inserting a thin screwdriver under the front edge about 3" from each end to release the spring clips. Several of the igniters were cemented in place with caramelized sugar and required some pretty vigorous prying to dislodge. If I had this to do again on a range that had been ridden hard, I wouldproactively order a full set of gaskets (they're fragile), the HV harness (even if it doesn't leak as mine did, the igniter connectors degrade from heat exposure), a set of electrode mounting clips (none of them were much use either), and enough igniters to replace any that don't work plus at least one. I pried out the recalcitrant igniters; in retrospect I should have crushed them because of the severe risk imposed by prying of breaking either a burner casting or the cooktop -- either of which are far more expensive than another igniter.
The first step was to determine whether the problem was with the fan itself or the switch. I did this by opening the back cover and using a Volt meter to verify that the fan was not getting power. (I could have skipped this step.)
Next, I unplugged the range, closed up the back cover and lifted the range hood by removing two he
... Read morex head screws that are just inside and on either side of the top of the opening in the range door. Propping the hood open, I removed the connector leading to the switch, then pushed the switch out the front. Inspection showed that the switch was damaged so I closed up the range and ordered the part from Part Select. Once the part arrived, it was a 15 minute job to unplug the range, lift the top, install the new switch, and close up the unit.
Caution. On starting to install the switch, I failed to unplug the range and my finger brushed one of the hot contacts leading to the switch. Thankfully, I was not injured. Do not repeat my mistake on this issue. Unplug the range even if you're only installing this simple switch.