Your coupon for will be reflected when you check out!
✖
Your coupon for
✖
Hello!
You're visiting the PartSelect site in U.S.
Would you like to shop on the Canadian site?
Stay on this site
Go to Canadian site
✖
Model Number Locations
1Select Category Type
Select Category Type
2Select Product Type
Select Product Type
3Select {MODEL} Type
Select {MODEL} Type
Sample Model Number Tags
Model numbers can be made up of numbers (1005400, for example) or a combination of letters and numbers (LAT1000AAE). The model number will most likely appear on either a paper sticker or a metal plate. Your appliance's model number tag may look similar to the sample model number tags shown here (model number highlighted in yellow):
GTH17DBDDRWW General Electric Refrigerator - Overview
Save your modelModel Saved!
Save your model for later to make things easier.
Model has been saved to My Models. If you're not signed in, your lists are available on this device and will expire within 30 days.
Model has been saved to My Models.
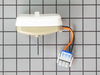
This 115-volt 60Hz evaporator fan motor is located in the back of the freezer and circulates air over the refrigerator coils. These coils will convert the heat into cool air, which is then circulated....
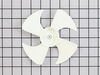
If you notice that your refrigerator or freezer is noisy or too warm, you may need to replace the evaporator fan grommet. This part is red in color, and is about 1 inch in diameter. The evaporator fan...
This door shelf is a replacement part for your refrigerator. It is very easy to install and requires no tools. Simply pull out the existing shelf bar and snap the new one into place, making sure the l...
This part is the door fixed shelf, also known as the door shelf bar, and it is built for your refrigerator. It allows food and beverages items to stay in the door shelf. It is made of white plastic. I...
This 40-Watt light bulb is sold individually.
It is specially designed to withstand extreme temperatures, so this bulb is compatible with a variety of appliance types including refrigerators, ranges,...
The interior light of your refrigerator is controlled by a switch that is activated when the door is opened and closed. If your refrigerator light will not turn on, there could be an issue with the sw...
This compression ring is meant to hold the evaporator fan motor in place in the freezer compartment of your refrigerator. This is is a genuine OEM part. The tools needed to complete this repair are a ...
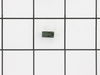
The lid bumper or evaporator fan motor bumper in your refrigerator prevents the fan motor from scraping against the side bracket. If your refrigerator/freezer is noisy, the bumper could be worn down o...
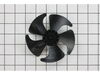
The condenser fan blade assembly helps to regulate the temperature in your refrigerator or freezer. This fan assembly has 4 blades, but other fans may have 3 blades, so be sure to check the number of ...
This is the replacement hinge washer for your refrigerator. The hinge washer is mounted on the top of the door hinge pin, and supports the refrigerator door, allowing it to open and close easily. The ...
$16.05
In Stock
Order now and your part arrives by May 16
Questions And Answers for GTH17DBDDRWW
Ask our experts a question about this model and we'll get back to you as soon as possible!
3 questions answered by our experts.
Sort by:
< Prev
1
Next >
Search filter:
Clear Filter
Your search term must have 3 or more characters.
Keep searches simple. Use keywords, e.g. "leaking", "pump", "broken" or "fit".
Sorry, we couldn't find any existing answers that matched.Try using some different or simpler keywords, or submit your new question by using the "Ask a Question" button above!
Charles
December 7, 2022
Does the 40 watt light bulb inside the fridge have a fuse . I tested the bulb on other sockets in the house and it works fine but not in the fridge . If yes where can I find it . Thank you.
For model number GTH17DBDDRWW
Hello Charles, thank you for contacting us. We would recommend checking the light switch, part number PS8758429. This switch is operated by the door opening and closing and controls the light. When faulty the refrigerator light may not work. Please get in touch with customer service if you need help placing an order, anyone will be happy to assist you. We hope that helps.
Which way to turn the temperature thermostas Dial to get the fridge colder? Clockwise or Counterclockwise? Thank you
For model number GTH17DBDDRWW
Hi Joe, thank you for getting in touch. For colder temperatures, turn the dial clockwise towards snowflakes. For warmer temperature, turn the dial counterclockwise away from the snowflakes. Allow 24 hrs of adjustment. We hope that helps!
1 person found this helpful.
Did this question help you?
Thank you for voting!
Alfred
December 7, 2022
I have a refrigerator and cannot get the bottom door to go back on
For model number GTH17DBDDRWW
Hello Alfred, thank you for your inquiry. We recommend cleaning the gasket and reattaching the gasket, balancing the feet, tightening the hinges, and clearing items from the door. If that doesn't work, you'll need to replace the gasket, part number PS2364916, and inspect the center hinge and pin assembly, part number PS8690695, as well as the bottom hinge. We hope this helps!
I removed two srews from the back panel inside fthe reezer compartment and the two that hold the air manifold/baffle? and pulled the baffle out. Then, I removed the two srews that hold the front part of the fan bracket behind the baffle and the back panel came out easily. Two more screws and one quick connect plug attached to the fan and
... Read moreI was done with removal. Insallation was even quicker, I slid the original fan right off the old motor and slid it on the new motor's shaft. Piece of cake! Thanks Partselect.
the repair was really easy!!! took longer to put the little clip on the fan part than it was to install the whole moter and put everthing back together
I applied some tips learned by reading other reviews. So before I started I grabbed my trusty vise grip pliers and a small screw driver. I locked onto the switch actuator, the part that the refrigerator door pushes in, with the vise grips and pulled on it just hard enough to get the screw driver inserted in the right side to push in the c
... Read moreatch clip so the switch could be pulled out further each time the catch clip was depressed to the next detent. Then I used the screw driver on the left site to encourage the switch past the detents on the left and very quickly the switch was out of the mount. The wires from the refrigerator pulled out with the old switch. I unplugged the old switch from the wires and plugged in the new switch and shoved the new switch back into the mount, wiggled it a couple of times to make sure it was secure and the job was done. Once I applied the vise gripes at first, the whole job took less than a minute.