Your coupon for will be reflected when you check out!
✖
Your coupon for
✖
Hello!
You're visiting the PartSelect site in U.S.
Would you like to shop on the Canadian site?
Stay on this site
Go to Canadian site
✖
Model Number Locations
1Select Category Type
Select Category Type
2Select Product Type
Select Product Type
3Select {MODEL} Type
Select {MODEL} Type
Sample Model Number Tags
Model numbers can be made up of numbers (1005400, for example) or a combination of letters and numbers (LAT1000AAE). The model number will most likely appear on either a paper sticker or a metal plate. Your appliance's model number tag may look similar to the sample model number tags shown here (model number highlighted in yellow):
Model has been saved to My Models. If you're not signed in, your lists are available on this device and will expire within 30 days.
Model has been saved to My Models.
This oven handle end cap connects to your oven door handle, and acts as the joint that connects it to the oven door. This part is made of black plastic and can be used as the left or right-side end ca...
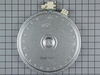
This is a large dual haliant element with a limiter or sensor for glass cooktops and freestanding ranges. It is a 2500-watt part. The inner diameter measures 9 inches, while the outer diameter measure...
This light bulb lens covers the interior light bulb in an oven, range, or stove. No tools are necessary to replace this part. Simply slide off the wire bracket to remove the existing light bulb lens. ...
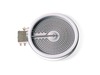
This haliant burner element is a gneuine OEM replacement part for your stove. This element is 8 inches in diameter. The element lies underneath the stovetop, and will need to be replaced if it stops h...
Introducing GEs 6 Inch Heating Element, the ultimate solution for your appliance repair needs. Authentic and guaranteed for quality, this radiant surface element is designed to be the perfect replacem...
This was really easy, and pretty with no problems or issues It took me longer to write this than to do the actual installation. I used a digital camera to help me remember where things were, but a pen/paper works fine. Here's what I did:
1. Turn off the breaker for the cooktop.
2. Remove (2) 1/4" hex screws directly
... Read moreunder cooktop. You may need to open oven door to reveal them.
2. Prop up cooktop. I used the box the replacement element came in.
3. The element is held in place with (3) brackets held in by a #2 philips screw each. Mark the location of each of the brackets. There are numbers on the element to help you do this.
4. Write down where each of the wires connects to the element. There's only a few of them, but I tend to forget that stuff. The wires have female spade-type connectors that connect to the male ends on the element.
5. Using a needle-nose or small pliers wiggle each wire off the element. Grab the wires by the end of the female connector when you do this. I found it helpful to use a small flat screwdriver to help pry them off. Mine were on pretty tight, so expect this to take a few mins. If you have problems getting to the wires, remove the brackets (next step) first and come back to this one. I let the element hang from the wires without any problems, but I still wouldn't recommend it.
6. Remove each of the screws with a #2 philips screwdriver. Support the element with your hand and gently pull each bracket away from the element. Once they're all gone, the element should just come out. I took a look at my old element and saw that the large burner wires were melted in a couple places, so it was definitely broken.
7. If necessary, clean the underside of the cooktop surface with a clean papertowel. There was a little dust from the old element on mine.
8. Connect the new element and test to make sure it works by turning on the breaker and turning on the burner for a second or two. Note: This will make the top of the element hot for some time, so test it and go away for a few mins. If it works OK, proceed. If not, disconnect and figure out what else may be wrong.
9. Using the old element, make copies of the marks you made for the bracket locations onto the new element. You'll have to punch through the insulation when re-attaching the screws.
10. Re-wire the new element, if necessary and re-attach the brackets over the marks you made. This may be a pretty tight fit because the new element was thicker than the old on mine. I opened up the brackets a bit to make it not so hard to re-attach. Hook the brackets on and squeeze them over the element. The holes in the brackets need to line up with the holes drilled into the bottom of the element. If they don't, spin the element around (or detach and re-attach the brackets) till they do.
11. Screw in the (3) screws over the brackets pushing them through the insulation on the element.
12. Close the cooktop and reattach the hex screws under it (1/4" hex).
Repair was very simple. Removed 2 screws under the cooktop, tilt the cooktop back, unplug 4 wires from 8" burner, remove two screws holding retaining clips, install new burner in reverse order. Very simple!