Your coupon for will be reflected when you check out!
✖
Your coupon for
✖
Hello!
You're visiting the PartSelect site in U.S.
Would you like to shop on the Canadian site?
Stay on this site
Go to Canadian site
✖
Model Number Locations
1Select Category Type
Select Category Type
2Select Product Type
Select Product Type
3Select {MODEL} Type
Select {MODEL} Type
Sample Model Number Tags
Model numbers can be made up of numbers (1005400, for example) or a combination of letters and numbers (LAT1000AAE). The model number will most likely appear on either a paper sticker or a metal plate. Your appliance's model number tag may look similar to the sample model number tags shown here (model number highlighted in yellow):
GLD2850T05CS General Electric Dishwasher - Overview
Save your modelModel Saved!
Save your model for later to make things easier.
Model has been saved to My Models. If you're not signed in, your lists are available on this device and will expire within 30 days.
Model has been saved to My Models.
This is a replacement axle for the wheel on your lower dish rack. The wheel must be ordered separately. All you need to complete this repair is a pair of needle nose pliers. Remove the rack stops and ...
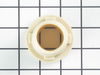
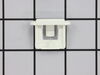
The Rack Slide End Cap is a white one-inch plastic part which replaces the end cap for your dishwasher rack, preventing your rack from sliding too far. If you find the dish rack is causing the door to...
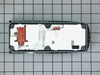
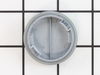
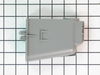
This detergent dispenser assembly is attached to the inner door panel of a dishwasher. This part holds detergent and dishwasher rinse products in a covered container. If your dispenser will not open, ...
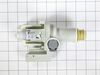
This water inlet valve should be located behind the lower kickplate panel in either the right or left corner. The attaching solenoids on the valve open and close according to the desired amount of wat...
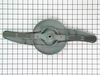
The lower spray arm is mounted to the bottom of your dishwasher tub, and it rotates and sprays water to clean the dishes in the lower dish rack. This spray arm is made of gray plastic, and is approxim...
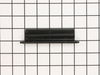
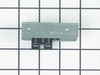
This is a handle actuator for your dishwasher. It is made of black plastic, and is sold individually. The handle actuator is found in the control panel, and it releases the door latch when you lift th...
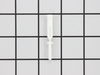
This OEM-compatible screw is designed for use with many GE dishwashers. Measuring 8-16 HXW and 1/2" in length, this stainless steel screw secures the middle spray arm hub to the upper rack assembly, e...
Your dishwasher’s middle spray arm is connected to the top dish rack, and moves the water around to clean the dishes. If your dishwasher is noisy, or it is not cleaning the dishes properly, you may ne...
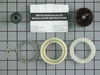
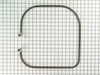
This is the tub gasket replacement for your dishwasher. The tub gasket fits around the perimeter of the door and forms a seal that prevents the dishwasher from leaking when it is filled with water. If...
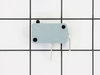
This switch interlock is found on your dishwasher door, and it must be actuated for the dishwasher to start. If your dishwasher door does not close properly, or if the machine will not start, you may ...
Turned off power to unit, 'cuz it has a solenoid lead to open the soap door. Removed the phillips head screws that held the door together. The screw are located on the inside edge of the door, there are 10-12 of them. Spearated the door shells carefully, trying not to disturb the location of the wiring in the middle of the doo
... Read morer.
Found the 4 screws that hold the module assembly to the door from the inside, and removed them. Popped the assembly out, cleaned the gasket-seat area and placed the new one in place. Carefully tightened the 4 screws. It is easy to over-tighten them, so only turn them until you feel they are snug. Let the gasket do the work. Attached the two solenoid control wires in the same positions they were in before they were removed from the old assembly. Re-assembled the door halves, again taking care to not over-tighten the phillips-head screws. One got "spun" and I removed it and re-set it into some epoxy. Returned power to the dishwasher, and stopped washing dishes by hand. Note: the latch is now made with a plastic that is more dense, and likely will not fail as soon as the original one did. I think GE learned something about the durability of their component plastics since this was originally built.
The hardest part for me was pulling the dishwasher out from under the countertop. Once it is out all you have to do is disconnect the power (or power off the fuse going to the dishwasher) then look underneath the dishwasher and you will see where the two ends of the heating element come through. Disconnect the wires connected to the ends
... Read moreby simply sliding off the connector. Then remove the plastic "nuts" that screw onto the ends of the heating element by turning them counterclockwise counterclockwise. Once the nuts are removed you can reach inside the dishwasher and remove the old heating element and replace it with the new one. Then simply replace the plastic nuts and reconnect the wires and you are good to go.
First and formost before you buy read everything in trouble shooting your dishwasher. Then you do not buy parts you do not need. First you turn off power, then water. Remove two screws, a rubber hose and a hard line by unscrewing if you are lucky some contractors might sweat this on. No biggie just two extra steps that's all. do in reve
... Read morerse to assemble...