Your coupon for will be reflected when you check out!
✖
Your coupon for
✖
Hello!
You're visiting the PartSelect site in U.S.
Would you like to shop on the Canadian site?
Stay on this site
Go to Canadian site
✖
Model Number Locations
1Select Category Type
Select Category Type
2Select Product Type
Select Product Type
3Select {MODEL} Type
Select {MODEL} Type
Sample Model Number Tags
Model numbers can be made up of numbers (1005400, for example) or a combination of letters and numbers (LAT1000AAE). The model number will most likely appear on either a paper sticker or a metal plate. Your appliance's model number tag may look similar to the sample model number tags shown here (model number highlighted in yellow):
Model has been saved to My Models. If you're not signed in, your lists are available on this device and will expire within 30 days.
Model has been saved to My Models.
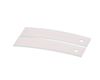
This authentic, white Drum Bearing Slide, also known as the bearing drum slide, glide, or pad, is a plastic, easy-to-install part for your dryer. It replaces the dryer's front drum slide to allow for ...
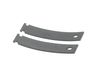
This original equipment manufacturer Drum Bearing Slide is a plastic, green, easy-to-install part for your dryer. It replaces the dryer's front drum slide to allow for easier movement. You'll know if...
This rear drum bearing kit includes a shaft, ground strap, bearing, seven screws, and installation instructions. The bearing plate comes with a slot in it for the ground strap. This part helps keep yo...
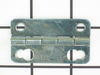
This door latch is designed for your dryer, and is mounted to the dryer frame. The door latch holds the door of your dryer closed while the machine is operating. If your dryer door is not catching on ...
TThe door strike for your dryer is mounted on the dryer frame that the door shuts onto. It fits into the door catch on the door and keeps the door closed. If the door strike is damaged or missing, the...
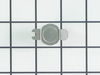
This part is the replacement high-limit thermostat or safety thermostat for your dryer. The high-limit thermostat is found on the upper right-hand side of the heater housing, and it cuts off power to ...
First of all, unplug the dryer. I removed the two screws on the front of the cabinet to remove the top. I then took out the screws to remove the dial panel. Release the belt for the drum through the access hole in the rear of the dryer. Remove the front cover and pull the drum assembly out.
Remove the element disc from the
... Read more rear of the housing, take note of the the wireing placement. Replace disc and reverse order of disassembly.
This job was easy for me as I am a tinkerer by nature. The hardest part of the whole job was waiting on the part, which by the way was ordered on a Sunday evening and I had the replacement in my hands and back in the dryer running by 1:00 PM on the following Tuesday!
I book marked this website and WILL refer it to others who simply need a repair, not a costly new appliance!
The end repair was very simple and took minimal effort. The time and difficulty was all in the testing. I disassembled the dryer and removed the drum and then hard wired each thermo-fuse to determine where the fault was. After test all of those I was stumped. When I opened the door the light would not come on so I assumed it was a pow
... Read moreer fault closer to the source. However after all of my testing I couldn't find anything wrong. I then removed the light bulb and realized it was burned out which led me to the door switch being the fault. I removed the switch and soldered the three wire together and the dryer started right up! All I had to do was order a new $15 part, unsolder the wires and plug them in. Would have been so much simpler if that light bulb hadn't of been burned out causing me to over think my diagnosis. This was my first major appliance repair and I did it with only the help of the parts diagram provided on the website.
I confirmed the dryer wasn't making any heat by running it for a few minutes, then opening the door. The air was cool, so I knew it wasn't making heat. I searched on Google and discovered that it could be the thermostat control or heating element. I began by unplugging the dryer from the 220 plug and moving it into the garage. I then
... Read moreunscrewed the top four Torx screws that hold the control panel in place. I immediately started to take lots of pictures of the wiring with my digital camera because I have no idea how to read a wiring diagram and knew I would never be able to remember which wire plugged into the appropriate control. Trust me, this is the smartest thing I've ever done. I unplugged all connections and draped the wires out of the way. Then removed the control panel completely and put it on my workbench. Then I unscrewed the top panel which exposes the drum. I was really surprised to learn how simple a dryer really is. I then unscrewed the front panel with the door. There are 3 or 4 wires that you will need to disconnect on the left side of the door. You can then remove the front door panel and set it up against a wall or whatever. At this point the front of the drum is NOT supported so it will rest on the small bottom panel in the front. Then you have to release the tension of the belt around the drum, which is easy enough to do. Just reach through the front, under the drum and pull the tension toward the right side of the dryer. This will release the tension and you should be able to slide the belt off of the roller. You may also have to unscrew the sides of the dryer panels in the front so that you can pull the drum out. It's fairly lightweight, just big and awkward. Once the drum was out, I could clearly see that both heating coils were burnt in two. There are some wires you'll need to disconnect on the element housing then there are 4 screws that hold the housing to the back of the dryer. Unscrew these and pull the element out. From there, I just followed the directions that came with the heating coil parts and reinstalled new coils. Once the coils are in place, just work backward putting things back together. Now, when you take the dryer apart, it's a GREAT idea use compressed air or a vacuum to blow or suck out all of the lint inside. I also blew out the electric motor and got everything all nice and clean inside. I also vented my dryer directly into my garage. It's an electric dryer so no dangerous fumes. Plus side to this is that I'll have heat in my garage during the winter months. Also, instead of the dryer venting 50+ feet out the side of the house, it now vents 3 feet to the garage. The dryer will now dry a full load of clothes on MEDIUM heat in 50 minutes. It used to take 80 minutes on high heat. This is a difficult fix, but if you take your time and lots of pictures, you can do it and save yourself a ton of money.