Your coupon for will be reflected when you check out!
✖
Your coupon for
✖
Hello!
You're visiting the PartSelect site in U.S.
Would you like to shop on the Canadian site?
Stay on this site
Go to Canadian site
✖
Model Number Locations
1Select Category Type
Select Category Type
2Select Product Type
Select Product Type
3Select {MODEL} Type
Select {MODEL} Type
Sample Model Number Tags
Model numbers can be made up of numbers (1005400, for example) or a combination of letters and numbers (LAT1000AAE). The model number will most likely appear on either a paper sticker or a metal plate. Your appliance's model number tag may look similar to the sample model number tags shown here (model number highlighted in yellow):
Model has been saved to My Models. If you're not signed in, your lists are available on this device and will expire within 30 days.
Model has been saved to My Models.
The tub dampening straps support the wash tub and reduce vibration by keeping the tub at the center of the cabinet. If your washer shakes and moves, or is making a loud banging noise during the wash c...
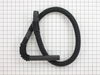
The drain hose is black in color and made of flexible material. This is a part for your top-load washer. The hose measures 57 inches long. This part moves the water out of the washer and into the drai...
The main tub seal is located between the transmission and the outer tub. Its the primary water seal in the outer tub for the transmission-shaft. If your washer is leaking during the fill cycle, or at ...
This is a tub bearing and it is meant to work in conjunction with your washing machine. The purpose of this part is to aid in keeping the inner tub of your washing machine spinning smoothly during a w...
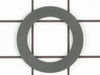
This split ring is supplied by the original equipment manufacturer, and it is designed to secure the tub bearing in washing machines. It is a circular metal ring, with an outer diameter of 2 inches. T...
This tub bearing goes in your washing machine. You will find it on the bottom of the outer tub, where the transmission goes through the tub. If you hear metal on metal when the washer is spinning, you...
This lid switch with wire harnesses is used in washing machines. The pin on the lid switch pushes onto the lever of the switch to communicate to the machine that the washer lid is closed. If your wash...
This replacement inlet drain hose connects your washer's water pump to its tub. This hose is seven and a half inches in length and only two inches wide.
This is a water pressure switch hose, also known as the air dome tube, for your washer. It is made of clear plastic and is sold individually. The hose transports water to your water pressure switch, s...
The purpose of the triple water valve is to properly fill your washer with water by controlling the hot and cold water going into the tub. If your washer is overfilling or not filling, you may need to...
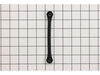
This is the start/stop button for your washer. If your washer will not start after the button is depressed, you may need to replace it. However, you may also want to check your door switch, because wh...
Ask our experts a question about this model and we'll get back to you as soon as possible!
2 questions answered by our experts.
Sort by:
< Prev
1
Next >
Search filter:
Clear Filter
Your search term must have 3 or more characters.
Keep searches simple. Use keywords, e.g. "leaking", "pump", "broken" or "fit".
Sorry, we couldn't find any existing answers that matched.Try using some different or simpler keywords, or submit your new question by using the "Ask a Question" button above!
Dale
January 21, 2023
When you push start, it does not put water in the tub, but I will jump to wash without water in it
For model number GCWN4950D1WS
Hello Dale, thank you for contacting us. The issue is probably related to a faulty water inlet valve, part number PS3652834, and a defective pressure switch, part number PS2354068. Please test these parts with a multimeter. If this does not help, the issue is probably related to a faulty control board, part number PS8757105. It manages the washer's functions such as filling, washing, draining, and spinning. Customer service is available 7 days a week if you require assistance placing an order. Thanks again for reaching out!
I have two problems with this top load washer. 1) water will drip into the tub when the washer is not in use and 2) on all but one setting the water will start to fill the tub but then stop. Any guidance you can provide on this fix would be great.
For model number GCWN4950D1WS
Hello Tisha, thank you for contacting us. Before replacing any part, we would recommend checking the pressure of the water. If the pressure is low, then the water inlet valve is not detecting that water, and it starts filling the tub. If the issue still occurs, you may need to check the water inlet valve, part number PS3652834, and the electronic control board, part number PS8757105. We hope this solves your problem!
After removing frt panel which prys off I checked for anything obvious like a loose belt. Then I jiggled the magnet switch located on the inside of the loading cover. I saw the machine start agitating the it stopped again when I stopped touching it. I ordered the new part and spliced it in with the wire crip tool. Now the machine is A ok.
To diagnose, first I unhooked the washer: power, water supply, and drain pipe. I then slid the washer out, laying it on its front. With nutdriver, I unscrewed two screws that held the other end of the drain tube and removed it completely. Then, again with the nutdriver removed 4 screws from the back near the legs, two in between the leg
... Read mores in the middle, and approx. 4 to 6 on the bottom. This let me pull the bottom off partially to access the motor area. (I did did not take the bottom completely off, only about 2/3 off and let it bend over, as it was flexible tin) The belt was broken. After receiving the new belt, I positioned it between the pulley and the motor and between the drum and the big pulley. Then I rotated the big pulley, pulling the belt onto it as I rotated. At the same time, as I rotated, I pulled the other end of the belt on to the little pulley. Once it was on, I would put pressure on it as I turned the pulley, to jump the belt to the appropriate grooves on the little pulley. Note: the replacement belt had been modified, so it had one less groove than the pulley. I would have known this if I had read the insert that came with the belt first! Anyway, this was not a problem, only a design change. Also it was important to start the belt on the inside, so if it slipped, you didnt loose your bite. Total diagnostic, repair, and reassembly time: 30 minutes plus or minus. I had read other online forums that said you had to loosen the motor, etc. And I do know some type of a belt installation tool was offered on line, but I got along fine with my installation method. An extra set of hands would have been helpful, but not necessary.
Used 1" puddy knife to depress spring loaded retainer tabs. Front panel is removed by prying the top of the front panel away from the machine. Lift front panel to release bottom from machine. Set panel aside. New belt is installed by placing it on the drive pulley and then rolling belt onto the motor pulley. Rotate the motor by hand while
... Read more moving belt so it is properly seated on pulley.