Your coupon for will be reflected when you check out!
✖
Your coupon for
✖
Hello!
You're visiting the PartSelect site in U.S.
Would you like to shop on the Canadian site?
Stay on this site
Go to Canadian site
✖
Model Number Locations
1Select Category Type
Select Category Type
2Select Product Type
Select Product Type
3Select {MODEL} Type
Select {MODEL} Type
Sample Model Number Tags
Model numbers can be made up of numbers (1005400, for example) or a combination of letters and numbers (LAT1000AAE). The model number will most likely appear on either a paper sticker or a metal plate. Your appliance's model number tag may look similar to the sample model number tags shown here (model number highlighted in yellow):
Model has been saved to My Models. If you're not signed in, your lists are available on this device and will expire within 30 days.
Model has been saved to My Models.
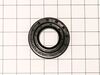
This magnetic door plunger, also known as the magnet holder, is built for your washer. When you order this part, you will receive the plastic housing and a spring that goes with it. The magnetic door ...
If you notice your washing machine is leaking water from the top of the transmission, it might be due to the gasket being damaged or worn down. When replacing your gasket, consider replacing your tub ...
This is a tub-to-pump drain hose for a front load washer. The hose features flexible bellows which allow it to expand and contract when necessary. It carries the water from the tub of the washer to th...
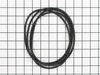
This is a seal for a washer tub. It creates a seal between the front and rear halves of the washer tub to prevent the appliance from leaking. If you notice leakage between the two sections of the tub,...
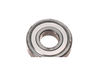
This tub bearing is for washers.
Tub bearing supports the spin basket shaft at the tub.
Unplug the washer and shut off the water supply before installing this part. Wear work gloves to protect your hands.
Upgrade your LG washing machine with this genuine OEM tub bearing. Designed specifically for LG rear tub models, this high-quality component provides support to the spin basket shaft at the tub, ensur...
The drain hose assembly is a genuine OEM assembly supplied directly by LG for use in washing machines. The assembly includes the hose, connector, elbow fitting, and metal clamp. It is responsible for ...
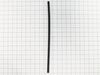
This is a locking pin, and it works in conjunction with your washer. The part measures to be roughly 3 inches long, and less than an inch wide. The pin is cylindrical, off-white in color, and made ent...
The door boot seal clamp, also referred to as an outer door gasket clamp, holds the door boot in place in a front-loading washer. If your washer is leaking from the door and there are no signs of dama...
This shipping bolt is an OEM part that holds the tub and basket of your washer steady during transport, stopping them from moving around and getting damaged. You will usually find these bolts at the b...
$19.30
Special Order
Questions And Answers for GCWM1069QS8
Be the first to ask our experts a question about this model!
✖
Ask a Question
Ask our experts a question on this model and we'll respond as soon as we can.
There is a magnet at the bottom of the door which allows the door to be held ajar when the washer is not in use to allow the tub and gaskets to dry. A tab on the plastic housing which retains the magnet broke which allowed the housing to pull free of the door and stick itself to the machine preventing the door to close. Easy fix to replac
... Read moree the magnet was $18. Instructions were included in the box. Part number on the drawing was A165. PS3618292 Magnetic Door Plunger
Pull washer away from wall. Unplug cord and remove drain hose from receptacle. Remove 4 screws holding panel to rear of washer. Squeeze and slide back hose clamps on each end of drain hose and loosen center clamp with screwdriver. Remove old hose. Reinstall new hose in reverse order using existing clamps. Re-install back panel.
I went online and looked at the different parts companies for this brand of washer. This is an LG Tromm steam washer. I am pretty mechanically inclined so I watched videos on this machine which you can also find on line and U-Tube and took down some notes that I felt relevant for the disassembly and the repair. I looked at the break down
... Read moreparts schematics and ordered all the parts I felt I needed for this machine. The parts I ordered were the tub hub seal and the inner and outer bearings that go on the spindle shaft which is connected to a piece they call the spider that connects to the inner tub. I also ordered the outer tub o-ring where the outer tub splits in half. Note that I mentioned the spider and that they have a tendency to corrode bad, but you cannot see it until it is disassembled, the parts I ordered are reasonable, the spider can cost upwards of a hundred plus dollars so make sure you evaluate the cost of parts to the age of your machine and to the cost of a new one. Well on my front load washer when I finally took it apart and I felt I got lucky with just the two spindle hub bearings and the seal and the outer tube seal. After looking at the videos and taking some notes, written and mental, I started the disassembly of the washer. First " unplug the power to the washer". the next step is to shut off your two water supplies to the washer and disconnect the hot and cold water lines, note that I disconnected the lines at the washer just for the convenience of not having those lines hanging off the machine and out of your way. another note is that you will want an area with some space so you can keep everything organized and give yourself some room to work. Once you have your machine moved to a open space, start by removing the top of the machine. there are two screws, 4 total in the back of the cover that are removed with a plastic bracket on each side, these are Phillips head or cross type screws. once removed, take the top and shift it back about 1 to 1.5 inches, you then can lift the top off and out of the way. The next step is to remove the front control panel by starting with the wire connectors that go into the control panel. Each connecter is different so there is no mix up. next is to remove your soap dispenser tray, on top of the tray about in the center towards the back is a spot that you gently push down on and this will release the tray for removal and move it out of the way. There are two Phillip screws on each side where you removed the tray that need to be removed to be able to remove the dispenser section out of the way. there are hoses connected to the dispenser but once lifted up an out you can lay the dispenser with the hoses connected over towards the back. There is a large rubberized hose connection that needs to be removed which has a clamp on it that you need to loosen up to take loose the connection. back to the front control panel there is one more screw on the back side on the right side looking at the front that must be removed then the front control panel assembly can be removed. there are some plastic clips on the control panels back side that need undone, gently and be careful not to force these clips but slightly lift up on the rear of the control panel and it should come out of there and then set the control panel aside. There are I believe 6 screws on the top of the front door panel assembly that need removed but before you do that down on the left bottom corner you have a panel door which pops open then is easily removed out of the way. there is a small rubber line with a plug in the end of it which can be pulled a little ways. Get a container that is low profile and pull the plug on the hose and direct it into the container, you may or may not get any water out of it, it is the tub drain. reinstall plug when done and put line back in place. Next take the pump screen out by unscrewing it out counter clockwise like a bolt, it is about 1.5 inches in diameter, you may want to put a small towel down in front of it because you will usually get a little water out of it. Once removed, inspect the plastic screen for any debri and remove it and reinstall the screen. Now down in that same area below the screen there is a Phillips screw which needs to be removed and set aside. Now you go to the rubber boot behind the washer door when the door is open on the outer edge there is a metal wire that goes around the boot to hold it in place with a spring on it. You want to gently take a flat blade screw driver and not to tear the boot, work that wire and spring out of its groove and remove it out of the way. now you may take the rubber boot on the front and take it off its edge and push it back in towards the tub. Now we go back to the six screws at the top of the panel and remove them. at this time you should be able to lean the panel out enough to disconnect the wires to the door latch. Once the door latch has been disconnected, lift up on the front door panel and bring it out