Your coupon for will be reflected when you check out!
✖
Your coupon for
✖
Hello!
You're visiting the PartSelect site in U.S.
Would you like to shop on the Canadian site?
Stay on this site
Go to Canadian site
✖
Model Number Locations
1Select Category Type
Select Category Type
2Select Product Type
Select Product Type
3Select {MODEL} Type
Select {MODEL} Type
Sample Model Number Tags
Model numbers can be made up of numbers (1005400, for example) or a combination of letters and numbers (LAT1000AAE). The model number will most likely appear on either a paper sticker or a metal plate. Your appliance's model number tag may look similar to the sample model number tags shown here (model number highlighted in yellow):
Model has been saved to My Models. If you're not signed in, your lists are available on this device and will expire within 30 days.
Model has been saved to My Models.
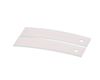
This authentic, white Drum Bearing Slide, also known as the bearing drum slide, glide, or pad, is a plastic, easy-to-install part for your dryer. It replaces the dryer's front drum slide to allow for ...
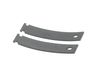
This original equipment manufacturer Drum Bearing Slide is a plastic, green, easy-to-install part for your dryer. It replaces the dryer's front drum slide to allow for easier movement. You'll know if...
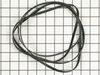
This Drive Belt is 89.5" long and comes in black, featuring four ribs on the inside for a better grip. This is a long belt that wraps all the way around the dryer drum, around a tension pulley, and th...
This is a duct felt seal for a dryer. The duct felt seal allows the front-load dryer drum to glide smoothly on the front panel. Your dryer will not function properly if the drum felt seal is compromis...
This light bulb, also known as a drum lamp, illuminates and lights up the dryer drum when the door is open. If the light bulb in the dryer is burnt out or lighting is inconsistent, replacing it can so...
This rear drum bearing kit includes a shaft, ground strap, bearing, seven screws, and installation instructions. The bearing plate comes with a slot in it for the ground strap. This part helps keep yo...
The drum slides are not included with this part. The top bearing helps your dryer operate as quietly as possible. This part will require two green drum slides and 2 white drum slides.
This door latch is designed for your dryer, and is mounted to the dryer frame. The door latch holds the door of your dryer closed while the machine is operating. If your dryer door is not catching on ...
This rear drum bearing sleeve is a critical support component located at the back of the dryer drum, designed to reduce friction and ensure smooth rotation during operation. As the drum spins, the sle...
TThe door strike for your dryer is mounted on the dryer frame that the door shuts onto. It fits into the door catch on the door and keeps the door closed. If the door strike is damaged or missing, the...
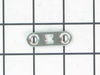
This authentic OEM rear bearing O-ring is designed for use with GE dryers. It helps secure the drum rear bearing onto the drum shaft, playing a key role in maintaining smooth and quiet dryer operation...
Ask our experts a question about this model and we'll get back to you as soon as possible!
5 questions answered by our experts.
Sort by:
< Prev
1
Next >
Search filter:
Clear Filter
Your search term must have 3 or more characters.
Keep searches simple. Use keywords, e.g. "leaking", "pump", "broken" or "fit".
Sorry, we couldn't find any existing answers that matched.Try using some different or simpler keywords, or submit your new question by using the "Ask a Question" button above!
Patty
January 18, 2020
Belt broke will this stop dryer from starting
For model number DBVH512EF0WW
Hello and thank you for writing.
Yes, it could. A belt switch PS1481922 would prevent the motor from running if the drive belt PS1766009 is broken, this is just a safety feature. We hope this helps. Please contact us anytime if you require further assistance.
I need the electronic module o dryer power pcb
8rf4b10204100
For model number DBVH512EF0WW
Hi Jesus,
Thank you for your question. The part number listed under your model number for the user interface board assembly is PS2337893. If you would like to place an order for it, you may order it either online or by calling our customer service line and anyone will be happy to assist you. We hope this helps! If you have any questions, please let us know.
I'm trying to identify the thermal fuse and part number
For model number DBVH512EF0WW
Hello Steven, thank you for contacting us. According to our research, your model does not have a thermal fuse. However, the hi-limit thermostat, part number PS267900, is considered a thermal safety fuse in your model. We hope this information helps!
Hi Vic, thank you for reaching out. We would suggest checking the entire length of the exhaust vent duct for any clogs or restrictions. If it is fine, the issue could be with the lint filter, part number PS1022431. You may need to replace it to fix the issue. We hope this sorts out your problem!
It was pretty easy. After already taking apart the dryer to install a new belt I knew exactly my plan of action. I removed the two screws that hold the top panel of the dryer to the front panel. I then removed the top panel and removed the screws that hold the front to each side panel. I than pulled the front away from the cabinet and
... Read more drum. I put the new slides in place and installed a new felt strip. I put it back together and that was that. Very easy.
1. Removed top cap on lid by removing the 3 - phillips screws. 2. removed front digital display panel from PC board. 3. removed bolts with nut-driver on the top of the front panel, removed bottom screws with #2 square bit. 4. removed "snap-in" plastic top bearing ( paying attention to where wiring is routed within this fram
... Read moree. 5. cleaned all areas of plastic and felt debris, installed new bearing, felt, and glides. 6. Re-installed all wiring and panels.
*** make sure to order all of the glides, there should be a total of 4 for the top assembly.
First of all, unplug the dryer. I removed the two screws on the front of the cabinet to remove the top. I then took out the screws to remove the dial panel. Release the belt for the drum through the access hole in the rear of the dryer. Remove the front cover and pull the drum assembly out.
Remove the element disc from the
... Read more rear of the housing, take note of the the wireing placement. Replace disc and reverse order of disassembly.
This job was easy for me as I am a tinkerer by nature. The hardest part of the whole job was waiting on the part, which by the way was ordered on a Sunday evening and I had the replacement in my hands and back in the dryer running by 1:00 PM on the following Tuesday!
I book marked this website and WILL refer it to others who simply need a repair, not a costly new appliance!