Your coupon for will be reflected when you check out!
✖
Your coupon for
✖
Hello!
You're visiting the PartSelect site in U.S.
Would you like to shop on the Canadian site?
Stay on this site
Go to Canadian site
✖
Model Number Locations
1Select Category Type
Select Category Type
2Select Product Type
Select Product Type
3Select {MODEL} Type
Select {MODEL} Type
Sample Model Number Tags
Model numbers can be made up of numbers (1005400, for example) or a combination of letters and numbers (LAT1000AAE). The model number will most likely appear on either a paper sticker or a metal plate. Your appliance's model number tag may look similar to the sample model number tags shown here (model number highlighted in yellow):
Model has been saved to My Models. If you're not signed in, your lists are available on this device and will expire within 30 days.
Model has been saved to My Models.
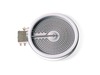
This haliant burner element is a gneuine OEM replacement part for your stove. This element is 8 inches in diameter. The element lies underneath the stovetop, and will need to be replaced if it stops h...
Facing unstable cooking conditions? The GE Glass Range Top Assembly is the perfect solution. This premium quality glass cooktop is more than just aesthetic appeal; it's the heartbeat of your cooking p...
Are you struggling with an underperforming or leaking engine? Don't worry! With the Briggs and Stratton Engine Gasket Set, you can bring your engine back to top form. This total package delivers all t...
Repair was very simple. Removed 2 screws under the cooktop, tilt the cooktop back, unplug 4 wires from 8" burner, remove two screws holding retaining clips, install new burner in reverse order. Very simple!
Unplugged range. Opened oven door and removed two screws from top of oven opening. Lifted oven top and propped up with a 2 x 3.Unscrewed the two screws that were holding