


1058 - Overview
Models starting with 1058
Click on the best match to narrow your results.
- 1058 MTD Lawn Mower (MTD Lawn Mower Model 1058 Parts)
- 1058 Dirt Devil Upright Vacuum (Upright Vacuum)
- 1058(Z) Royal Upright Vacuum (Metal Upright Vacuum)
- 1058-0-580768000 Craftsman Pressure Washer (1058-0 - 580.768000, 1,500 Psi Craftsman)
- 10581-1 General Electric Range
- 10581-2 General Electric Range
- 10581-3 General Electric Range
- 10585 Kenmore Grill (Grill)
- 1058850-0274 (1987) MTD Lawn Mower (Lawn Mower)
- 1058A MTD Lawn Mower (MTD Lawn Mower Model 1058A Parts)
- 1058A850-0274 (1988) MTD Lawn Tractor (Lawn Tractor)
- 1058A850-0274 (1989) MTD Lawn Tractor (Lawn Tractor)
- 1058AF-CW Admiral Range (Electric)
- 1058AF-CZ Admiral Range (Electric)
- 1058AH-W Admiral Range (Electric)
- 1058AH-Z Admiral Range (Electric)
- 1058B MTD Lawn Mower (MTD Lawn Mower Model 1058B Parts)
- 1058C MTD Lawn Mower (MTD Lawn Mower Model 1058C Parts)
- 1058C850-0274 (1990) MTD Lawn Tractor (Lawn Tractor)
- 1058D MTD Lawn Mower (MTD Lawn Mower Model 1058D Parts)
- 1058WF-CW Admiral Range (Electric)
- 1058WF-CZ Admiral Range (Electric)
- 1058WH-W Admiral Range (Electric)
Keep searches simple, eg. "belt" or "pump".

Chrome Drip Bowl - 8 inch
PartSelect #: PS11750107
Manufacturer #: WPW10196405
This manufacturer-certified drip bowl is also known as a drip pan, and it is designed for use with cooktops and ranges. It sits below 8-inch burner elements and catches drips and spills from the cookw...
$11.77
In Stock

Drip Bowl - 6 Inch
PartSelect #: PS11750108
Manufacturer #: WPW10196406
This drip bowl is used for electric cooktops and ranges, it is designed to sit under a 6-inch surface burner. It catches the drips and spills coming from the cookware on the surface burner. This drip ...
$8.55
In Stock

Light Bulb - 40W
PartSelect #: PS884734
Manufacturer #: 8009
This an authentic OEM 40-Watt replacement light bulb, used in a number of household appliances. It is specially designed to withstand extreme temperatures, which is why these replacement bulbs are mos...
$18.22
In Stock

Burner Bowl - 8 Inch
PartSelect #: PS244399
Manufacturer #: WB31T10015
This part is located beneath the element and catches any spills.
$22.52
In Stock

Burner Bowl - 6 Inch
PartSelect #: PS244398
Manufacturer #: WB31T10014
This burner bowl is also known as a burner drip bowl or burner drip pan, and is designed for use with your cooktop or range. It is black in color and is approximately 6 inches in diameter. It can be f...
$18.22
In Stock

Surface Burner Receptacle Kit
PartSelect #: PS1570190
Manufacturer #: 12001676
The tools you will need to replace the surface burner receptacle kit on your range include a Phillips screw driver, and a pair of wire strippers. Before doing this repair, make sure to disconnect your...
$19.30
In Stock

Light Bulb - 40W
PartSelect #: PS217532
Manufacturer #: 40A15
This 40-Watt light bulb is sold individually.
It is specially designed to withstand extreme temperatures, so this bulb is compatible with a variety of appliance types including refrigerators, ranges,...
$20.37
In Stock

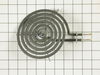
Surface Element - 6 Inch - 240V
PartSelect #: PS243867
Manufacturer #: WB30M1
If you notice that your surface element will not heat properly, you may need to replace it. This surface element is 6 inches in diameter and 240V. It is a Y-frame surface burner element with five turn...
$51.61
In Stock

Door Handle End Cap
PartSelect #: PS228368
Manufacturer #: WB07K10043
This white end cap is sold individually. One cap is required for each end of the oven door handle.
$56.38
In Stock

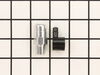
Screw - 10-16 x 1
PartSelect #: PS11741409
Manufacturer #: WP3387230
This screw is sold individually.
$7.47
In Stock

Range Terminal Block
PartSelect #: PS11750972
Manufacturer #: WPW10245259
This part is for oven ranges, it connects individual wires and protects the device from electrical surges, voltages, and current. With this part, the house power is connected to the range wire harness...
$27.36
In Stock

2 Piece Broiler Pan
PartSelect #: PS971245
Manufacturer #: 4396923
This is cookware designed for use in your range or oven. It is a two-piece dish that is used to grill or cook food while the broil function is on, meaning it can withstand high temperatures. This set ...
$49.50
In Stock
Exact Part matches for your search term
[Viewing 8 of 8]
GEAR-WORM 1.25 PD .62 LEAD
This part number matches the current model number 1058
PartSelect #: PS9444439
Manufacturer #: 1058
No Longer Available
Pin
This part number matches the current model number 1058
PartSelect #: PS9877411
Manufacturer #: 1058
No Longer Available
Pin, Pivot
This part number matches the current model number 1058
PartSelect #: PS9877412
Manufacturer #: 1058
No Longer Available

Vent Pipe
This part number matches the current model number 1058
PartSelect #: PS10468452
Manufacturer #: 1058
$8.32
Special Order
Manifold
This part number matches the current model number 1058
PartSelect #: PS12273978
Manufacturer #: 1058
No Longer Available
Vent pipe
This part number matches the current model number 1058
PartSelect #: PS16558697
Manufacturer #: 1058
No Longer Available
CAP CHUCK E300
This part number matches the current model number 1058
PartSelect #: PS19058628
Manufacturer #: 1058
$49.04
Special Order
RH85-ROLL FITTING HYDR ROLL FI
This part number matches the current model number 1058
PartSelect #: PS19110379
Manufacturer #: 1058
$109.48
Special Order
Common Symptoms of models starting with 1058
[Viewing 9 of 9]Element will not heat
Fixed by
these parts
these parts


Show All
Little to no heat when baking
Fixed by
these parts
these parts


Show All
Will Not Start
Fixed by
these parts
these parts
Show All
Little to no heat when broiling
Fixed by
these parts
these parts

Show All
Oven not heating evenly
Fixed by
these parts
these parts
Show All
Door won’t close
Fixed by
these parts
these parts

Show All
Oven is too hot
Fixed by
these parts
these parts
Show All
Touchpad does not respond
Fixed by
these parts
these parts
Show All
Leaks water
Fixed by
these parts
these parts
Show All


Keep searches simple. Use keywords, e.g. "leaking", "pump", "broken" or "fit".
Drip bowls were burned and tacky
First I removed the old bowls and replaced them with the new.
Parts Used:
-
Donna from Dallas, TX
-
Difficulty Level:Really Easy
-
Total Repair Time:Less than 15 mins
473 of 481 people
found this instruction helpful.
Was this instruction helpful to you?
Thank you for voting!
Drip bowls needed to be replaced
took old bowls out, put new bowls in, took a coffee break
Parts Used:
-
John from Chester, VT
-
Difficulty Level:Really Easy
-
Total Repair Time:Less than 15 mins
455 of 546 people
found this instruction helpful.
Was this instruction helpful to you?
Thank you for voting!
Oven tempature was approximately 150 degrees to low
This repair is EASY if you know how to use an ohm meter. If not, seek help for this step.
SYMPTOM:
The oven (JKP27WOP3WG or JKP27WP3WG and many ovens like it ) was not getting hot enough. Verifying the cooking temperature with an typical oven thermometer, I was able to determine that the oven was cooking temperature was ... Read more about 150 degrees to low.
FAILURE POINTS:
There are two logical failure points (1) The oven sensor ( WB21X5301 about $75), or the (2) the controller board (PS238233 about $252). In my case it was the controller board. When replaced the oven worked beautifully.
REPAIR:
As with any repair, you MUST DISCONNECT POWER TO THE UNIT BEFORE SERVICING!!!
Pull oven from the wall:
- Disconnect power by flipping the circuit breaker to the OFF position.
- Remove the top flange / cowling from the top of the oven (it just pulls off)
- Remove two screws under the top flange / cowling
- The whole unit easily slides out, but it is highly recommended that you use two people to place the oven on the floor.
As a diagnostic between these two parts, if the oven sensors measure approximately 1.1K ohms of resistance at room temperature, then it is probably not the sensor. The oven sensor wires are connected to two white wires that run up to the controller board. You need to disconnect the oven sensor to make the measurement. You may either completely remove the oven sensor by cutting the wire (be sure to allow yourself enough slack so that they may be safely reconnected) where it connects to the white wires, OR, (preferred method) if leaving the oven sensor partially installed,
- Remove the top sheet metal cover (10 screws)
- Remove the service connect cover (2 screws - this is where the main Power cord comes into the unit)
- Disconnect the white wires from the controller board (this connector which also includes other circuits is on the left side when looking at the controller board).
- Remove two screws from oven sensor but just let in dangle down so that you can put the sensor in the ice water / boiling water.
Measure the resistance under the following conditions. Your ohm meter should read APPROXIMATELY...
- 1.02K ohms in ice water
- 1.09K ohms at room temperature
- 1.36K ohms in boiling water.
If you get approximately these readings, then it is NOT the oven sensor. If that checks out then re-install the sensor AND the connector.
If it is NOT the sensor, replace the controller board.
- Take a moment to write down the color of the wire to the LETTERING (N, L, G, C / COM,,,) on the controller board. The connectors are in different locations on the new controller board so the wire color to the letter designation is significant.
- Carefully remove the wires one at a time
- VERY carefully remove the keypad ribbon cable from the right side of the controller board.
-- The ribbon cable will disconnect by releasing some little pressure clips on the side of the connector.
- Remove the controller board (4 screws)
- Install new controller board (4 screws)
- VERY carefully connect the keypad ribbon cable on the right side.
-- Make sure that the connector is in the OPEN position first, then,
-- Slide in the cable ensuring that all parts of the ribbon made it into the connector, then
-- Press down on the connector locking tabs.
- Reconnect each wire to the correctly lettering on the board.
-- Again, the connectors MAY BE in a different order on the replacement controller board. Match color to letter.
- Reconnect the (5 wire?) connector that includes the white oven sensor wires.
- Make sure everything looks normal, (i.e. no wires are pinched, remove tools from top of oven area, etc.)
- Re-install top cover.
- Re-install service connect cover.
You can test the unit while it is out of the cabinet,
- Make SURE that all sheet metal covers are in place.
- Flip power breaker to "On".
- Test that oven gets to the desired temp.
Read less
Parts Used:

-
James from Austin, TX
-
Difficulty Level:Easy
-
Total Repair Time:1- 2 hours
-
Tools:Nutdriver, Screw drivers
224 of 264 people
found this instruction helpful.
Was this instruction helpful to you?
Thank you for voting!