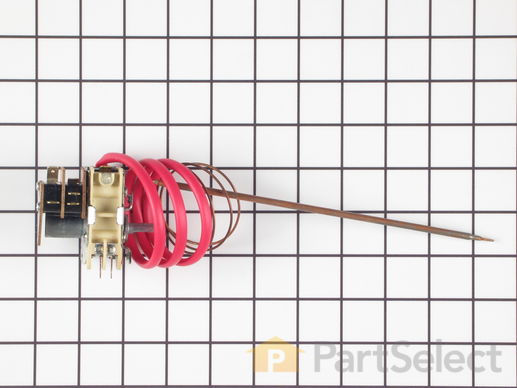
Part Location Diagram of WP74005019 Whirlpool Oven Thermostat
See part 5 in the diagram
( Grid squares measure 1x1 inch )
Customer Service Representative

Get in touch, we're here to help!

Daily 8am - 9pm EST

customerservice@partselect.com

Oven Thermostat WP74005019

Rated by 5 customers 

Really Easy 

1- 2 hours 

Ratings submitted by customers like you who bought this part.

$ 205.73
  In Stock
Get FREE EconoShip on orders over $100! T&C apply

Get this part fast! Average delivery time for in-stock parts via standard shipping: 1.8 days.

PartSelect Number PS11744075
Manufacturer Part Number WP74005019
Manufactured by Whirlpool
Product Description

Oven Thermostat Specifications

This part establishes and maintains the internal temperature of the oven cavity.
How Buying OEM Parts Can Save You Time and Money

How Buying OEM Parts Can Save You Time and Money

Troubleshooting
This part fixes the following symptoms:
Oven is too hot
This part works with the following products:
Range.
This part works with the following products:
Magic Chef, Maytag, Admiral, Crosley.
Part# WP74005019 replaces these:
74003409, 74005019
Back to Top
Customer Repair Stories
 Average Repair Rating: 3.2 / 5.0, 5 reviews. What's this?
Sort by:
  • 1
Sorry, we couldn't find any existing installation instruction that matched.
Oven stayed on in the off position.
Removed the 2 rear panels and removed the 2 screws holding switch in place; Removed the wires to the switch and replaced.
  • John from MUNFORD, TN
  • Difficulty Level:
    Really Easy
  • Total Repair Time:
    30 - 60 mins
  • Tools:
    Screw drivers
2 of 2 people found this instruction helpful.
Was this instruction helpful to you?
Thank you for voting!
Oven would not shut off
Removed back top and lower covers, raised top of stove, opened oven door to remove probe and pulled probe out.Then I ran new probe back in just like it was removed.I took two screw out of the oven switch and removed the wire one at a time and mounted switch back with the two screws put knob back on. Job complete works like new again.Thanks Alex
  • Alex from Clyo, GA
  • Difficulty Level:
    Really Easy
  • Total Repair Time:
    15 - 30 mins
  • Tools:
    Screw drivers
4 of 8 people found this instruction helpful.
Was this instruction helpful to you?
Thank you for voting!
oven woulfd not shut off when temp reached
very to install thermostat and probe...took about 30 mins. with the old therm exposed i just disconnected the wires one at a time reconnecting onto new therm one at a time...works great now.
Other Parts Used:
Oven Thermostat Switch Knob
  • Cindy from Uniontown, AR
  • Difficulty Level:
    Really Easy
  • Total Repair Time:
    15 - 30 mins
  • Tools:
    Screw drivers
9 of 13 people found this instruction helpful.
Was this instruction helpful to you?
Thank you for voting!
oven would turn on with thermostat set to OFF.
My wife and I did the repair. The most difficult part was finding the correct replacement part. The store where we bought the stove lied about what part was needed, which cost us a lot of online time before we found the part. UNPLUG THE STOVE or turn off the breaker. We removed the back of the stove, which is two or three pieces, completely. The thermostat is part of the single oven control. This job inclludes replacing the oven thermocouple (temperature sensor) which is a small copper tube about a foot long which is inside the oven itself,held in two spring clips on the left upper side near the front. You install the new thermocouple, which comes with and is attached to, the replacement thermostat from the back and top of the stove. Unplug the top burner elements and remove them, along with the drip pans. Remove the single screw that holds the connector for each burner to the stove top. Then lift the front of the stove top and remove it. Remove the screws holding the inner top of the stove. It has a tab on each side that slides under the flange of each side of the stove, so you must remove all the screws from the back of one side so you can swing it out a bit. Then you can remove the inner top, Under that is insulation covering the top of the oven. Remove the old thermocuple. It is easier to cut it instead of fishing it all the way back. Just be careful to note how it is installed. Silde the new thermocouple in from the thermostat, under the insulation and through the small hole in the top of the oven box and clip it in place. The clips are flimsy so support them as you remove and install the part. Hold the new thermostat right next to the old one BEFORE you disconnect any wires. Unplug each wire in turn and plug it into the new thermostat before going on to the next wire. Watch for the short wire that connects from the thermostat to the oven indicator light. Then remove the old thermostat and put in the new one. Reverse the steps of the disassembly process to get it all back together. Be sure the insulation holds the thermocouple in the center of the hole mentioned above. That's it. Be careful of the sheet metal parts of the stove; Crosley didn't bother to deburr them and they can give you a nasty cut. Reconnect the power and test. If it all works, maybe you can talk your wife into baking something.
  • William from Mount Pleasant, MI
  • Difficulty Level:
    Easy
  • Total Repair Time:
    More than 2 hours
  • Tools:
    Screw drivers
8 of 12 people found this instruction helpful.
Was this instruction helpful to you?
Thank you for voting!
Oven would not turn off and temp was way off.
What seemed to be a relativly eacy job turned into a partial disaseembly of the top of the oven/stove just so the old thermocouple could be removed and the new inserted into the oven. Installing the control itself was a piece of cake. Well at least the whole oven/stove is now as clean as when it was new. Was no sense in putting it back dirty in all the nooks and crannies.
  • Dan from Sacramento, CA
  • Difficulty Level:
    Easy
  • Total Repair Time:
    1- 2 hours
  • Tools:
    Screw drivers
5 of 7 people found this instruction helpful.
Was this instruction helpful to you?
Thank you for voting!
  • 1
Questions and Answers

Be the first to ask our experts a question about this part!

Model Cross Reference
This part works with the following models:
PartSelect Number: PS11744075
Manufacturer Part Number: WP74005019
Brand
Model Number
Description
Admiral
AER1150AAH
Range - Built-in, Electric
Admiral
AER1350AAH
Range - Freestanding, Electric
Admiral
AER1350AAL
Range - Freestanding, Electric
Admiral
AER1350AAT
Range - Freestanding, Electric
Admiral
AER1350BAH
Range
Admiral
AER1350BAT
Range
Admiral
AER1450AAH
Range - Freestanding, Electric
Admiral
AER1450BAH
Range
Crosley
CE35100AAA
Range - Freestanding, Electric
Crosley
CE35100AAT
Range - Freestanding, Electric
Crosley
CE35100AAW
Range - Freestanding, Electric
Crosley
CE35111AAA
Range - Freestanding, Electric
Crosley
CE35111AAD
Range - Freestanding, Electric
Crosley
CE35111AAQ
Range - Freestanding, Electric
Crosley
CE35111AAT
Range - Freestanding, Electric
Crosley
CE35111AAV
Wall Oven
Crosley
CE35111AAW
Range - Freestanding, Electric
Magic Chef
CER1140AAA
Range - Freestanding, Electric
Magic Chef
CER1140AAQ
Range - Freestanding, Electric
Magic Chef
CER1140AAW
Range - Freestanding, Electric
Magic Chef
CER1150AAH
Range - Freestanding, Electric
Magic Chef
CER1150AAL
Range - Freestanding, Electric
Magic Chef
CER1160AAH
Range - Freestanding, Electric
Magic Chef
CER1160AAL
Range - Freestanding, Electric
Magic Chef
CER1160AAT
Range - Freestanding, Electric
Magic Chef
CER1350AAH
Range - Electric
Magic Chef
CER1350AAL
Range - Electric
Magic Chef
CER1360AAH
Range - Freestanding, Electric
Magic Chef
CER1360AAL
Range - Freestanding, Electric
Magic Chef
CER1360AAW
Range - Freestanding, Electric
Customer Service Representative

Get in touch, we're here to help!

Daily 8am - 9pm EST

Contact Customer Service