


ZDT915SPJ0SS General Electric Dishwasher - Overview
Sections of the ZDT915SPJ0SS
[Viewing 8 of 8]


Keep searches simple, eg. "belt" or "pump".

Dishwasher Lower Rack Roller
PartSelect #: PS16217024
Manufacturer #: WD12X26146
This lower rack roller is a genuine replacement component designed to support the smooth and stable movement of the dishwasher’s bottom rack. Measuring approximately 1.5 inches in diameter and finishe...
$13.92
In Stock

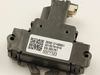
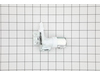
Door Latch
PartSelect #: PS6447681
Manufacturer #: WD21X10490
This dishwasher door latch is designed to secure the door during operation by connecting to the door strike and ensuring a tight seal. Mounted to the tub frame, it plays a critical role in enabling th...
$48.45
In Stock

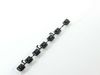
RACK CARRIER AND ROLLER KIT
PartSelect #: PS17873321
Manufacturer #: WD01X35298
- Includes: 4 brackets, 4 roller wheel brackets, and 8 wheels part # WD12X26146
Dishwasher Lower Dishrack Carrier and Roller Kit (Set of 4). This kit will replace all four one piece roller carriers w...
$34.74
In Stock

Countertop Bracket
PartSelect #: PS11700868
Manufacturer #: WD01X21740
This mounting bracket is manufactured to secure your dishwasher to your countertop. Mounting brackets should be installed so the dishwasher doesn’t tip forward. You can fit the bracket to either the c...
$39.44
In Stock

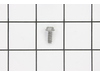
Screw 8-16 hxw 1/2 Stainless Steel
PartSelect #: PS258461
Manufacturer #: WD02X10067
This OEM-compatible screw is designed for use with many GE dishwashers. Measuring 8-16 HXW and 1/2" in length, this stainless steel screw secures the middle spray arm hub to the upper rack assembly, e...
$16.05
In Stock

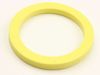
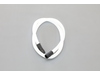
GASKET TUB Stainless Steel
PartSelect #: PS11721490
Manufacturer #: WD08X22095
Stop leaks and keep your dishwasher running smoothly with this tub gasket replacement. It forms a tight seal between the door and tub, so water stays inside during every wash cycle. Made from strong, ...
$29.44
Special Order


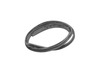
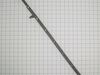
TUB TRIMS KIT
PartSelect #: PS16742698
Manufacturer #: WD01X31858
This part is the replacement tub trim for your dishwasher. It is approximately 26 inches long and 2 inches wide. The tub trim is found on the exterior of the dishwasher, and the main reason you would ...
$41.70
In Stock


SCR 8-18 AB TSQ 5/8 Stainless Steel
PartSelect #: PS963132
Manufacturer #: WR01X10380
$16.05
In Stock

DOOR VENT SEAL
PartSelect #: PS8688151
Manufacturer #: WD08X10092
Enhance the functionality of your dishwasher with this Door Vent Seal from renowned brand GE. This product ensures a reliable barrier to prevent leaking between the door vent and the dishwasher's inne...
$39.46
In Stock

Hex Head Screw 10-32 GX HXW 3/8
PartSelect #: PS8688150
Manufacturer #: WD02X10220
Enhance the longevity and efficiency of your dishwasher with the GE Hex Head Screw. Exemplifying precision and durability, this 10 - 32 GX HXW 3/8 screw adds strength to your appliance, ensuring a snu...
$16.05
In Stock
Questions And Answers for ZDT915SPJ0SS
We're sorry, but our Q&A experts are temporarily unavailable.
Please check back later if you still haven't found the answer you need.
Common Symptoms of the ZDT915SPJ0SS
[Viewing 8 of 8]Will Not Start
Fixed by
these parts
these parts
Show All
Leaking
Fixed by
these parts
these parts

Show All
Door latch failure
Fixed by
these parts
these parts
Show All
Not cleaning dishes properly
Fixed by
these parts
these parts

Show All
Door won’t close
Fixed by
these parts
these parts

Show All
Will not fill with water
Fixed by
these parts
these parts
Show All
Not draining
Fixed by
these parts
these parts
Show All
Noisy
Fixed by
these parts
these parts
Show All


Keep searches simple. Use keywords, e.g. "leaking", "pump", "broken" or "fit".
Door latch not functioning
1. Turn off breaker supplying power to dishwasher in electrical panel
2. Open dishwasher door
3. Unscrew the screws that secure the dishwasher to the counter.
4. Tip dishwasher forward. Identify the non-functioning door latch. It looks exactly like the replacement. Unclip the wire harness from the door latch.
5. ... Read more On the inside of the dishwasher, there are 2 screws directly under the door latch. Unscrew them and carefully set aside.
6. Remove old door latch.
7. Set new door latch in place. Holding securely, replace screws removed in step 5. Toward the end they get a little tougher to screw in.
8. Plug wire harness into new door latch.
9. Re-align dishwasher and re-secure to counter in previous position.
10. Test latch to make sure it closes properly.
11. Turn on breaker in electrical panel.
The dishwasher should now function properly.
Read less
Parts Used:
-
James from ALBRIGHTSVLLE, PA
-
Difficulty Level:Really Easy
-
Total Repair Time:Less than 15 mins
-
Tools:Screw drivers
32 of 53 people
found this instruction helpful.
Was this instruction helpful to you?
Thank you for voting!
leaking from somewhere around tub
the actual gasket tub seal was easy, 10 minutes. The trim tub gaskets were a pain because I had to uninstall the dishwasher (not plumbing or electrical) then pull it out from the cabinet, remove old trim and re-install. Re-leveled dishwasher, screwed into side of cabinets but it still leaks. Can't figure out where but after replacing all
... Read more
the trim and gaskets its very frustrating.
Read less
Parts Used:
-
jeff from FORT COLLINS, CO
-
Difficulty Level:A Bit Difficult
-
Total Repair Time:1- 2 hours
-
Tools:Pliers, Screw drivers, Wrench (Adjustable)
4 of 5 people
found this instruction helpful.
Was this instruction helpful to you?
Thank you for voting!
Wouldn't start, no lighted functions.
Shut off power at breaker, remove two screws anchoring DW to counter top . Slide DW out far enough to access door latch, disconnect electrical wiring plug, remove two Phillips head screws, install new door latch, repeat installation in reverse order.
Parts Used:
-
Edward from BEAUFORT, SC
-
Difficulty Level:Really Easy
-
Total Repair Time:Less than 15 mins
-
Tools:Screw drivers
14 of 24 people
found this instruction helpful.
Was this instruction helpful to you?
Thank you for voting!