Your coupon for will be reflected when you check out!
✖
Your coupon for
✖
Hello!
You're visiting the PartSelect site in U.S.
Would you like to shop on the Canadian site?
Stay on this site
Go to Canadian site
✖
Model Number Locations
1Select Category Type
Select Category Type
2Select Product Type
Select Product Type
3Select {MODEL} Type
Select {MODEL} Type
Sample Model Number Tags
Model numbers can be made up of numbers (1005400, for example) or a combination of letters and numbers (LAT1000AAE). The model number will most likely appear on either a paper sticker or a metal plate. Your appliance's model number tag may look similar to the sample model number tags shown here (model number highlighted in yellow):
Model has been saved to My Models. If you're not signed in, your lists are available on this device and will expire within 30 days.
Model has been saved to My Models.
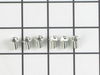
This is a door handle fastener to secure the handle to your refrigerator drawer. It is also known and a mounting bolt or screw. It is approximately 1 inch in total length, and is made of metal.
This refrigerator door handle mounting screw connects your refrigerator door to the handle. The part is less than 1 inch in length, and can come in both silver and gold colors. When installing this sc...
This part provides a way of connecting individual electrical wires and offers protection of the device from electrical surges (voltages and/or currents).
Introducing the GE Foot Grate, a premium, durable solution for protecting your cooktops from scratches and damage. Designed with high quality materials, this burner grate pad features an easy-installa...
This burner cap replaces a worn or discolored cap on high-output burners, helping ensure even heat distribution and reliable cooking performance. Designed for 18,000-BTU burners, it’s a direct drop-in...
Enhance the functionality of your appliance with the GE Lamp Halogen, a 20-watt powerhouse that ensures optimum performance. Renowned for its brightness and longevity, this halogen lamp proves critica...
This single surface burner grate provides a stable and durable platform for cookware, ensuring even heat distribution and reliable performance during cooking. Crafted from resilient cast iron, it feat...
The existing terminal block on my Ge oven/Range had melted due to a loose wire causing sparking and starting the plastic casing of the terminal block on fire and melting it, Part select made the part easy to find and had it at my house in 2 days. All I had to do was remove six screws to take the back sheet metal cover off of the oven. U
... Read morenscrew the terminal connections remove two mounting screws that held the terminal on to the oven body. This was a little trickier than it should have been because the melted plastic had reformed making it very hard to access the mounting screws. i then mounted the new piece and plugged the oven in, it took 15 minutes and was very easy. definitely saved me at-least a $100 for the service call i would have made if finding the part wasn't so convenient
Safety first * Unplugged 220 VAC from outlet. Removed shield cover screws with 1/4" hex nut driver (5 screws). Removed all 6 silver screws from terminal block with 1/4" nut driver, freeing all wires. Removed the green ground screw and ground bracket from center terminal. Cut away (using the drill) melted original terminal block plastic to
... Read more access the 2 black 1/4" nuts holding original terminal block onto appliance. Discarded the original damaged terminal block. Attached the new terminal block, aligning the mounting holes and the terminal block the same way the original terminal block was lined up and re-used the black 1/4" nuts (original used because the replacement package did not include new black screws). I bought a new appliance cord, since the original cord overheated. Reattached all wires using the 6 new silver screws. Start with the middle terminal by attaching the appliance wires and the ground bracket. The ground must be attached to the bracket and the bracket bridges between the terminal block and the range body. Reattached shield cover. Plugged in appliance. Note: it doesn't matter which outside wire attaches to the outside terminals (both are hot), but the middle wire (neutral) must attach to the middle terminal. However, the ring terminal should be flush on the terminal block so you don't bend the ring.


 – Part Number: WB29X43469")