


YWMH53521HV05 Whirlpool Microwave - Overview
Sections of the YWMH53521HV05
[Viewing 6 of 6]


Keep searches simple, eg. "belt" or "pump".

Light Bulb - 40W
PartSelect #: PS2376034
Manufacturer #: 8206232A
This 40w light bulb is a replacement bulb constructed of glass and metal. It is an easy-to-install electrical part which produces 40w of light. If the bulb won't light up then it may be broken and sho...
$8.35
In Stock

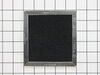
Charcoal Filter
PartSelect #: PS1871363
Manufacturer #: 8206230A
This Charcoal Filter traps grease from your oven's exhaust to help prevent it from entering the vent, which could cause damage over time. If the exhaust fan on your microwave is not working, you may n...
$15.70
In Stock

Grease Filter
PartSelect #: PS3650910
Manufacturer #: W10208631A
This Grease Filter is constructed of Acrylonitrile Butadiene Styrene and is used to trap grease and help eliminate odors from the exhaust air while cooking. It attaches onto the exhaust and is rated ...
$26.73
In Stock

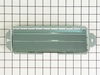
Mounting Plate
PartSelect #: PS12074431
Manufacturer #: W11025649
This mounting plate is sourced directly from the original manufacturer for use with microwaves. It is a metal plate designed to support a microwave by attaching the microwave to the wall studs. If the...
$23.05
In Stock

Microwave Top Mounting Screw
PartSelect #: PS11744892
Manufacturer #: WP8169704
This screw is sold individually.
$8.35
In Stock

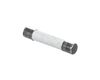
R Ceramic Fuse 20 A
PartSelect #: PS17629444
Manufacturer #: W11707984
If your microwave is not turning on it could be due to your fuse needing to be replaced. This part protects the microwave by shutting it off if there is an electrical surge. This fuse is just over an ...
$36.00
In Stock

Light Socket
PartSelect #: PS2342199
Manufacturer #: W10210871
The light socket in your microwave houses the light bulb and connects it to the power source. The light bulb will screw into it, so the light bulb will be held in place. Be very careful when installin...
$10.45
In Stock

Microwave Damper
PartSelect #: PS11728088
Manufacturer #: W10843943
This damper is an authentic OEM replacement assembly used in microwave/range hood combos. It includes the damper door and frame. It is designed to direct the flow of air through the vent duct, and the...
$59.11
In Stock

Hardware Kit
PartSelect #: PS11730898
Manufacturer #: W10821385
This is a manufacturer-approved mounting kit for your microwave. This kit is crucial for keeping your microwave securely wall-mounted. This kit does not include the mounting plate itself. This kit com...
$74.41
In Stock

TEMPLATE
PartSelect #: PS2362798
Manufacturer #: W10190018
Discover the power of a premium-quality appliance part brought to you by Whirlpool. This original upper template is designed for meticulous precision in your microwave installation process. Produced b...
$8.35
In Stock


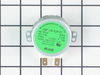
MOTOR-TURN
PartSelect #: PS11729872
Manufacturer #: W10642989
This motor is used to rotate the cooking tray.
$85.29
In Stock
Questions And Answers for YWMH53521HV05
We're sorry, but our Q&A experts are temporarily unavailable.
Please check back later if you still haven't found the answer you need.
Common Symptoms of the YWMH53521HV05
[Viewing 6 of 6]Won’t turn on
Fixed by
these parts
these parts

Show All
Exhaust fan not working
Fixed by
these parts
these parts

Show All
Tray won’t turn
Fixed by
these parts
these parts
Show All
No heat
Fixed by
these parts
these parts
Show All
Doesn’t shut off
Fixed by
these parts
these parts
Show All
Noisy
Fixed by
these parts
these parts
Show All


Keep searches simple. Use keywords, e.g. "leaking", "pump", "broken" or "fit".
light bult needed to be replaced
The nightmare was that this microwave is installed under the cabinet....in order to get to the light bulb I had to pull out my stove then squeeze into the space between the stove and counter....my old microwave light bult was much easier to change.....Shame on Whirlpool for making this so difficult.....must be a better way to cover the li
... Read more
ght bulb so that we do not need a screwdriver to remove the door to get to the light bulb
Read less
Parts Used:
-
Deborah from Millersville, MD
-
Difficulty Level:Difficult
-
Total Repair Time:Less than 15 mins
-
Tools:Screw drivers
220 of 325 people
found this instruction helpful.
Was this instruction helpful to you?
Thank you for voting!
Bulb "burnt out"
Removed 1 screw, removed "burnt out" bulb and replaced it with new bulb.
Parts Used:
-
Joseph from Pembroke, MA
-
Difficulty Level:Really Easy
-
Total Repair Time:Less than 15 mins
-
Tools:Screw drivers
96 of 160 people
found this instruction helpful.
Was this instruction helpful to you?
Thank you for voting!
Microwave turntable does not work
My unit is a wall mount/cabinet/built-in model. The repair is actually fairly simple once you determine that the actual microwave is just a component of the entire unit, and that it (the microwave) can be easily removed from the unit. I did not figure this out until after I removed the entire unit (disconnect the power supply, lift the
... Read more
entire bulky, heavy unit out of the cramped space in the cabinet, etc). Once I got it out I figured out how easy it is to remove the actual oven - a couple of screws, literally. The unit is a bit bulky, but not particularly heavy and is quite manageable. I did this entire process alone.
I got the oven out, rolled it on it's side and found the plate to access the motor. The plate is located on the bottom/underside of the unit. The plate is nothing more than a section of the underside of the metal housing that has been cut-out as an access point. This "cut-out" is not complete - that is, not completely cut out so as to all the plate to stay in place without the need for screws, etc, until you actually have to use it. I used a pair of dykes to cut the couple of points still connecting this plate, removed the two phillips screws to remove the motor, disconnected the two wires connected, then reversed to complete the repair. You then flip the cut-out plate over/rotate it, and some screw holes line up. Find a couple of small screws, and re-attach the plate to cover the motor.
The actual fix is really easy, again, once you figure out the simple way to remove the oven. I am an idiot, so you will probably find this much easier. I could probably do this repair now, after my experience, in less than 30 minutes (probably less than 15 minutes). I probably save a couple hundred $ by doing it myself so was well worth the time to do it. Good luck.
Read less
Parts Used:
-
Todd from San Bernardino, CA
-
Difficulty Level:A Bit Difficult
-
Total Repair Time:More than 2 hours
-
Tools:Pliers, Screw drivers
32 of 40 people
found this instruction helpful.
Was this instruction helpful to you?
Thank you for voting!