Your coupon for will be reflected when you check out!
✖
Your coupon for
✖
Hello!
You're visiting the PartSelect site in U.S.
Would you like to shop on the Canadian site?
Stay on this site
Go to Canadian site
✖
Model Number Locations
1Select Category Type
Select Category Type
2Select Product Type
Select Product Type
3Select {MODEL} Type
Select {MODEL} Type
Sample Model Number Tags
Model numbers can be made up of numbers (1005400, for example) or a combination of letters and numbers (LAT1000AAE). The model number will most likely appear on either a paper sticker or a metal plate. Your appliance's model number tag may look similar to the sample model number tags shown here (model number highlighted in yellow):
Model has been saved to My Models. If you're not signed in, your lists are available on this device and will expire within 30 days.
Model has been saved to My Models.
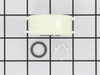
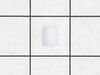
The Dryer Thermal Fuse (Thermal Cutoff, Temperature Fuse) is a 2 by ½ inch, white, plastic safety mechanism that stops the flow of electricity to the motor circuit when a dryer overheats. If the fuse ...
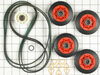
This Whirlpool Dryer Repair Kit is a convenient solution for fixing noise and drum movement problems in 27-inch dryers. Compatible with models from Whirlpool, Kenmore, Maytag, and more, the kit includ...
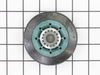
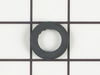
This Idler Pulley includes the tri-ring and gasket and everything included here is manufacturer-certified. This part maintains correct tension on the drive belt in order to spin the drum properly. If ...
The Drive Belt is a 93 1/2" belt which wraps around the dryer drum to allow tension and movement. If broken the dryer will not turn properly, or there may be loud noises. The part is rated as "medium"...
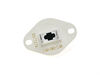
This dryer thermistor is a genuine replacement component designed to monitor and regulate internal temperature in Whirlpool dryers. Mounted on the blower housing, it plays a critical role in controlli...
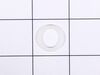
If you notice that your dryer is noisy or will not tumble, you may need to replace the tri ring. This part is triangular, and is less than an inch in size. Tri rings can be found both on the idler pul...
If your washer shakes or vibrates loudly when it reaches its max speed, check that the leveling legs are even. To ensure that the washer is firmly on the ground using all four legs, adjust the legs so...
The idler pulley with bracket ensures proper tension on the dryer’s drive belt, allowing the drum to spin effectively. This assembly includes the pulley and arm, making it ideal for replacing a worn o...
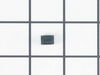
This is the moisture sensor for your dryer. It helps detect the amount of moisture in your clothes during the dryer cycle. If you notice your clothes are still wet after an automatic dryer cycle is do...
Also known as Thermal Cut-Off kit. The thermostat acts as a safety mechanism that keeps the dryer from overheating and the fuse is like a backup system - it's set to trip at a higher temperature than...
This kit is used for electric clothes dryers, and it comes with a yellow wire nut.
$9.62
In Stock
Order now and your part arrives by Jun 25
Questions And Answers for YWED72HEDW0
Ask our experts a question about this model and we'll get back to you as soon as possible!
4 questions answered by our experts.
Sort by:
< Prev
1
Next >
Search filter:
Clear Filter
Your search term must have 3 or more characters.
Keep searches simple. Use keywords, e.g. "leaking", "pump", "broken" or "fit".
Sorry, we couldn't find any existing answers that matched.Try using some different or simpler keywords, or submit your new question by using the "Ask a Question" button above!
Shannon
December 5, 2022
The door is open n the wrong side. I heed an Allen key of something to change it
For model number YWED72HEDW0
Hi Shannon,
Thank you for your question. To remove the door hinge, you will need a torque 25 and a Phillips head screwdriver. If you have any questions, please let us know. We are open 7 days a week. We look forward to hearing from you!
Did this question help you?
Thank you for voting!
Fernand
April 23, 2023
What is the part number of the knob/mode selector. Mine is broken. I Would like to order 1
For model number YWED72HEDW0
Hello Fernand, thank you for the question. The part number for the compatible knob is PS11738143. We hope this is what you were looking for!
Dryer starts okay, gets warm, but stops early after a few minutes with the clothes still wet. No lint blockages or anything obvious like that.
All controls and buttons work.
What does that imply for parts to change?
Thanks!
For model number YWED72HEDW0
Hi Alan, thank you for contacting us. Based on the description that you have provided, we would recommend checking the moisture sensor, part number PS11741408, to solve the problem. We hope that helps!
When starting the cycle for my dryer, everything appears to be functioning properly at first. But then, it only spins for about 3-5 seconds before stopping. It will try to start again within a few minutes, and again only spin for about 3-5 seconds. After that the estimated time on the display will drop to either 3 or 1 minute remaining before it says the cycle is done. Could this be a faulty motor?
For model number YWED72HEDW0
Hi Brad, thank you for reaching out. Yes, a malfunctioning drive motor, part number PS12723927, could be the issue, and its replacement might resolve the issue. A malfunctioning drive motor can overheat quickly, even in the first few seconds of a cycle, triggering the safety switch. The motor will then restart once it cools down, explaining why the cycle might briefly attempt to start again. We hope this helps.
First I unplugged the dryer, then removed the back panel, this exposed most all of the wiring and I could see the heater coils. Not knowing what the problem was I started looking at the coils and could not see any broken parts. So then checked the thermal fuse for continuity I removed the two wires from it with a small pair of
... Read moreneedle nose pliers, it was held in place by two screws, once they were removed the fuse came out easily, I checked continuity with a volt meter placing the meter on X1 Ohms and could not get a reading. I replaced with a new one and put it all back together the way I took it apart. Then I plugged it in and it worked first time, I now have warm dry clothes.
Cleaning the lint out of the whole machine took quite a bit of time--it was everywhere. Underneath the lint trap was a collection that ultimately ruined the thermal fuse where it restricted the air flow considerably.
Ascertaining the problem was the most time consuming part.
The actual repair was quite simple and did
... Read moren't take but 15-20 minutes.
I started to repair this and got busy and ended up calling a repair service -- that was the first time. They repaired it for over $200 and said the cause was bad venting. I fixed the vent before using the fixed dryer but it blew again. So I ordered these parts and replaced them myself for a lot of savings. However, the dryer still ove
... Read morerheated. Through lots of testing I found the root cause the repairman missed: The heating element had gotten so hot that the assembly holding it warped, hitting the element and shorting it. So a new element is on order. I still needed the parts I ordered here but the overall repair ended up more complicated and expensive. I was disappointed a paid repair person left without further diagnosis. If he had unplugged the vent and checked the heat on the exhaust vent (as I ended up doing) it would have been obvious more than a new thermal fuse/thermistor was necessary. Instead I wasted over $200 on his visit. So my advice is if you're at all handy, repair this yourself. The dryer has a service manual inside the front toe board that walks you through most diagnostics and tests. However, it took a little more than that for me to discover the heating element problem. This was a very dangerous situation that could have easily led to a fire, yet not found by a trained technician!


 Diagram and Parts List for Whirlpool Dryer")