Your coupon for will be reflected when you check out!
✖
Your coupon for
✖
Hello!
You're visiting the PartSelect site in U.S.
Would you like to shop on the Canadian site?
Stay on this site
Go to Canadian site
✖
Model Number Locations
1Select Category Type
Select Category Type
2Select Product Type
Select Product Type
3Select {MODEL} Type
Select {MODEL} Type
Sample Model Number Tags
Model numbers can be made up of numbers (1005400, for example) or a combination of letters and numbers (LAT1000AAE). The model number will most likely appear on either a paper sticker or a metal plate. Your appliance's model number tag may look similar to the sample model number tags shown here (model number highlighted in yellow):
Model has been saved to My Models. If you're not signed in, your lists are available on this device and will expire within 30 days.
Model has been saved to My Models.
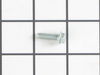
This is a multi-use and multi-appliance screw. It can be used on a microwave, refrigerator, range/oven, air conditioner, dehumidifier, washer, or dryer. The measurements of this screw are 8 x 1/2 inch...
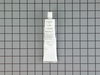
This touch-up paint can be used on a wide variety of household appliances. It is most often used on washers, dryer, refrigerators, dishwashers, ranges, freezers, trash compactors, or microwaves. It is...
If your refrigerator or freezer is too warm, or making noises, you may need to replace the fan blade. The fan blade attaches to the evaporator motor, which is in the freezer section, to help circulate...
This is a genuine replacement light bulb for a refrigerator. The inside of your refrigerator should illuminate when you open the door. If your fridge does not illuminate, you may need to replace this ...
This temperature sensor is for refrigerators.
The temperature sensor senses the temperature inside the refrigerator and sends information to the electronic control.
Unplug the refrigerator and s...
Appliance spray paint is a great way to cover up any chips and scratches that have appeared on your appliances. Instead of replacing the part entirely, this is an easy fix. This is also a great way to...
Introducing the Whirlpool Refrigerator Leveling Leg. This genuine OEM part supports your refrigerator, ensuring it remains stability and level. The height of the leveling leg can be adjusted to suit y...
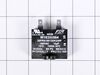
The compressor run capacitor helps keep the motor running smoothly in refrigerators. It works with various models and is a genuine replacement part. Always unplug the refrigerator before installing th...
This wire shelf is a genuine OEM replacement part for refrigerators. It has dimensions of approximately 25 inches by 15.5 inches. The wire shelf is positioned within the freezer compartment of your fr...
This is the replacement wire shelf for your refrigerator. It is approximately 12 inches by 25 inches. The wire shelf slides into grooves on either side of the refrigerator and is used to store meat an...
$69.91
In Stock
Order now and your part arrives by Mar 29
Questions And Answers for WZF34X18DW03
We're sorry, but our Q&A experts are temporarily unavailable.
Please check back later if you still haven't found the answer you need.
1 question answered by our experts.
Sort by:
< Prev
1
Next >
Search filter:
Clear Filter
Your search term must have 3 or more characters.
Keep searches simple. Use keywords, e.g. "leaking", "pump", "broken" or "fit".
Sorry, we couldn't find any existing answers that matched.Try using some different or simpler keywords, or submit your new question by using the "Ask a Question" button above!
Priscilla
October 28, 2022
I would like 2 shelves.
For model number WZF34X18DW03
Hello Priscilla, thank you for your inquiry. We have researched the model you have provided and have found that the part you are looking for is the wire shelf, part number PS11727968, and part number PS11727969. Customer service is always available to help you place an order if you are having trouble doing so. Good luck with your repair.
I took the screws out of back panel and slid water line and panel off to the right side while I removed the capacitor and starter relay. Relay was probably the only problem, but I replaced capacitor too while I was doing the repair. Finished removal and replacement in about 20 minutes. While I had panel off I cleaned coils that I coul
... Read mored see from behind and then did the same on front side. Cost was $136 for both parts. I could have done it for $71 if I did not replace the capacitor too. Saved my daughter from being taken advantage of.
This product comes in a bottle with a brush like Liquid Paper. It goes on incredibly easy. A second coat might be needed. I wanted to prevent rust from setting in so I covered the scratches and dings. The paint is a little brighter since my washer is 10 years old but it still looks great.
The repair seemed simple, I just needed to remove the old bracket -- 4 screws -- and slip the new one on.
The tricky bit is that the roller bracket holds the weight of the fridge. So in order to make sure that the fridge did not fall over, and to keep the installation point off the ground so that I could align the screw holes,
... Read moreI needed to shim up the side of the fridge that I was working on.
To tap in the shims, I used a hammer and a spare chunk of wood. I ultimately used 3 shims, and kept tapping until the roller wheel could roll freely. Then I knew that the fridge was high enough. After that, it was pretty easy to remove the 4 screws, align the new bracket, and replace the screws. After that, in order to get the shims out I could just extend the foot brake as it was designed, and that lifted the fridge enough for me to easily slide out the shims. After that I just had to level out the fridge by adjusting the two feet.


 Diagram and Parts List for Whirlpool Freezer")