Your coupon for will be reflected when you check out!
✖
Your coupon for
✖
Hello!
You're visiting the PartSelect site in U.S.
Would you like to shop on the Canadian site?
Stay on this site
Go to Canadian site
✖
Model Number Locations
1Select Category Type
Select Category Type
2Select Product Type
Select Product Type
3Select {MODEL} Type
Select {MODEL} Type
Sample Model Number Tags
Model numbers can be made up of numbers (1005400, for example) or a combination of letters and numbers (LAT1000AAE). The model number will most likely appear on either a paper sticker or a metal plate. Your appliance's model number tag may look similar to the sample model number tags shown here (model number highlighted in yellow):
Model has been saved to My Models. If you're not signed in, your lists are available on this device and will expire within 30 days.
Model has been saved to My Models.
This splutch cam kit is a genuine replacement assembly designed for select Whirlpool, Maytag, and affiliated brand washing machines. It plays a critical role in the wash and spin cycles by engaging th...
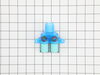
This washer lid switch is a critical safety component designed to halt the spinning motion of the tub when the lid is opened. Its primary function is to prevent accidental contact with moving parts du...
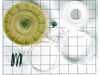
This suspension rod kit is a genuine OEM kit specially designed for washing machines. Each kit includes a set of 4 rods, 4 suspension balls and 4 bushings. The suspension rods are responsible for supp...
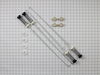
This genuine OEM drive belt is designed to transfer power from the motor to the drum in select Whirlpool, Maytag, Kenmore, and other compatible washing machines. Operating at 115 volts and 60 Hz, the ...
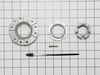
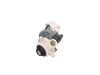
This shift actuator is a genuine replacement component designed for top-load washing machines. It plays a critical role in transitioning the washer between agitation and spin cycles by shifting the tr...
This touch-up paint can be used on a wide variety of household appliances. It is most often used on washers, dryer, refrigerators, dishwashers, ranges, freezers, trash compactors, or microwaves. It is...
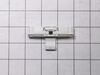
This part is the replacement lid latch or latch assembly for your top-load washer. The lid latch holds your washer door closed, and allows the washer to run its cycle. If the lid latch is damaged, you...
The hose clamp is used to hold the water hose in place which will prevent the hose from leaking water. Sometimes the clamp may lose its ability to latch on, causing a leaking washer. For the installat...
This washing machine cleaner includes three time-release tablets designed to remove odor-causing residues, grime, and buildup from high-efficiency and top-load washing machines. The tablets work by cl...
Ask our experts a question about this model and we'll get back to you as soon as possible!
1 question answered by our experts.
Sort by:
< Prev
1
Next >
Search filter:
Clear Filter
Your search term must have 3 or more characters.
Keep searches simple. Use keywords, e.g. "leaking", "pump", "broken" or "fit".
Sorry, we couldn't find any existing answers that matched.Try using some different or simpler keywords, or submit your new question by using the "Ask a Question" button above!
Stan
January 25, 2020
Is there any way to test if lid latch is bad? The washer runs just fine but sometimes doesn't run unless i open and close lid. Thanks
For model number WTW5610XW0
Hello and thank you for writing.
The best way to test if the latch is the problem is to simply open and close the dryer door, paying close attention to how firmly it shuts at the latch point. Listen for the click upon closing the door, then pull gently to test how easily the door falls open. you can also do the following.
Step 1
Unplug the dryer or turn off the circuit breaker delivering power to it, whichever is easiest for you. Since we are going to be opening the dryer's control panel, you want to make sure the power is OFF!
Step 2
Place the towel down at the base of the control panel along the top of the dryer. We will be resting the panel on the dryer top and the towel will help to protect the dryer's finish.
Step 3
Along the top (or on the backside) of the control panel, you should see a number of screws. Use your screwdriver to remove the screws and this should release the control panel.
A quick tip: Use a screwdriver that has a magnetized tip. This will help save you from dropping screws down behind the dryer
tep 4
With the control panel released, carefully pull it out and set it on the towel. Locate the backside of the start switch. Most start switches have either two or three wires attached to them.
Before you disconnect the wires, label them or write down in a notebook where they each get connected to save yourself a headache later.
Step 5
Use your needlenose pliers to remove the slip connectors from the terminals. They simply slide off but be sure to pull the connector off by pulling on the connector itself, NOT the wire.
Step 6
With all of the wires removed from the start switch, set your multitester to read ohms. This setting is usually marked R1 or RX1 on the tester.
Step 7
If your switch featured two wires, touch one probe of your tester to each terminal. The tester should read infinity. Now, while keeping the probes touching the terminals, press or turn the start switch and hold it there. The tester should then read zero. If it doesn't change, the switch is bad.
Step 8
If you have a three-wire switch, find the terminal marked NC or CT1. Touch one probe to this terminal. Then find the terminal labeled CO or R1 and press the other probe to that terminal. Your tester should read infinity. Press or turn your switch on and hold it and the tester should read zero. If it does not, then your switch is bad.
Step 9
To replace the switch, simply remove the existing one, take it to an appliance store for the proper replacement and install it as you disassembled the original one.
We hope this helps. Please contact us anytime if you require further assistance.
+-
Did this question help you?
Thank you for voting!
< Prev
1
Next >
✖
Ask a Question
Ask our experts a question on this model and we'll respond as soon as we can.
A detailed Service Technician Service Manual is hidden inside the machine on the front panel. It is hidden by the bleach dispenser input. It gives a list of fault codes and instructions for calibration after repair, resetting fault codes, and a manual test mode for stepping the machine through each mode on command. The Tachometer faile
... Read mored which would not let the machine come up to maximum spin speed. The tachometer is part of the solenoid actuator that shifts the transmission. It is not specifically called out in the manual. Any failure causes the lid lock light to blink which gives the appearance of a lid lock failure
The instructions that came with the part were worthless. Essentially, unplug, put in new part, plug it back in. I spent a considerable amount of time on the internet and finally found a video showing how to open the top. Unlike other models, it is held down by clamps in the back rather than clips in the front. Once finding this inform
... Read moreation the installation was simple. Remove the clamps and the back of the console, slide the top forward and lift, remove and replace the lock and reassemble. You don't even have to remove the hoses.


 Diagram and Parts List for Whirlpool Washer")