Your coupon for will be reflected when you check out!
✖
Your coupon for
✖
Hello!
You're visiting the PartSelect site in U.S.
Would you like to shop on the Canadian site?
Stay on this site
Go to Canadian site
✖
Model Number Locations
1Select Category Type
Select Category Type
2Select Product Type
Select Product Type
3Select {MODEL} Type
Select {MODEL} Type
Sample Model Number Tags
Model numbers can be made up of numbers (1005400, for example) or a combination of letters and numbers (LAT1000AAE). The model number will most likely appear on either a paper sticker or a metal plate. Your appliance's model number tag may look similar to the sample model number tags shown here (model number highlighted in yellow):
Model has been saved to My Models. If you're not signed in, your lists are available on this device and will expire within 30 days.
Model has been saved to My Models.
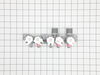
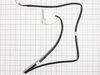
This is an authentic LG water inlet valve for a top-load washer. It is designed to control the flow of water into the washer. If your washer is filling slowly, making loud noises, overflowing, or stop...
This is a pulsator assembly, also known as an agitator, for your washing machine. This pulsator sits at the bottom of your washer and is what is used as the main driving force to wash your clothes. Th...
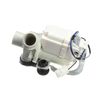
This drain pump assembly is a genuine replacement part designed for select LG and Kenmore washing machines. It plays a critical role in removing water from the washer tub during the drain cycle, ensur...
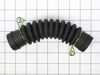
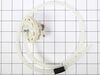
This is a drain hose assembly for top-load models of LG washing machines. This hose specifically is used to allow water to drain from the tub to the drain pump of the washer. This hose is made of plas...
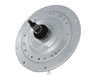
This clutch housing assembly with mode shifter, or washer drive shaft and shifter assembly, is made for your washer. It connects the appliance wash plate to the motor so the washer can shift the drive...
This drain hose is a genuine OEM replacement part supplied by LG for use in their washing machines. It is a light gray pipe with a diameter of 1.25 inches. The drain hose is connected to the drain pum...
Introducing the customized screw designed exclusively for LG washers. Manufactured with safety and efficiency in mind, installation is straightforward when you adhere to correct safety regulations. Sh...
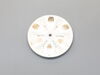
This water-level pressure switch in your wash monitors and regulates the water levels throughout the fill, wash, and rinse cycles. You will usually find it inside the control panel or near the tub. It...
This part is the replacement switch assembly for your top-load washer. It contains the switch mechanism and the connecting wire that hooks the door latch to the electrical system of the washer. The li...
Ensure the stable operation of your washer with this high-quality LG Suspension Assembly. The product supportively keeps your washer tub steady during periods of uneven loads, limiting noise and vibra...
Meet your newest kitchen lifesaver, the Frigidaire Burner Grate. This original and genuine OEM part is tailored to perfectly fit your Frigidaire, Electrolux, White Westinghouse, and Tappan appliances....
$36.85
On Order
Questions And Answers for WT4970CW
We're sorry, but our Q&A experts are temporarily unavailable.
Please check back later if you still haven't found the answer you need.
7 questions answered by our experts.
Sort by:
< Prev
1
2
Next >
Search filter:
Clear Filter
Your search term must have 3 or more characters.
Keep searches simple. Use keywords, e.g. "leaking", "pump", "broken" or "fit".
Sorry, we couldn't find any existing answers that matched.Try using some different or simpler keywords, or submit your new question by using the "Ask a Question" button above!
Dennis
May 4, 2023
Showing error code CL and controls are stuck
For model number WT4970CW
Hello Dennis, thank you for the question. According to our research, CL is not an error code but an indicator that the child lock feature is active. When the child lock feature is active, the control panel is disabled, and the setting cannot be adjusted. To activate or de-activate child lock:
1- Ensure the unit is powered on.
2- Press and hold the child lock button (rinse+spin) for 3 seconds.
We hope this solves your problem!
2 people found this helpful.
Did this question help you?
Thank you for voting!
Bruce
February 4, 2022
The pump continues to run even minutes after the spin cycle is over and all that is left in the hoses and pump might be 1 1/2 quarts.
For model number WT4970CW
Hello Bruce, thank you for writing. It could result from a damaged control board PartSelect Number PS7793256 a faulty drain pump PartSelect Number PS7785505, or a defective water level switch PartSelect Number PS3529177. Good luck with your repair.
Did this question help you?
Thank you for voting!
Scott
December 11, 2022
Washer takes to long to drain is there a place to clean out to make drain faster
For model number WT4970CW
Hello Scott, thank you for contacting us. We would recommend cleaning the drain hose, part number PS3617213. Also, check the drain pump, part number PS7785505, and make sure it is working. Customer service is available 7 days a week if you require assistance placing an order. Thanks again for reaching out!
Is there a lint filter on this model and where is it located.
For model number WT4970CW
Hi Judith, thank you for the question. Your model does not have a lint filter. We hope this information helps!
Did this question help you?
Thank you for voting!
Stan
March 10, 2023
While starting the balancing step and while facing the machine, on the right side there is a knocking noice. Cotinues through cycle. I've removed the back access panel only. This is not my first online repair.
Thanks in advance for your help.
For model number WT4970CW
Hi Stan, thank you for reaching out. We have researched and found that you may need to check the following parts to fix the issue: clutch assembly, part number PS11708484, suspension rod assembly, part number PS8737438, and basket balance ring, part number PS7785798. We hope this sorts out your problem!
1-Take water off manually. 2- Take machine to back yard. 3- lay machine 45 degrees. 4- Located water bump, (rear left side). 5-removed drain black hoses with hand. 6-removed 3 screws from bump frame. 7-Taker off all unit and marked down cable position at plug. 8- installed new pump. 9- Reverse all steps. Note: I did not use new cable su
... Read morepplied with the new bump, I did not want to mess around on mother board connections, I kept old wire harness which are only two cables blue and gray. It took me less than 30 minutes.
I diagnosed by running a full wash. I watched it and when the water should have stopped it kept running. I unplugged the washer from the power and the water kept running. This told me the inlet valve was the issue and not an electronic issue. I stopped the water by closing the water valve manually. Replacing the inlet valve was very easy
... Read more. Hardest part is moving the washer out of the laundry room. The videos online show very simple steps. Maybe 8 screws to remove and a couple of hoses and five electronic connectors. Take a photo of connectors before removing them to ensure you reconnect properly.