Your coupon for will be reflected when you check out!
✖
Your coupon for
✖
Hello!
You're visiting the PartSelect site in U.S.
Would you like to shop on the Canadian site?
Stay on this site
Go to Canadian site
✖
Model Number Locations
1Select Category Type
Select Category Type
2Select Product Type
Select Product Type
3Select {MODEL} Type
Select {MODEL} Type
Sample Model Number Tags
Model numbers can be made up of numbers (1005400, for example) or a combination of letters and numbers (LAT1000AAE). The model number will most likely appear on either a paper sticker or a metal plate. Your appliance's model number tag may look similar to the sample model number tags shown here (model number highlighted in yellow):
Model has been saved to My Models. If you're not signed in, your lists are available on this device and will expire within 30 days.
Model has been saved to My Models.
This is an authentic LG water inlet valve for a top-load washer. It is designed to control the flow of water into the washer. If your washer is filling slowly, making loud noises, overflowing, or stop...
This is a pulsator assembly, also known as an agitator, for your washing machine. This pulsator sits at the bottom of your washer and is what is used as the main driving force to wash your clothes. Th...
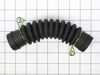
This is a drain hose assembly for top-load models of LG washing machines. This hose specifically is used to allow water to drain from the tub to the drain pump of the washer. This hose is made of plas...
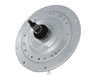
This clutch housing assembly with mode shifter, or washer drive shaft and shifter assembly, is made for your washer. It connects the appliance wash plate to the motor so the washer can shift the drive...
This drain hose is a genuine OEM replacement part supplied by LG for use in their washing machines. It is a light gray pipe with a diameter of 1.25 inches. The drain hose is connected to the drain pum...
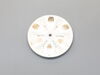
This water-level pressure switch in your wash monitors and regulates the water levels throughout the fill, wash, and rinse cycles. You will usually find it inside the control panel or near the tub. It...
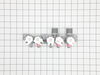
This part is the replacement switch assembly for your top-load washer. It contains the switch mechanism and the connecting wire that hooks the door latch to the electrical system of the washer. The li...
This drain pump removes used water from your washer during the drain cycle, ensuring that the drum is properly emptied. It operates on 120 volts and 60 Hz. Typically located at the bottom of the washi...
Have you been struggling with a broken or faulty handle on your trash compactor? Our genuine OEM White Container Handle, straight from the trusted manufacturer, Whirlpool, could be the perfect fix you...
This part is the replacement suspension assembly for your washer. The rod is approximately 26 inches long and is sold individually. The suspension rod and spring works something like a shock absorber ...
Introducing the unique Cap Cover, a genuine OEM item exclusively crafted by LG. This remarkable component is best suited for specific LG models of washers, serving as a valuable part of the dispenser ...
$47.40
In Stock
Order now and your part arrives by Apr 25
Questions And Answers for WT4870CW
We're sorry, but our Q&A experts are temporarily unavailable.
Please check back later if you still haven't found the answer you need.
5 questions answered by our experts.
Sort by:
< Prev
1
Next >
Search filter:
Clear Filter
Your search term must have 3 or more characters.
Keep searches simple. Use keywords, e.g. "leaking", "pump", "broken" or "fit".
Sorry, we couldn't find any existing answers that matched.Try using some different or simpler keywords, or submit your new question by using the "Ask a Question" button above!
Darlene
May 28, 2023
What would make the washer squeak during agitation?
For model number WT4870CW
Hi Darlene, thank you for contacting us. We have researched the model and would suggest making sure the washer is not overloaded and is not imbalanced. You may adjust the leveling legs to make the washer stable. If the issue remains, the suspension assembly, part number PS8749609, might be faulty. It supports the washer tub and keeps it stable. We hope this information helps!
Tongue on lock switch keeps popping out and it's not letting the door lock
For model number WT4870CW
Hello and thank you for writing.
It certainly sounds like it could be a faulty switch assembly, you should check the part(s) for signs of damage or test with a multimeter, and replace it as needed. Please see the part links related to this question just beneath this answer. We hope this helps. Please contact us anytime if you require further assistance.
Where can I acquire the 7" hose that goes from the discharge side of the drain pump to the fitting that the drain hose connects to? The hose from tub to pump is a larger diameter then the discharge hose which is the only hose listed for sale.
For model number WT4870CW
Hi Ken, thank you for reaching out. The inner drain connector hose you are requesting is part number PS8749199. We hope this helps!
Seems to be leaking looking at it on left side front and back very slow leaks
For model number WT4870CW
Hello Jeffrey, thank you for getting in touch. Based on the description that you have provided, we would recommend checking the dispenser assembly, part number PS7787209, to fix the issue. We hope this solves your problem!
Did this question help you?
Thank you for voting!
JOE
September 10, 2025
ACTUAL WASH TIME EXCEEDS SELECTED TIMES
For model number WT4870CW
Hello Joe, thank you for getting in touch. If the washer sensor detects too much dirt, or the detergent creates excess suds, it prompts the machine to add extra rinses and extend the cycle to ensure thorough removal. Blockages in the water inlet screens or drain pump can impede the machine's ability to fill or drain properly, affecting the cycle. Ensure clothes are spread evenly in the drum before starting the cycle. We hope this helps.
I diagnosed by running a full wash. I watched it and when the water should have stopped it kept running. I unplugged the washer from the power and the water kept running. This told me the inlet valve was the issue and not an electronic issue. I stopped the water by closing the water valve manually. Replacing the inlet valve was very easy
... Read more. Hardest part is moving the washer out of the laundry room. The videos online show very simple steps. Maybe 8 screws to remove and a couple of hoses and five electronic connectors. Take a photo of connectors before removing them to ensure you reconnect properly.
Watch this video on youtube:https://www.youtube.com/watch?v=8ZKgP6hu8Fk very similar
Keep all parts separate and in order in a plastic box with dividers 1. Disconnect washer from wall. (electrical and hot/cold hoses, drain tube) 2. Remove center cap from bottom tub plate 3. Remove small bolt under cap 4. R
... Read moreemove bottom Tub Plate 5. Remover washer 6. Remove larger 38mm nut (I bought the correct deep well socket) Ive seen other video use a pipe wrench) 6a. Remove the large washer under nut NOTE- I did not remove the tub, total hassle, found it unnecessary, Yes the washer was heavier but nothing that cant be managed. 7. Place a blanket on the floor and lay the washer on its back to access the bottom. NOTE Everthing is nuts and bolts at this point. 10mm socket worked on all 8. Remove Nut & washer on rotor. Remove rotor-its has a line of magnets and the edges are sharp. Just wiggle it a bit. wear gloves if need be. 9. Remove bolts from Stator, user a small flat blade screw driver to undo 1 or 2 (some) electrical connections. Lay the stator aside. Move the electric connector(s) out of the way. 10. Remove the grounding wire at 6 oclock position 11.Remove the rectangular pack and the 3 oclock position by removing 2 bolts. It has a small arm that reaches out to the clutch arm, slide the piece out to the widest part of hole in clutch arrn an wiggle it loose. Almost there.... 12. Remove all the 10MM headed bolts from the clutsh and drive assemble The inner bolts are a slightly different style, keep the two sets separate. 13. Remove the clutch and drive.
NOTE: if the drive doesnt come out with a slight pull, you have missed a bolt(s)-inspect and remove as need be
14 Wipe clean the pocket in the outer wash tub that accepts the seal on the top of the drive. Lubricate the new drives seal completely with a little dishwasher detergent so it slides smoothly and seals well.
15. Assembly is the reverse:
Last Notes: *Install all bolts for the clutch and drive hand tight as you get everything lined up. *Once all bolt are in the clutch and drive are hand tight, tighten the bolts in a cross pattern as you would a wheels lug nuts *Snug the bolts used to attached the clutch and drive firmly 1/8 to 1/4 turn past snug *Make sure you clock the stator to the correct position, again hand tighten bolts then final tighten in a cross pattern. *The nut and washer in the rotor tighten to 1/4 to 1/2 turn past snug, its tight. *The large 38 MM nut on the top of the drive assembly torque is 88 ft lbs. Have a partner or friend hold the tub while you torque the large nut. If you don't have a torque wrench you can rent one from a number of auto-part chain stores. *I used a 1/2 Impact gun to remove the 38mm nut, Never use that kind of power to reassemble as it will damage parts.