Your coupon for will be reflected when you check out!
✖
Your coupon for
✖
Hello!
You're visiting the PartSelect site in U.S.
Would you like to shop on the Canadian site?
Stay on this site
Go to Canadian site
✖
Model Number Locations
1Select Category Type
Select Category Type
2Select Product Type
Select Product Type
3Select {MODEL} Type
Select {MODEL} Type
Sample Model Number Tags
Model numbers can be made up of numbers (1005400, for example) or a combination of letters and numbers (LAT1000AAE). The model number will most likely appear on either a paper sticker or a metal plate. Your appliance's model number tag may look similar to the sample model number tags shown here (model number highlighted in yellow):
Model has been saved to My Models. If you're not signed in, your lists are available on this device and will expire within 30 days.
Model has been saved to My Models.
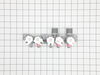
This is an authentic LG water inlet valve for a top-load washer. It is designed to control the flow of water into the washer. If your washer is filling slowly, making loud noises, overflowing, or stop...
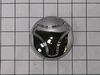
This part is known as a pulsator cap or washplate cap, and is designed for your LG washer. It fits over the washplate mounting bolt and prevents clothes from getting caught on the washplate during a w...
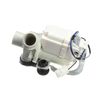
This drain pump assembly is a genuine replacement part designed for select LG and Kenmore washing machines. It plays a critical role in removing water from the washer tub during the drain cycle, ensur...
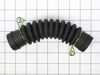
This is a drain hose assembly for top-load models of LG washing machines. This hose specifically is used to allow water to drain from the tub to the drain pump of the washer. This hose is made of plas...
Upgrade your LG washing machine with this genuine top lid hinge. Specially designed to support the hinge and help cushion the lid when opening and closing, this high-quality component ensures the long...
This drain hose is a genuine OEM replacement part supplied by LG for use in their washing machines. It is a light gray pipe with a diameter of 1.25 inches. The drain hose is connected to the drain pum...
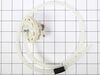
This water-level pressure switch in your wash monitors and regulates the water levels throughout the fill, wash, and rinse cycles. You will usually find it inside the control panel or near the tub. It...
This washing machine lid assembly is a genuine OEM replacement designed to cover the tub opening, ensuring water containment and safe operation during wash cycles. Built for durability, it helps preve...
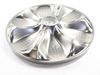
This washing machine coupling assembly, also known as a shift actuator, is a key component in the drive system of select top-loading washers. It facilitates the transition between agitation and spin c...
$55.29
In Stock
Order now and your part arrives by Apr 23
Questions And Answers for WT1501CW
Ask our experts a question about this model and we'll get back to you as soon as possible!
1 question answered by our experts.
Sort by:
< Prev
1
Next >
Search filter:
Clear Filter
Your search term must have 3 or more characters.
Keep searches simple. Use keywords, e.g. "leaking", "pump", "broken" or "fit".
Sorry, we couldn't find any existing answers that matched.Try using some different or simpler keywords, or submit your new question by using the "Ask a Question" button above!
Sal
July 31, 2023
When the washing cycle is finished and the machine is off, water drips into he machine and in a few hours there is over a gallon of water in the tub. Please help. Thank you.
For model number WT1501CW
Hi Sal, thank you for reaching out to PartSelect. According to our research, the water valve on the back of your washer may have failed. This can cause water to leak from the water valve into your washer tub when the washer is turned off. In this situation, the water inlet valve, part number PS3527446, usually needs to be replaced. We hope this is helpful!
1-Take water off manually. 2- Take machine to back yard. 3- lay machine 45 degrees. 4- Located water bump, (rear left side). 5-removed drain black hoses with hand. 6-removed 3 screws from bump frame. 7-Taker off all unit and marked down cable position at plug. 8- installed new pump. 9- Reverse all steps. Note: I did not use new cable su
... Read morepplied with the new bump, I did not want to mess around on mother board connections, I kept old wire harness which are only two cables blue and gray. It took me less than 30 minutes.
Popped out the plastic "doors" that cover the metal actuators. Removed the metal actuators on both right and left sides of the door then unscrewed (3 screws each actuator) them from door frame. Slid the actuators out to enable the door to be removed. Unscrewed 2 screws on the top front of the washer which enabled me to angle the top of
... Read more the washer to expose the screws that hold the plastic hinges. Unscrewed the hinges (2 screws each) and replaced both of the hinges (I figured I'd do both of them now so I don't have to do it again for another 15 years). Put everything back together and all works like new.