Your coupon for will be reflected when you check out!
✖
Your coupon for
✖
Hello!
You're visiting the PartSelect site in U.S.
Would you like to shop on the Canadian site?
Stay on this site
Go to Canadian site
✖
Model Number Locations
1Select Category Type
Select Category Type
2Select Product Type
Select Product Type
3Select {MODEL} Type
Select {MODEL} Type
Sample Model Number Tags
Model numbers can be made up of numbers (1005400, for example) or a combination of letters and numbers (LAT1000AAE). The model number will most likely appear on either a paper sticker or a metal plate. Your appliance's model number tag may look similar to the sample model number tags shown here (model number highlighted in yellow):
Model has been saved to My Models. If you're not signed in, your lists are available on this device and will expire within 30 days.
Model has been saved to My Models.
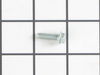
This is a multi-use and multi-appliance screw. It can be used on a microwave, refrigerator, range/oven, air conditioner, dehumidifier, washer, or dryer. The measurements of this screw are 8 x 1/2 inch...
This shallow refrigerator door shelf bin is a genuine replacement component designed to enhance interior organization and storage efficiency. Made from clear, durable plastic, it securely holds bottle...
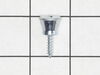
This mounting screw is a genuine OEM replacement part for the door handle in your refrigerator. If you are having trouble shutting the refrigerator door, or opening it, replacing this screw can help s...
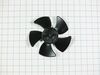
If your refrigerator or freezer is too warm, or making noises, you may need to replace the fan blade. The fan blade attaches to the evaporator motor, which is in the freezer section, to help circulate...
This genuine OEM ice maker kit is designed to fit refrigerators that did not originally come with an ice maker. This kit contains everything needed to install the new ice maker on your refrigerator in...
Enhance your refrigerator's longevity and performance with this efficient Whirlpool Door Hinge Nylon Washer. Specifically crafted for some models of Whirlpool, KitchenAid, Maytag, Jenn-Air, Amana, Ing...
Introducing the Whirlpool Refrigerator Leveling Leg. This genuine OEM part supports your refrigerator, ensuring it remains stability and level. The height of the leveling leg can be adjusted to suit y...
This white dairy tray is designed to mount inside your refrigerator door, providing a dedicated space for storing butter, cheese, and other dairy items. Made from durable, high-quality plastic, it hel...
$67.82
In Stock
Order now and your part arrives by Apr 20
Questions And Answers for WSZ57L18DM08
Be the first to ask our experts a question about this model!
✖
Ask a Question
Ask our experts a question on this model and we'll respond as soon as we can.
The repair seemed simple, I just needed to remove the old bracket -- 4 screws -- and slip the new one on.
The tricky bit is that the roller bracket holds the weight of the fridge. So in order to make sure that the fridge did not fall over, and to keep the installation point off the ground so that I could align the screw holes,
... Read moreI needed to shim up the side of the fridge that I was working on.
To tap in the shims, I used a hammer and a spare chunk of wood. I ultimately used 3 shims, and kept tapping until the roller wheel could roll freely. Then I knew that the fridge was high enough. After that, it was pretty easy to remove the 4 screws, align the new bracket, and replace the screws. After that, in order to get the shims out I could just extend the foot brake as it was designed, and that lifted the fridge enough for me to easily slide out the shims. After that I just had to level out the fridge by adjusting the two feet.
Removed the rear cardboard cover and cleaned the area around the compressor and as much of the condensor and fan area as possible. Removed the two base section securing bolts. Jacked the rear of the cabinet up enough to seperate the base from the cabinet. Removed the roller pins and removed and replaced both rollers. Lowered the cabinet
... Read more back into place, replaced the base bolts and the cardboard cover. The rollers that were sent were of much better quality than the original plastic type and should last the life of the refrigerator. Be careful when moving the fridge as the original rollers may cut into or scratch the flooring.


 Diagram and Parts List for Whirlpool Freezer")