Your coupon for will be reflected when you check out!
✖
Your coupon for
✖
Hello!
You're visiting the PartSelect site in U.S.
Would you like to shop on the Canadian site?
Stay on this site
Go to Canadian site
✖
Model Number Locations
1Select Category Type
Select Category Type
2Select Product Type
Select Product Type
3Select {MODEL} Type
Select {MODEL} Type
Sample Model Number Tags
Model numbers can be made up of numbers (1005400, for example) or a combination of letters and numbers (LAT1000AAE). The model number will most likely appear on either a paper sticker or a metal plate. Your appliance's model number tag may look similar to the sample model number tags shown here (model number highlighted in yellow):
Model has been saved to My Models. If you're not signed in, your lists are available on this device and will expire within 30 days.
Model has been saved to My Models.
This part is for oven ranges, it connects individual wires and protects the device from electrical surges, voltages, and current. With this part, the house power is connected to the range wire harness...
This touch-up paint can be used on a wide variety of household appliances. It is most often used on washers, dryer, refrigerators, dishwashers, ranges, freezers, trash compactors, or microwaves. It is...
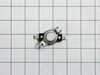
This microwave door interlock switch is a critical safety component designed to prevent the appliance from operating when the door is open. It functions by detecting the door’s position—open or closed...
Appliance spray paint is a great way to cover up any chips and scratches that have appeared on your appliances. Instead of replacing the part entirely, this is an easy fix. This is also a great way to...
This part is the replacement halogen light bulb for your range. The bulb is 10 watts and 12 volts. The halogen lamp lights up the inside of the oven you can see the cooktop more effectively in darknes...
This hex nut is an authentic Whirlpool part that is sourced directly from the original equipment manufacturer, and will fit a variety of appliances including ovens, microwaves, refrigerators, air cond...
Ask our experts a question about this model and we'll get back to you as soon as possible!
2 questions answered by our experts.
Sort by:
< Prev
1
Next >
Search filter:
Clear Filter
Your search term must have 3 or more characters.
Keep searches simple. Use keywords, e.g. "leaking", "pump", "broken" or "fit".
Sorry, we couldn't find any existing answers that matched.Try using some different or simpler keywords, or submit your new question by using the "Ask a Question" button above!
Michael
February 16, 2023
WHEN I PUSH ANY BUTTON IT SAYS FUNCTION NOT AVAILABLE
For model number WOC54EC7AS00
Hi Michael, thank you for reaching out. According to our research, the problem appears to be with the main control board, part number PS11756863. We would recommend checking this part. We hope this solves your problem!
My built in combo microwave/oven bake element not working.
Tested element 20 ohms. Tested sensor 1000 ohms and goes to 1800 ohms at about 400°. Power to bake element is 240V for 15 seconds then shuts off. Pulled bake element out and looks new. It warms up during the 15 second period. Broil element works and cycles on and off and on normally. No errors.
For model number WOC54EC7AS00
Hi Dean, thank you for your inquiry. Based on our research, the issue is most probably with the oven control board, part number PS11756863. It monitors the temperature and controls the oven heat. You may need to replace it to solve the problem. We hope this helps!
This product comes in a bottle with a brush like Liquid Paper. It goes on incredibly easy. A second coat might be needed. I wanted to prevent rust from setting in so I covered the scratches and dings. The paint is a little brighter since my washer is 10 years old but it still looks great.
I used a Google search to show how to access the area behind the front panel. There was a folded paper copy with a schematic and wiring diagram in that space.Then I used a multi-meter to determine which of the THREE micro-switches was causing the problem. I called your help line and ordered a replacement switch. The switch was delayed
... Read morein transit so your agent credited me with the cost of shipping.
When the part arrived, it had three terminals instead of two as shown in the on-line picture but that did not cause any difficulty in using it. It took about 20 minutes to remove and replace the old switch.
All seems to be working well now.
Finding which of the THREE switches was the problem was the most difficult part of the repair. All three "clicked" but the defective one did not click as easily. It needed to be depressed more than the door latch can would provide. Old age?